> ## Documentation Index
> Fetch the complete documentation index at: https://developers.nlpearl.ai/llms.txt
> Use this file to discover all available pages before exploring further.

# Variables

<div className="block dark:hidden">
  <Frame>
    <div className="p-1">
      <img src="https://mintcdn.com/nlpearl/tAyL-PAMsD9LnbQ9/images/light_mode/variables_cover.svg?fit=max&auto=format&n=tAyL-PAMsD9LnbQ9&q=85&s=eca8153dc3fddd0b9457cc196a03b972" alt="Variables cover" className="rounded-[14px]" width="1048" height="720" data-path="images/light_mode/variables_cover.svg" />
    </div>
  </Frame>
</div>

<div className="hidden dark:block">
  <Frame>
    <div className="p-1">
      <img src="https://mintcdn.com/nlpearl/tAyL-PAMsD9LnbQ9/images/dark_mode/variables_cover.svg?fit=max&auto=format&n=tAyL-PAMsD9LnbQ9&q=85&s=072dea147d43c26ee4be0565ab014bc1" alt="Variables cover" className="rounded-[14px]" width="1048" height="720" data-path="images/dark_mode/variables_cover.svg" />
    </div>
  </Frame>
</div>

***

## Introduction

Variables are essential placeholders that store and manipulate data during a conversation. They hold information such as:

* **User Inputs**: Data collected from user responses (e.g., names, email addresses).
* **System Data**: Information retrieved from external sources like CRM systems.
* **Computed Values**: Results from expressions or calculations within the conversation flow.

<Check>
  <b>Why Are Variables Important?</b>

  * **Personalize Interactions**: Tailor conversations to individual users for a more engaging experience.
  * **Control Conversation Flow**: Make decisions and branch dialogues based on variable values.
  * **Store and Reuse Information**: Keep track of data throughout the conversation for consistency.
  * **Integrate with External Systems**: Enrich conversations with data from other platforms.
  * **Enhance Actions**: Use variables in actions like sending personalized emails or SMS messages.
</Check>

***

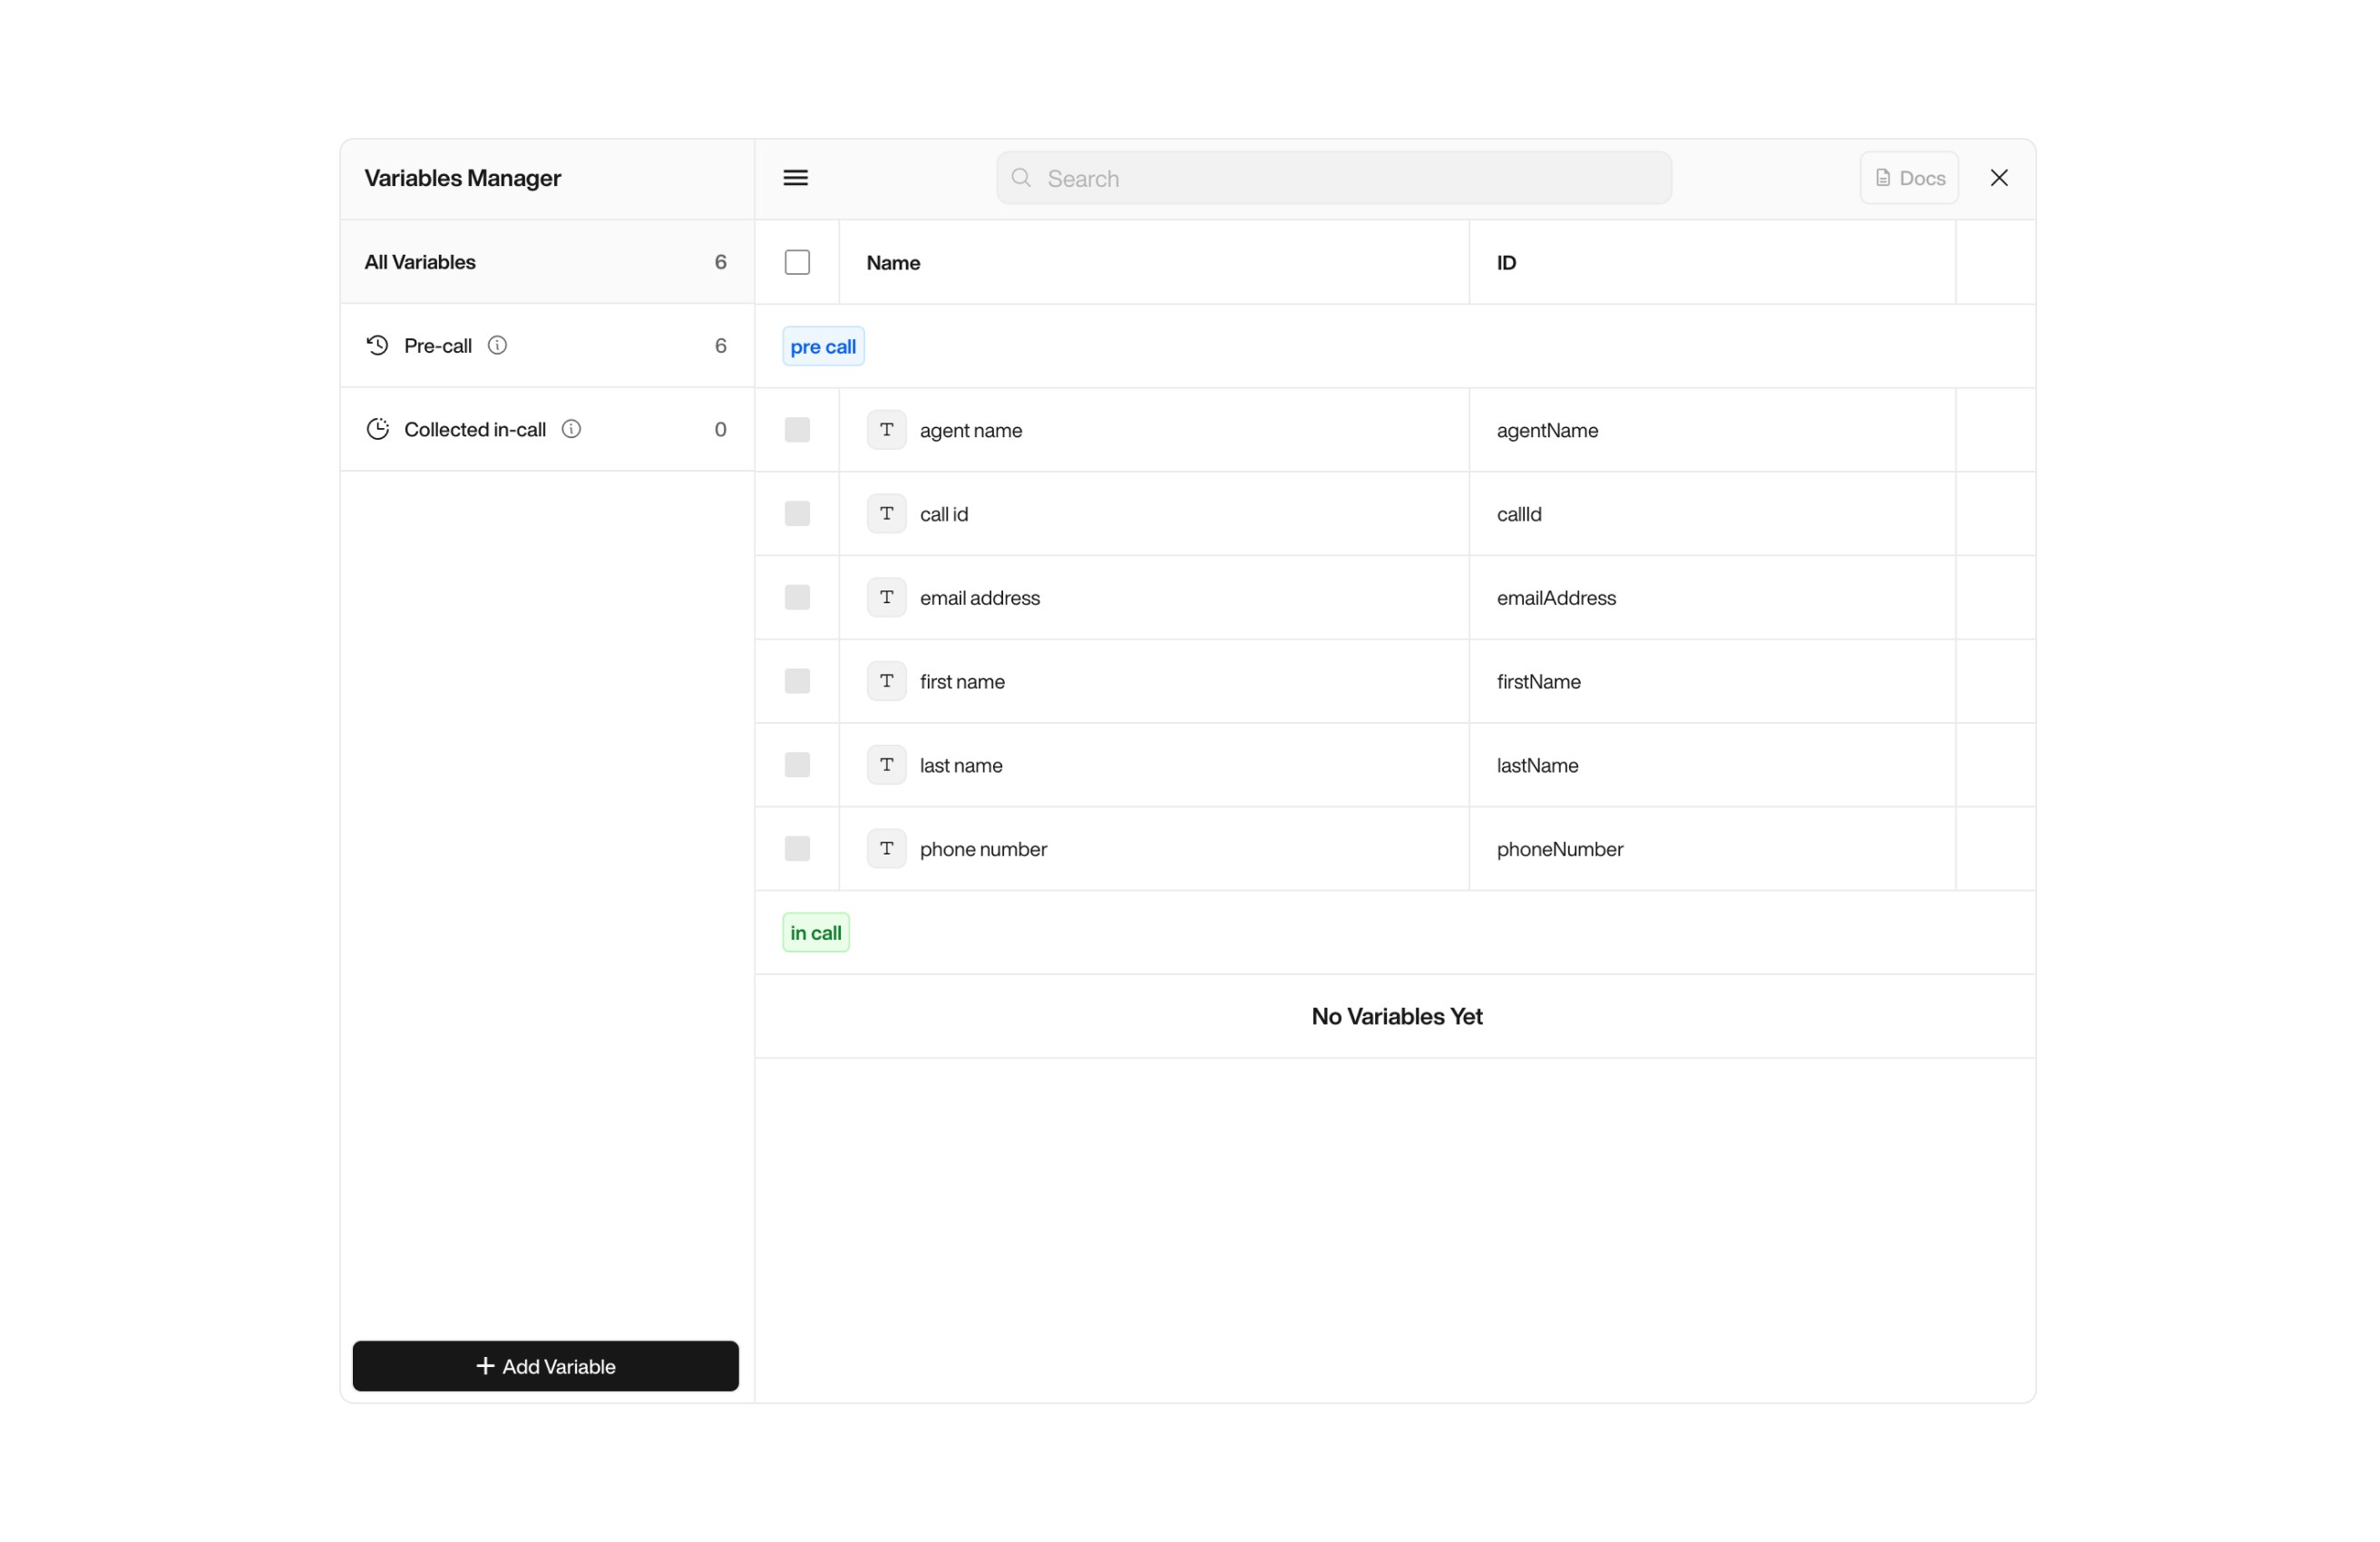
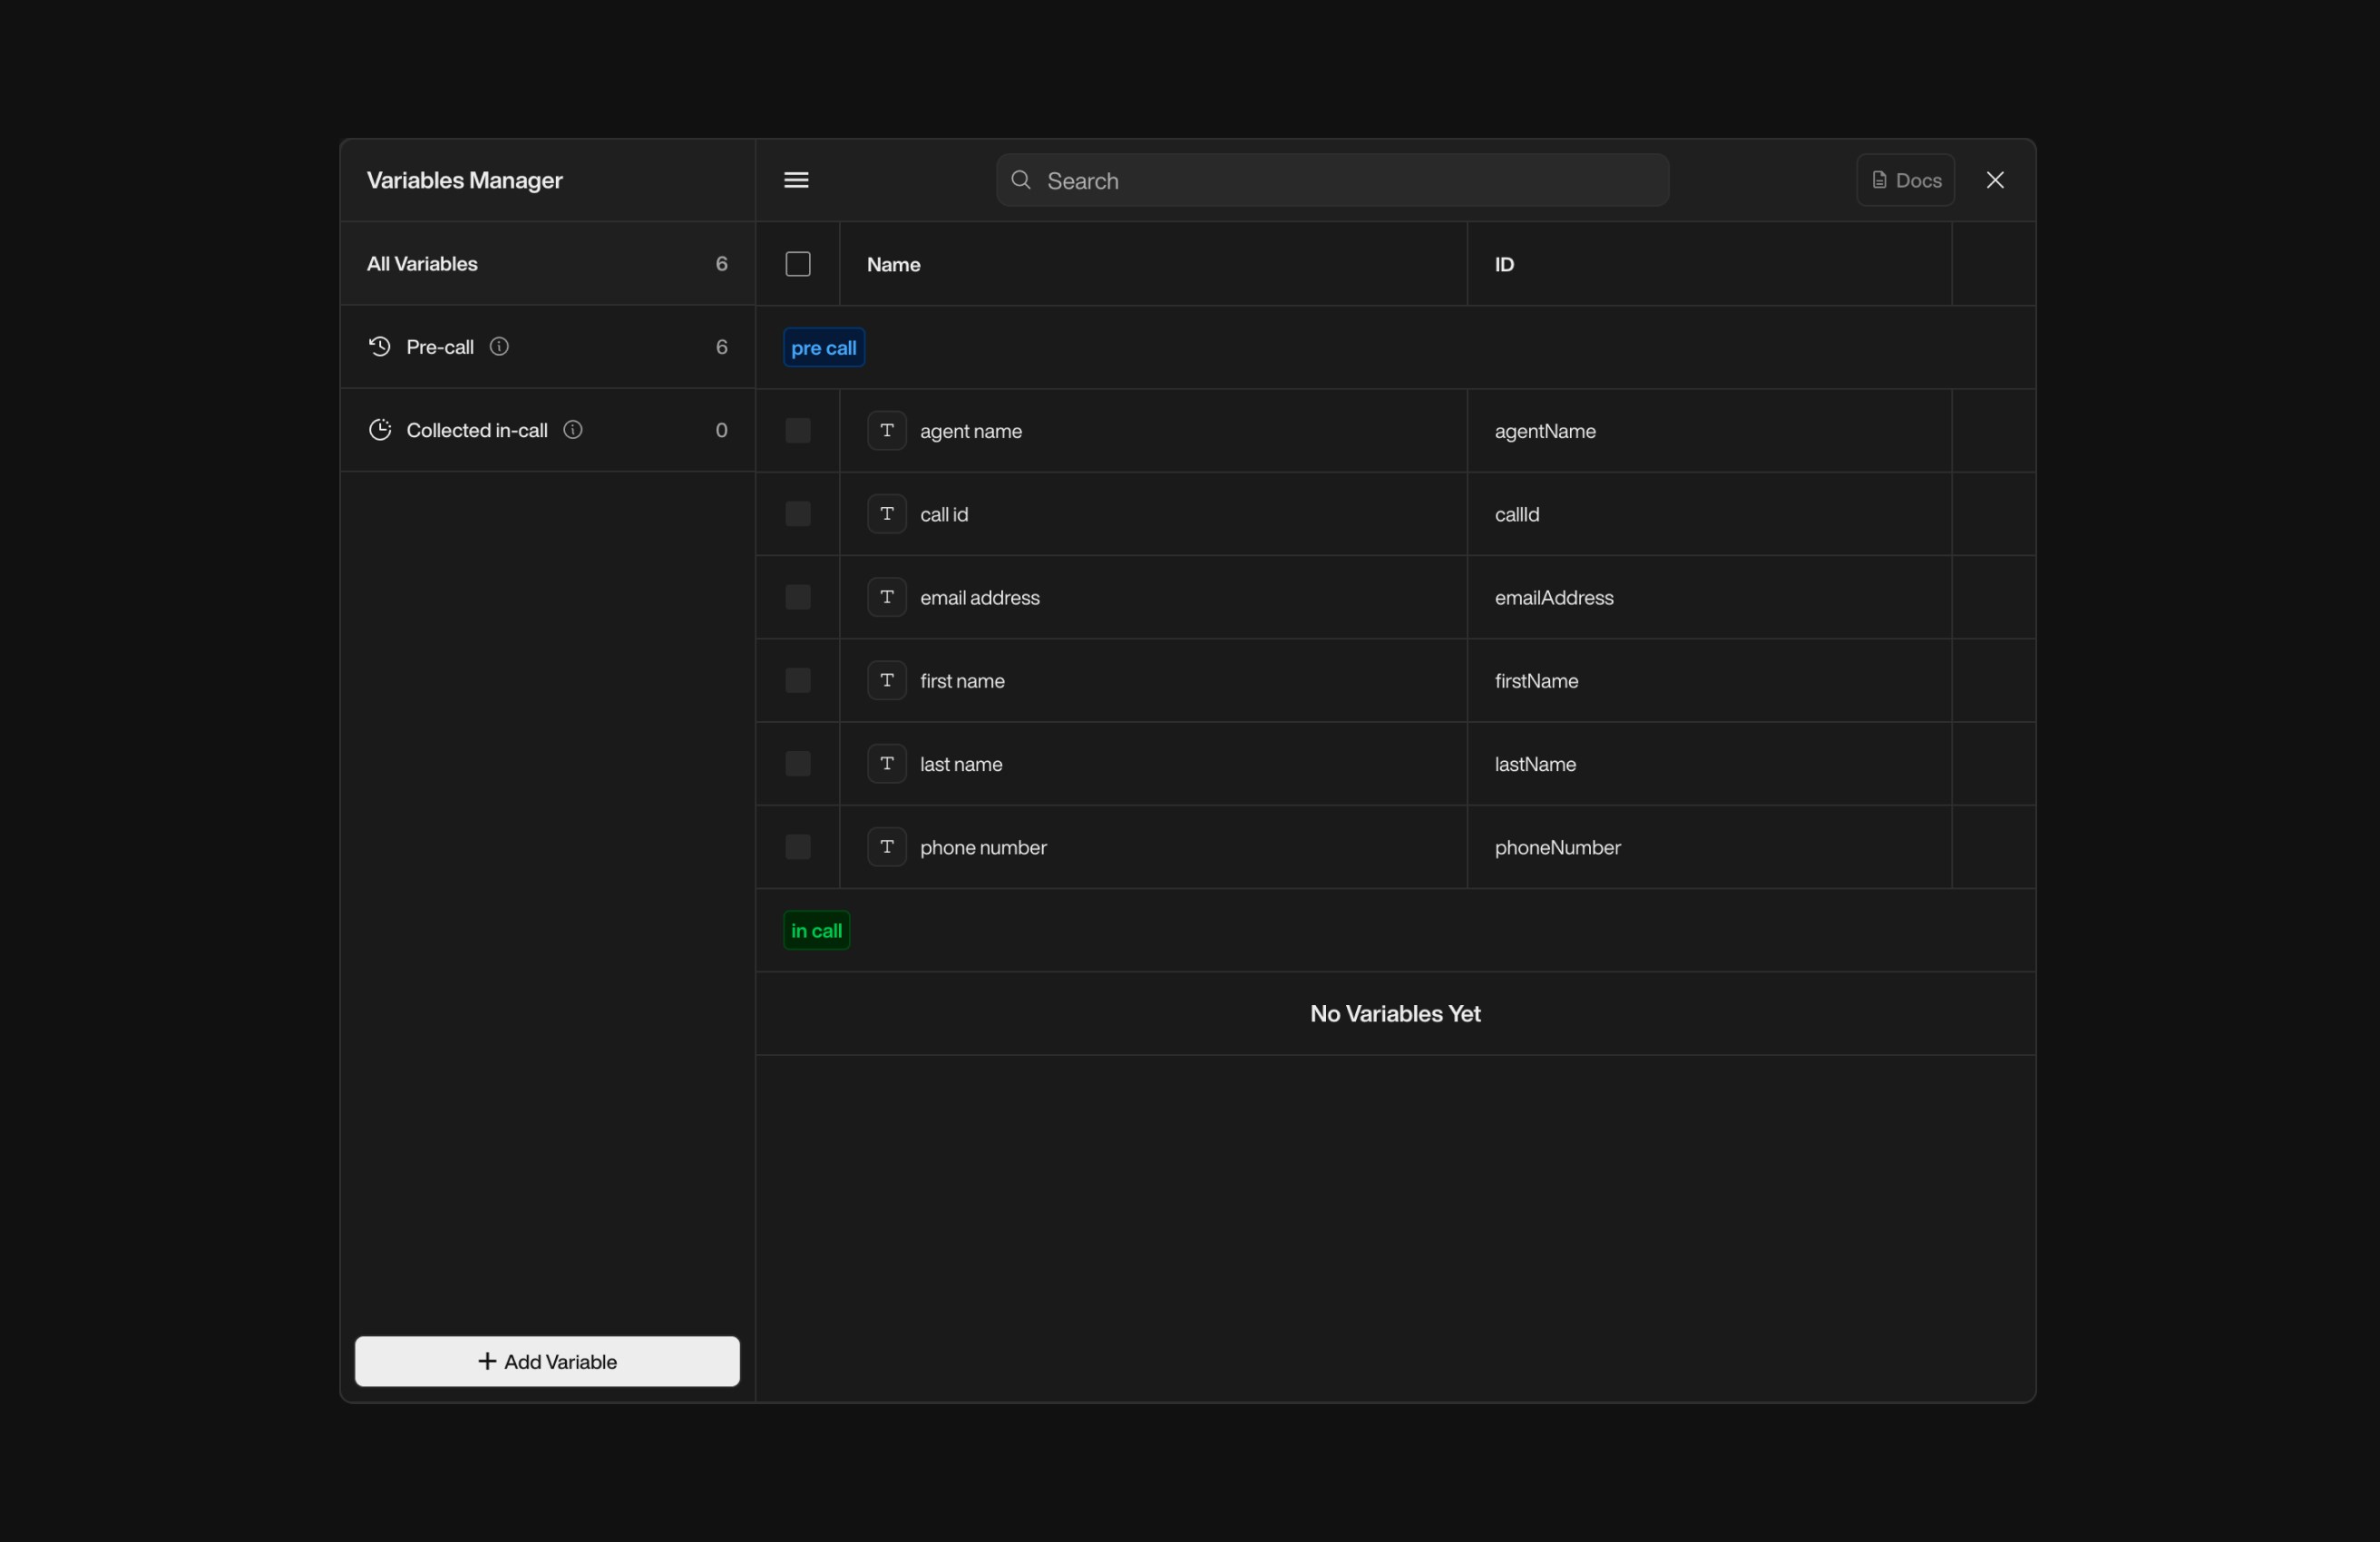
## Variable Manager Overview

Variables can be managed using the **Variable Manager**, which is accessible in both **Simple Mode** and **Advanced Mode (Tree Editor)**.

<div className="block dark:hidden">
  <Frame>
    <div className="p-1">
      <img src="https://mintcdn.com/nlpearl/yjNN1PpSs3yxoZOQ/images/light_mode/variables_manager.jpg?fit=max&auto=format&n=yjNN1PpSs3yxoZOQ&q=85&s=7033b501161b01ba8350139b2530cb0c" alt="Send Email action interface on light mode" className="rounded-[14px]" width="2624" height="1700" data-path="images/light_mode/variables_manager.jpg" />
    </div>
  </Frame>
</div>

<div className="hidden dark:block">
  <Frame>
    <div className="p-1">
      <img src="https://mintcdn.com/nlpearl/LRcBocnC9aRvHcb-/images/dark_mode/variables_manager.jpg?fit=max&auto=format&n=LRcBocnC9aRvHcb-&q=85&s=cf84e0cf2e16d09c7bba7e3d7be1aa78" alt="Send Email action interface on dark mode" className="rounded-[14px]" width="2624" height="1700" data-path="images/dark_mode/variables_manager.jpg" />
    </div>
  </Frame>
</div>

<br />

The Variable Manager allows you to create, edit, and organize variables used in your conversation flows. Variables are categorized into three types:

| **Type**                        | **Description**                                                                                                                                                                                  | **Representation**                                                                                                                                                                       |
| ------------------------------- | ------------------------------------------------------------------------------------------------------------------------------------------------------------------------------------------------ | ---------------------------------------------------------------------------------------------------------------------------------------------------------------------------------------- |
| **Pre-call Variables**          | Variables configured before the call starts, such as customer information. These variables are typically sourced from external systems like CRM or imported via CSV or API.                      | <span style={{ display: "inline-flex", alignItems: "center", gap: "6px" }}><span style={{ width: "18px", height: "18px", background: "#006BFF", borderRadius: "2px" }} />`blue`</span>   |
| **Collected In-call Variables** | Variables captured or updated dynamically during the conversation. These variables are collected based on user interactions, inputs, or system computations.                                     | <span style={{ display: "inline-flex", alignItems: "center", gap: "6px" }}><span style={{ width: "18px", height: "18px", background: "#28A948", borderRadius: "2px" }} />`green`</span>  |
| **Post-call Variables**         | Variables generated after the call ends, such as the call transcript, recording URL, and conversation summary. These variables are automatically produced and can be used for follow-up actions. | <span style={{ display: "inline-flex", alignItems: "center", gap: "6px" }}><span style={{ width: "18px", height: "18px", background: "#FFAE00", borderRadius: "2px" }} />`orange`</span> |

<Warning>
  **Note about Post-call Variables**\
  Post-call variables are **not accessible via the Variable Manager**, as they **cannot be created or modified by users**. These variables are **pre-defined by our team** and become available only **within End Call Notifications**. They’re designed to let your agents send structured data (like summaries or recordings) to external systems **after the call ends**.
</Warning>

***

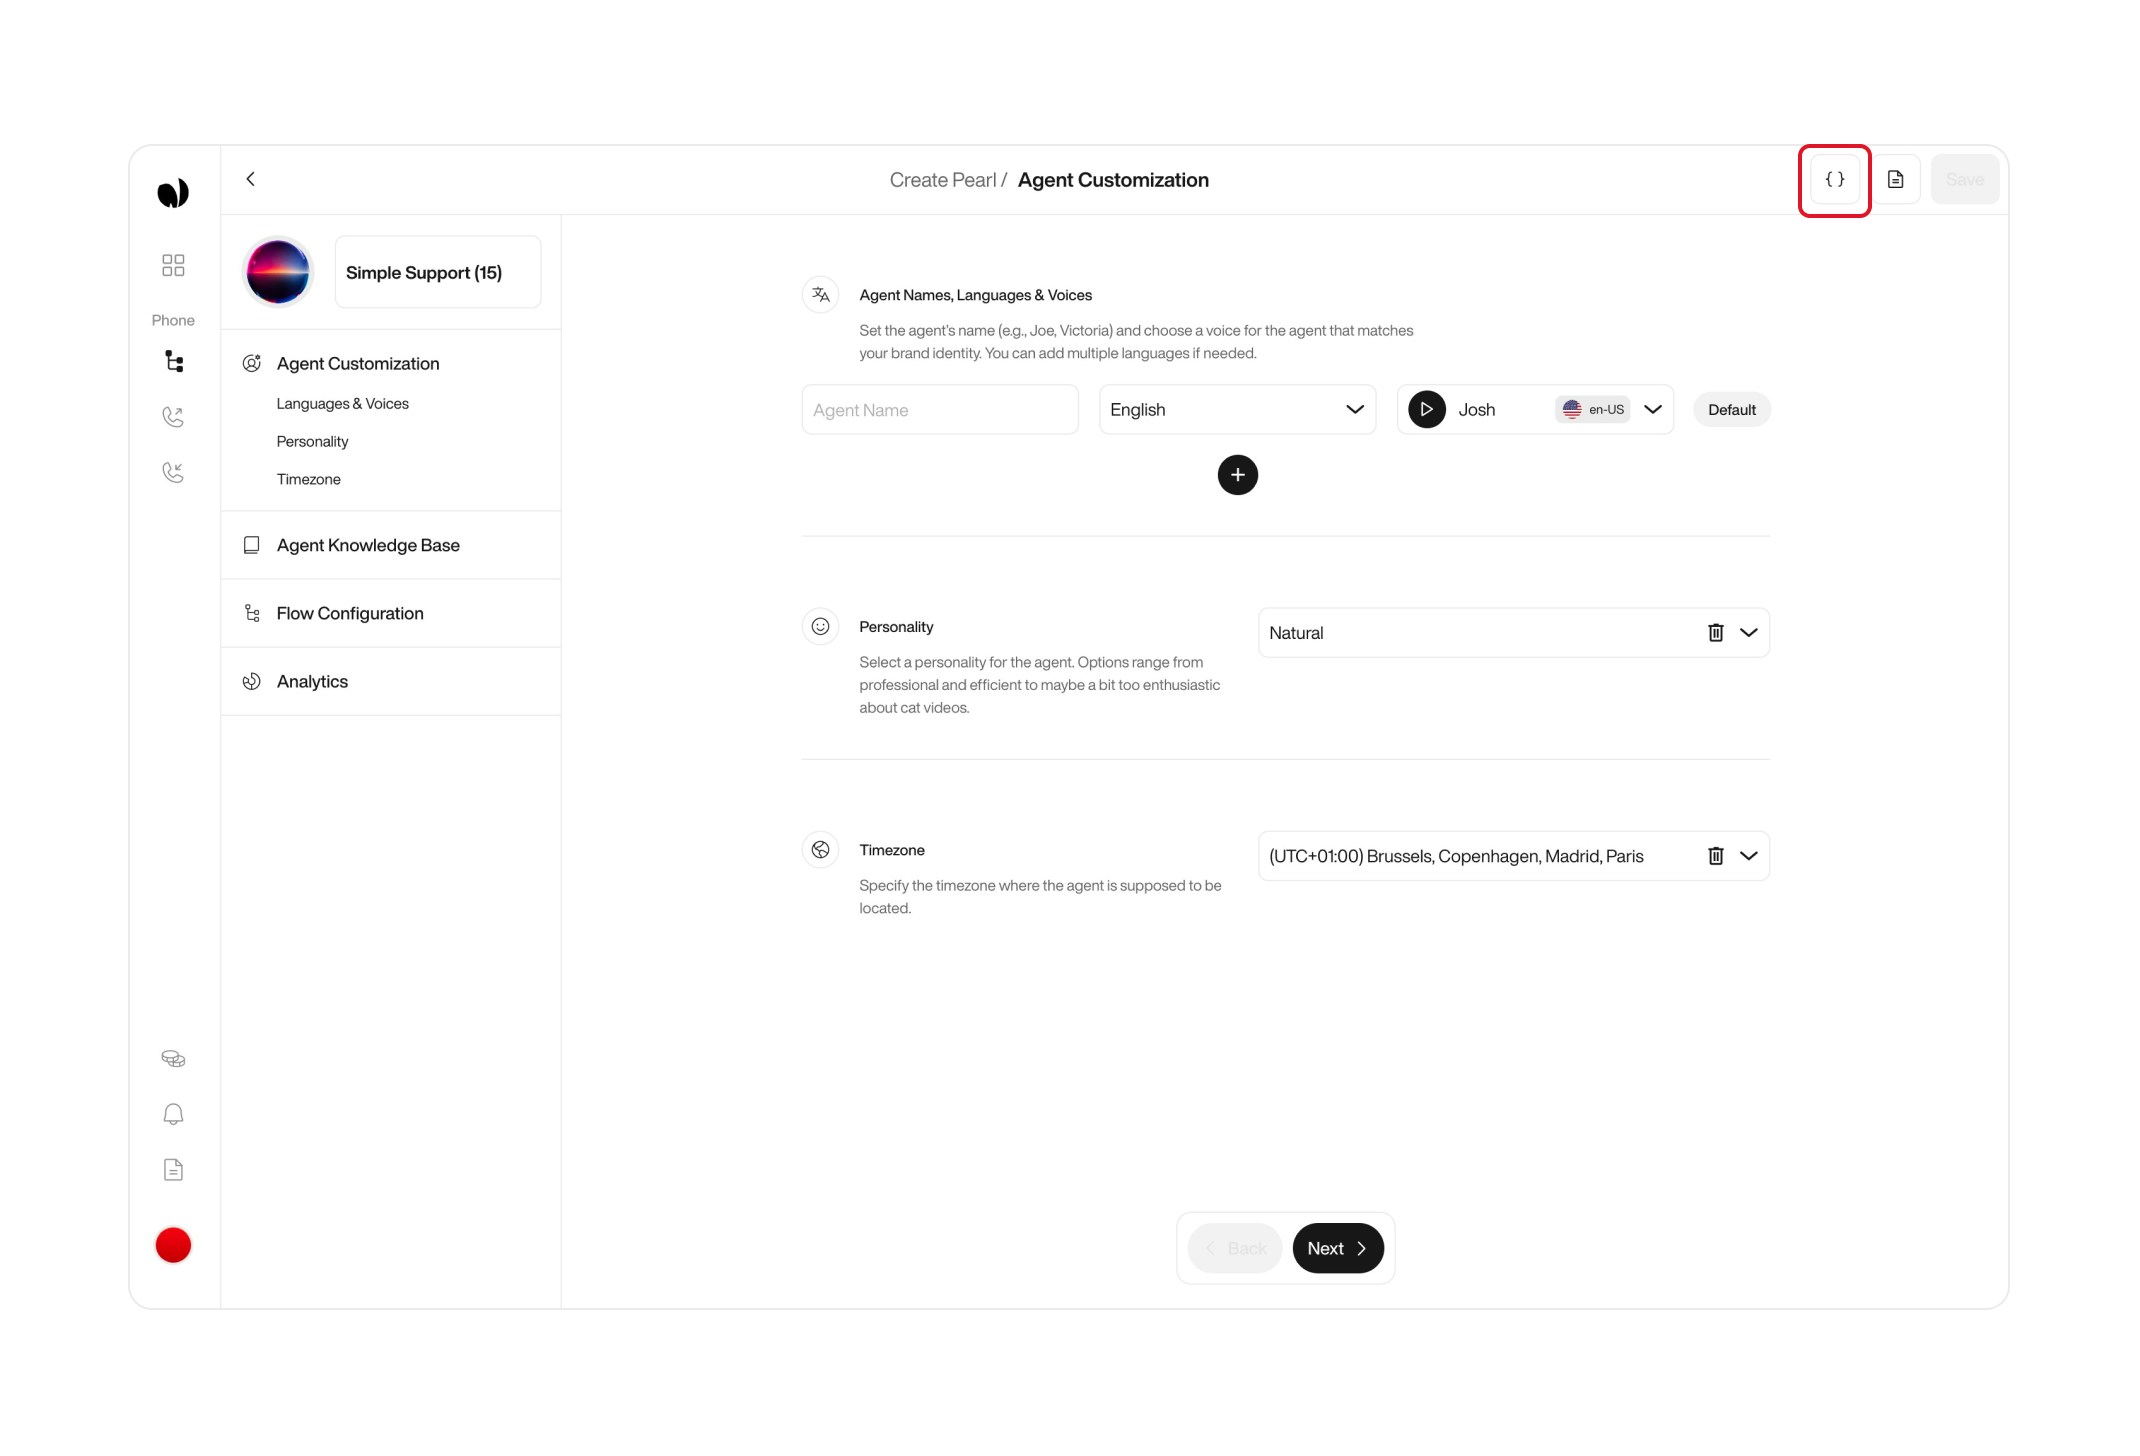
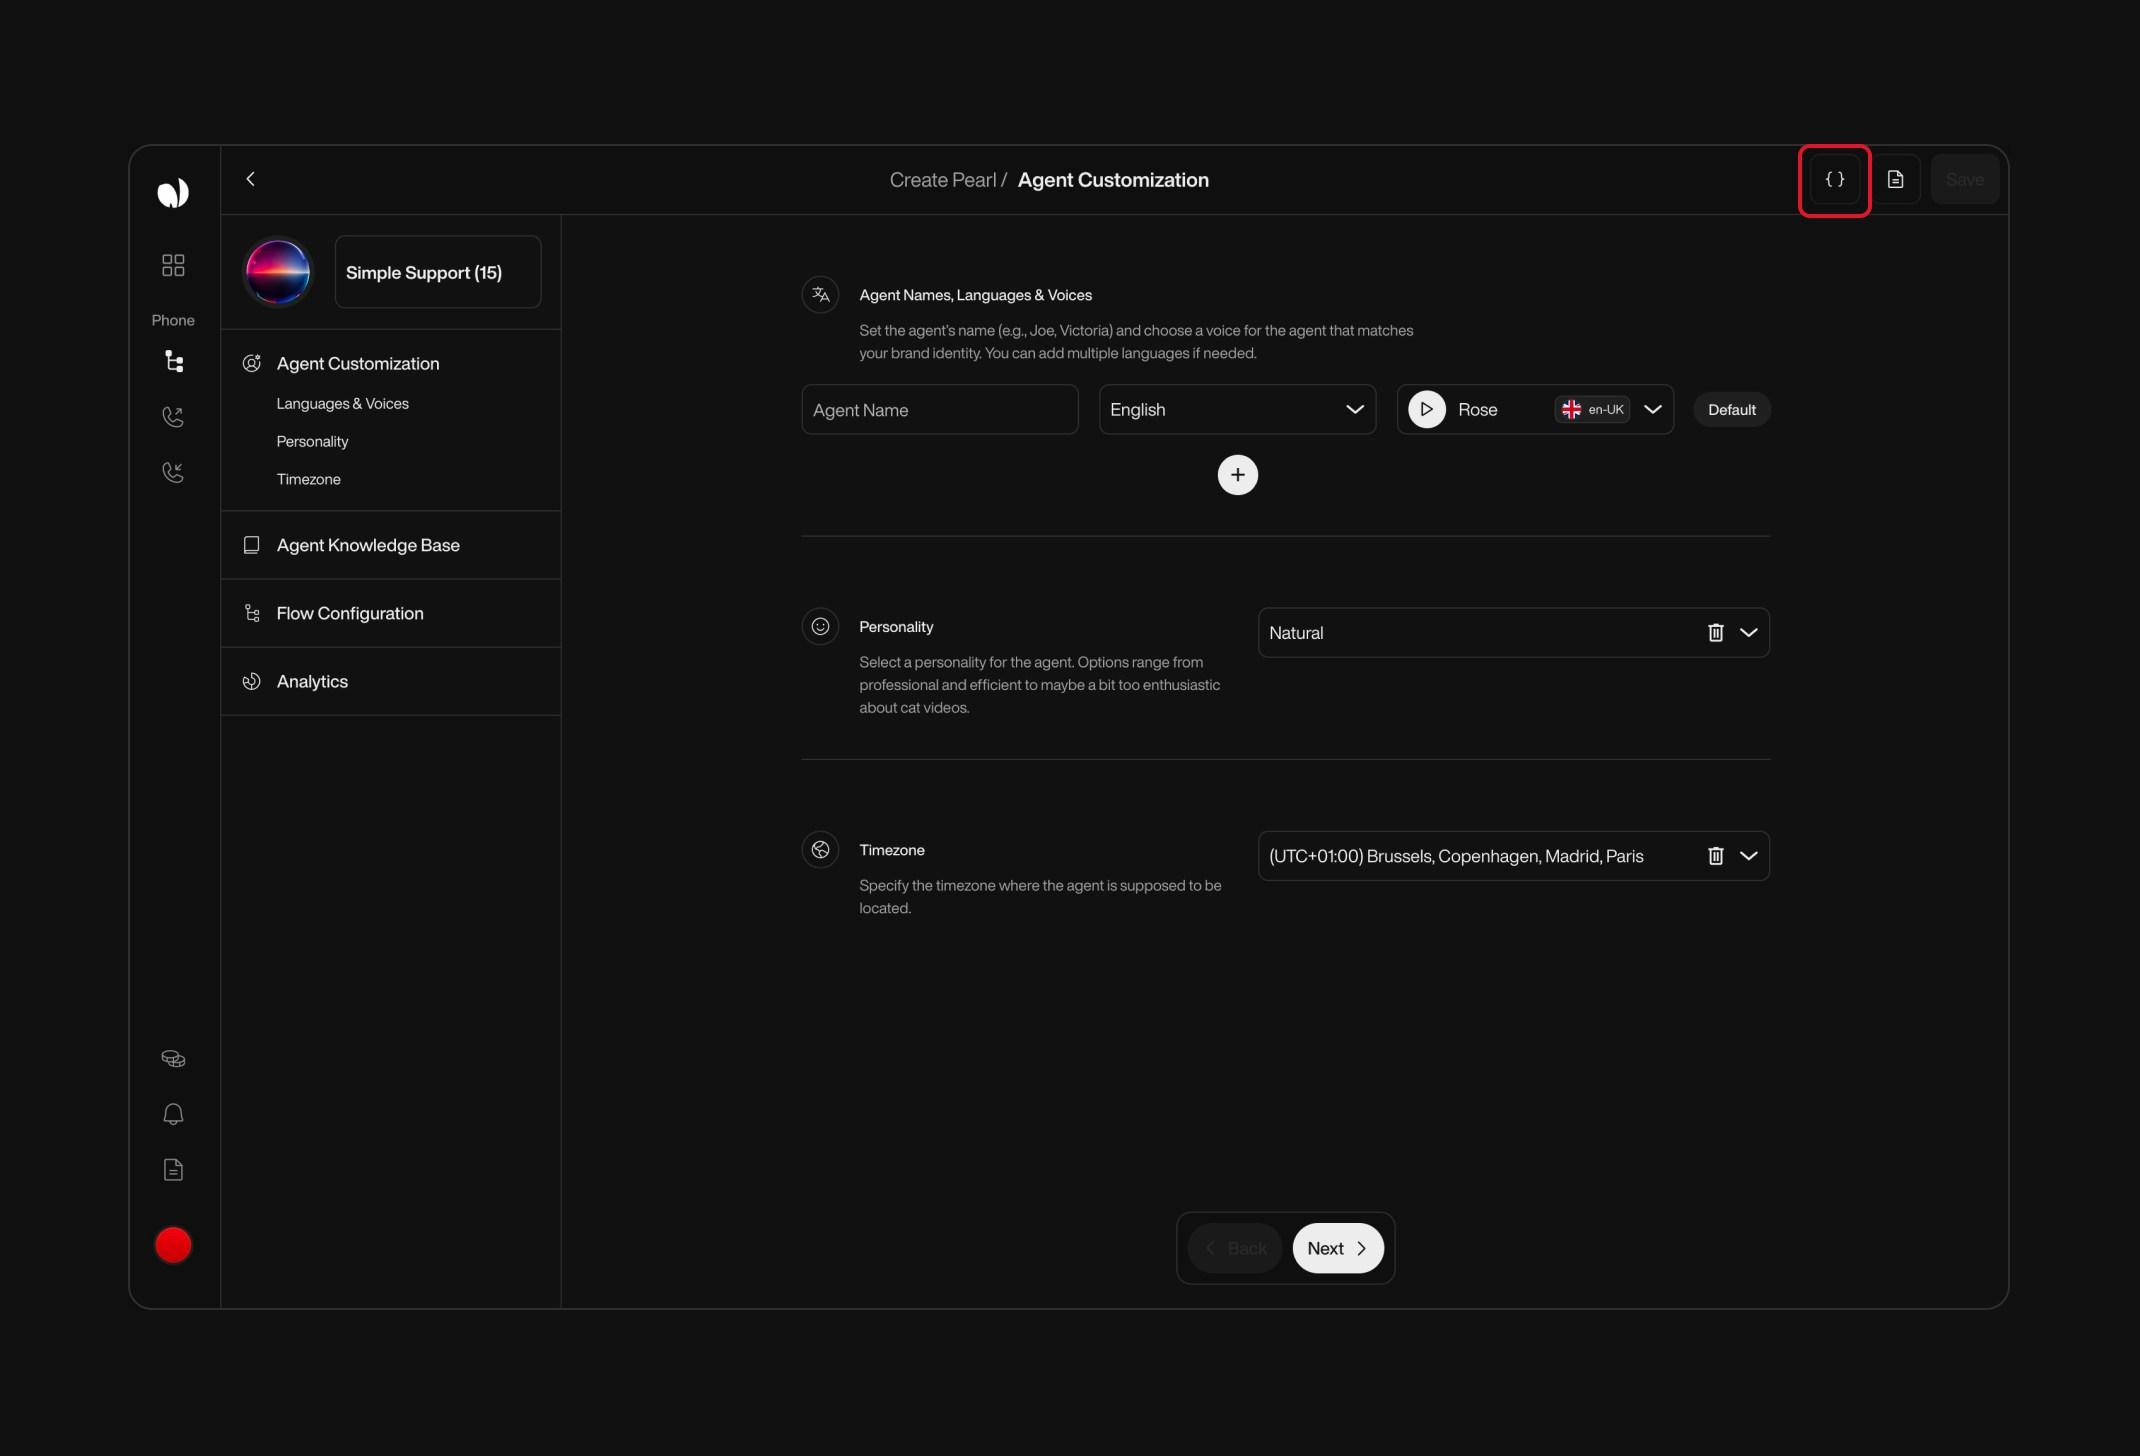
#### Accessing the Variable Manager

You can access the Variable Manager in **two quick ways** depending on your editor mode:

<Steps>
  <Step title="From the Header">
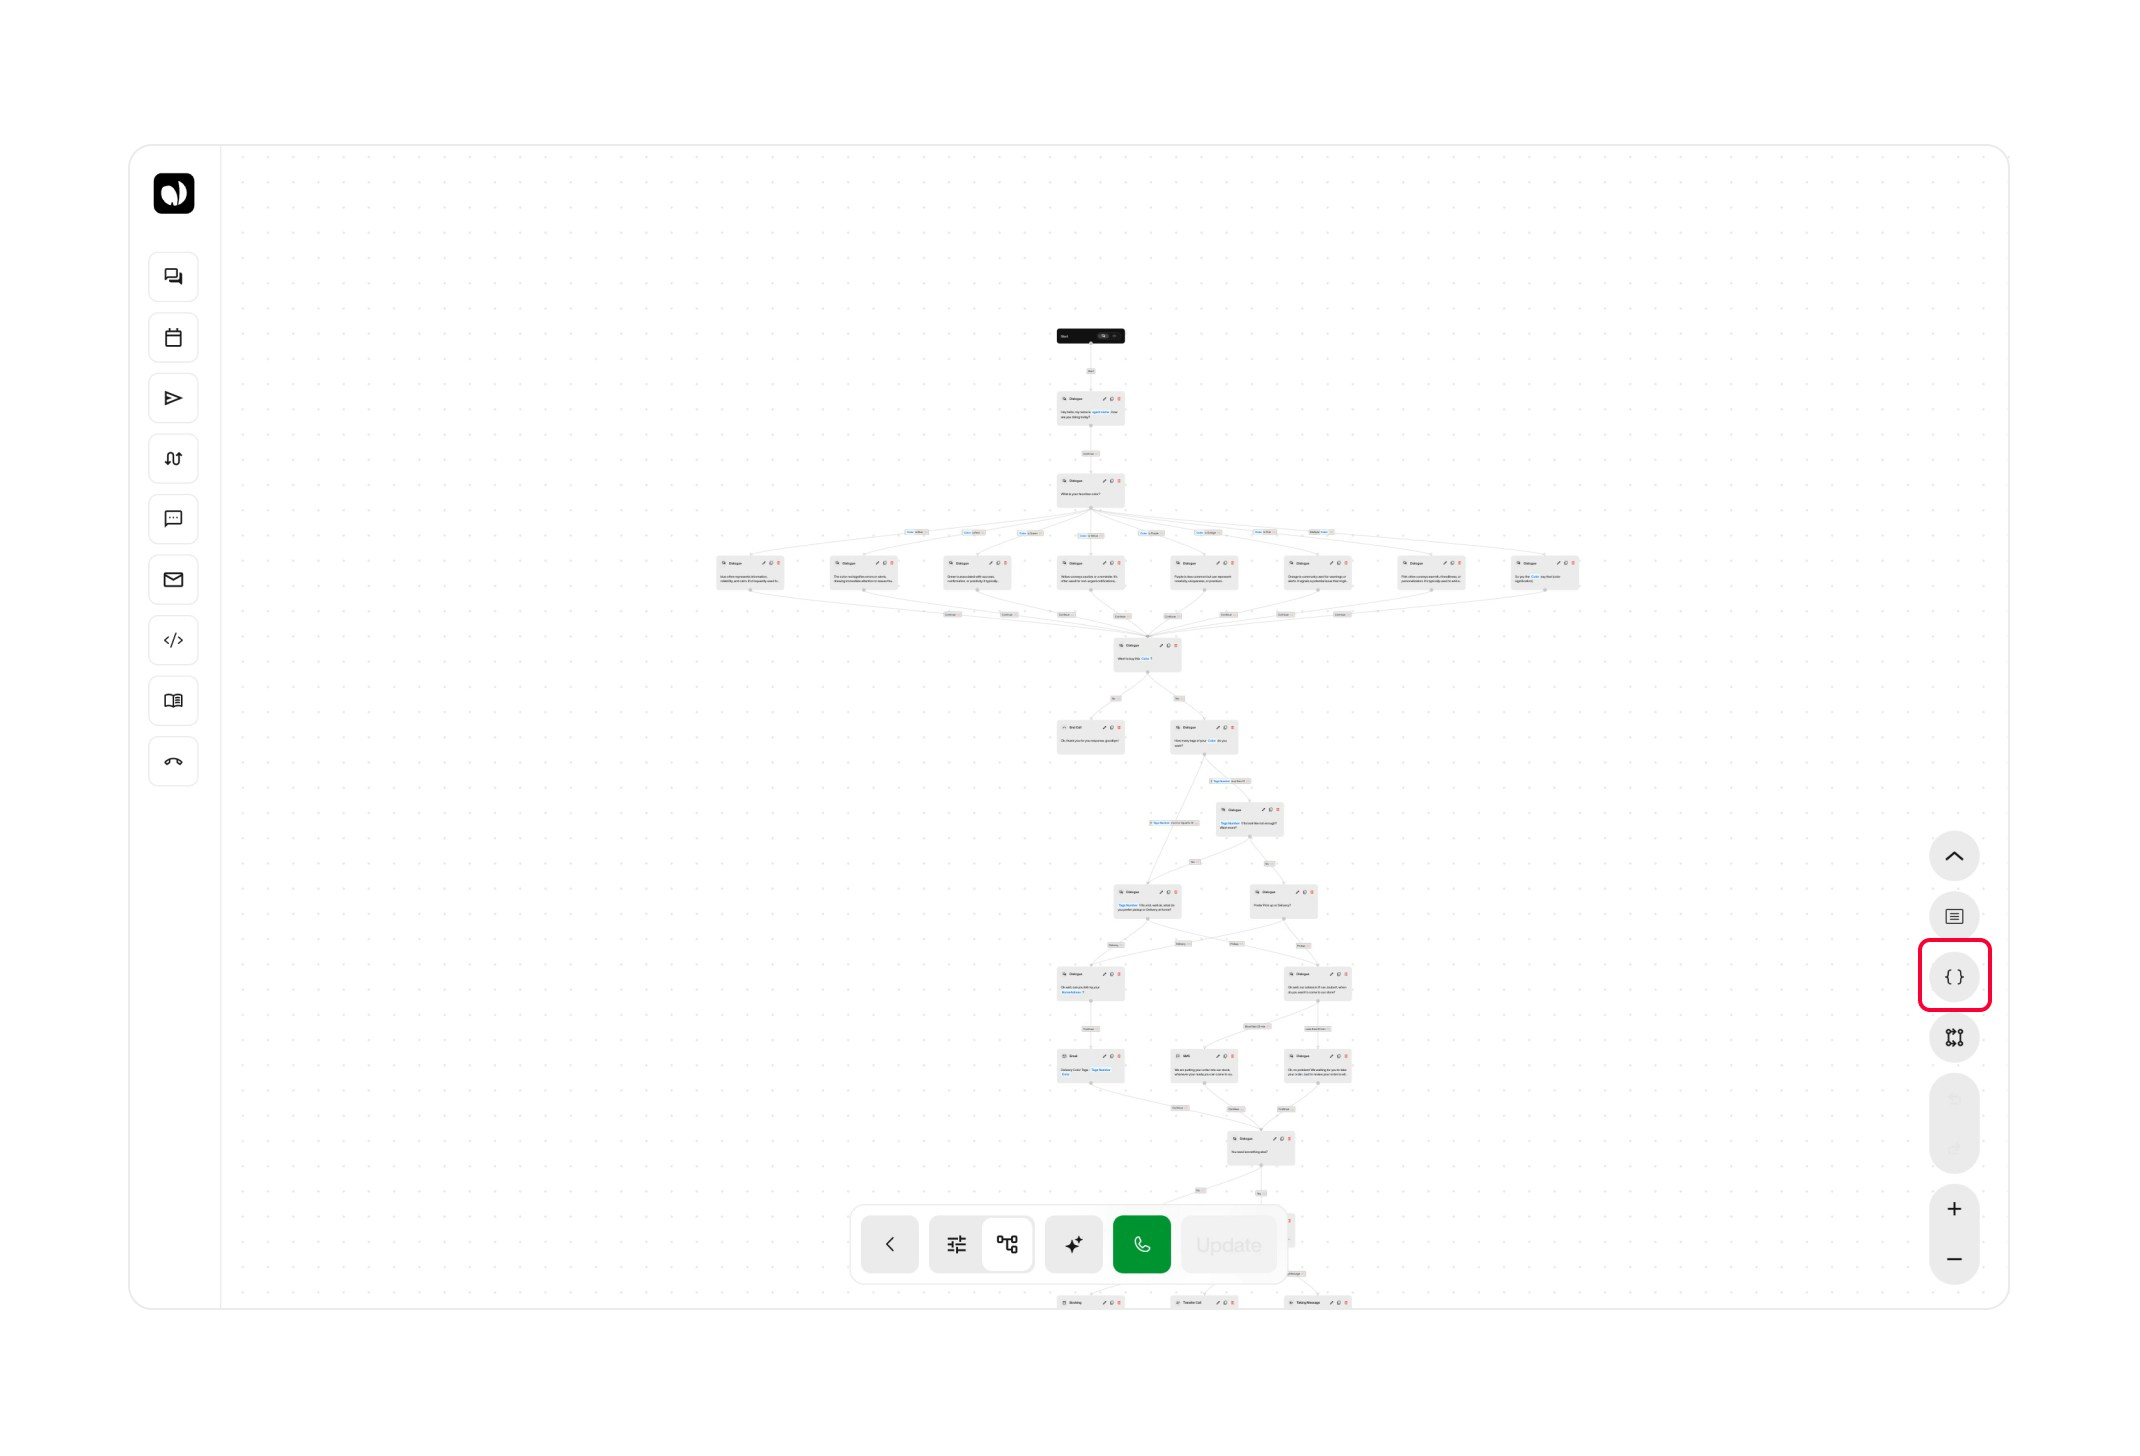
    You can access the **Variable Manager** directly from:

    * The **top navigation bar**, available in both **Simple** and **Advanced Mode**.
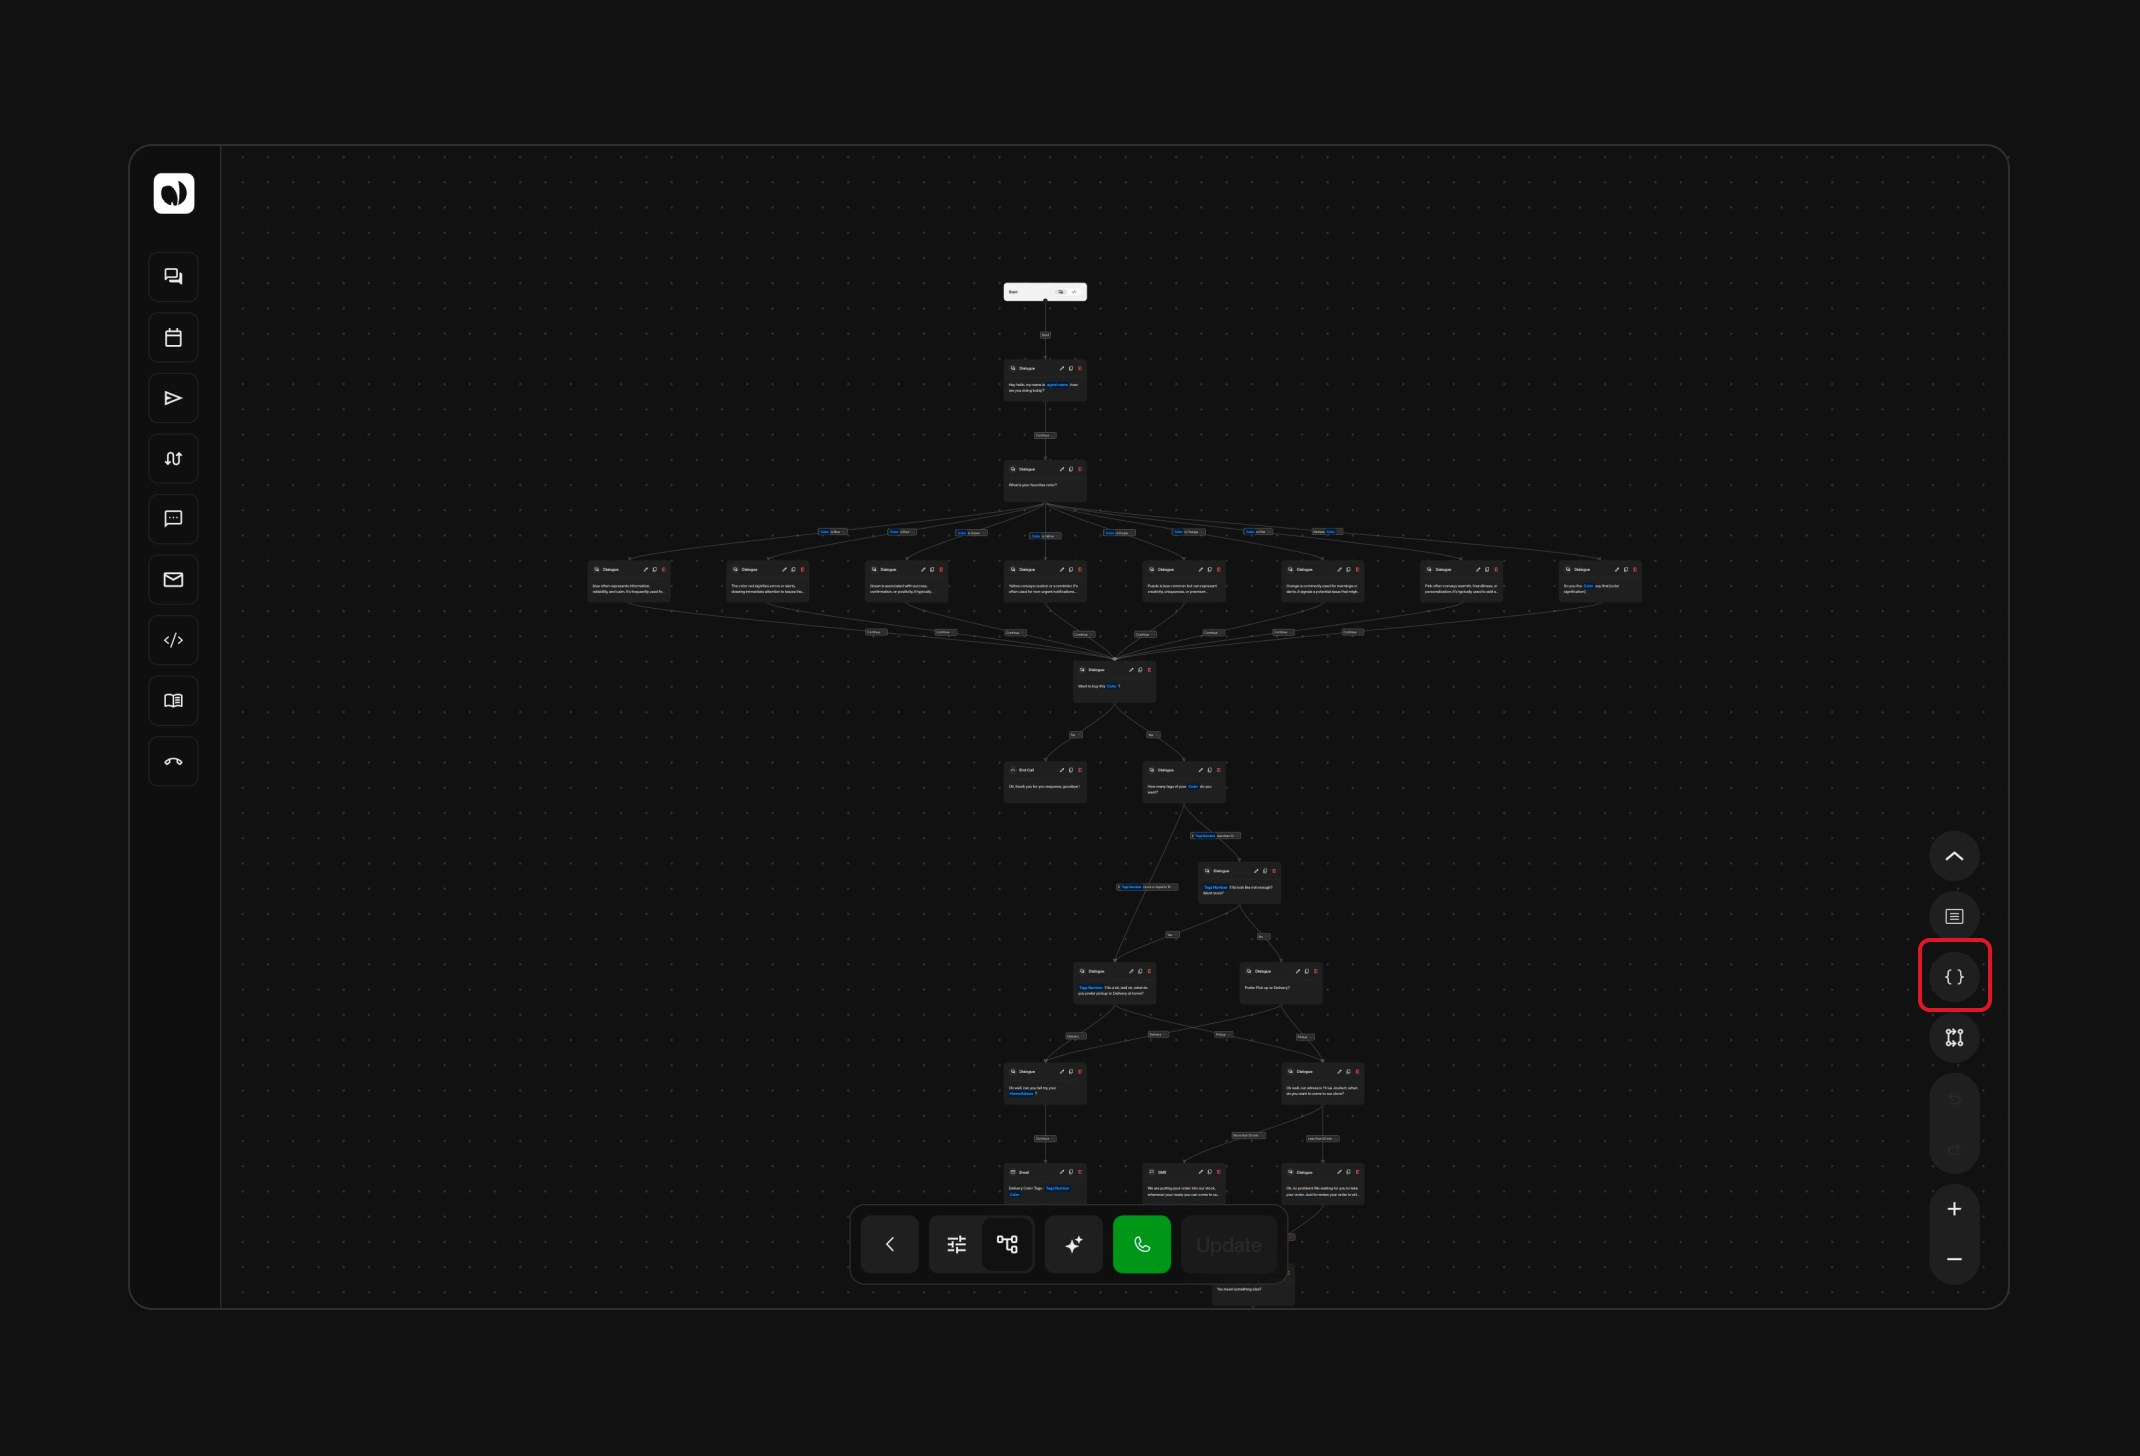
    * The **bottom-right corner** of the **Tree Editor**, exclusive to **Advanced Mode** — alongside zoom and instruction buttons.

    <div className="flex gap-6">
      <div className="w-1/2">
        <div className="block dark:hidden">
          <Frame>
            <div className="p-0 pb-0">
              <img src="https://mintcdn.com/nlpearl/yjNN1PpSs3yxoZOQ/images/light_mode/variables_simple-emplacement.jpg?fit=max&auto=format&n=yjNN1PpSs3yxoZOQ&q=85&s=cc7f16a74203d509da3aaec44136fc1d" alt="Frame 1 – Light Mode" className="rounded-[14px] w-full block" width="2140" height="1456" data-path="images/light_mode/variables_simple-emplacement.jpg" />
            </div>
          </Frame>
        </div>

        <div className="hidden dark:block">
          <Frame>
            <div className="p-0 pb-0">
              <img src="https://mintcdn.com/nlpearl/LRcBocnC9aRvHcb-/images/dark_mode/variables_simple-emplacement.jpg?fit=max&auto=format&n=LRcBocnC9aRvHcb-&q=85&s=7ccc781e52144b9e35d456c2e091e657" alt="Frame 1 – Dark Mode" className="rounded-[14px] w-full block" width="2140" height="1456" data-path="images/dark_mode/variables_simple-emplacement.jpg" />
            </div>
          </Frame>
        </div>
      </div>

      <div className="w-1/2">
        <div className="block dark:hidden">
          <Frame>
            <div className="p-0 pb-0">
              <img src="https://mintcdn.com/nlpearl/yjNN1PpSs3yxoZOQ/images/light_mode/variables_simple-emplacement3.jpg?fit=max&auto=format&n=yjNN1PpSs3yxoZOQ&q=85&s=92835ee4c64e7f6ee9fd32208c83ff24" alt="Frame 2 – Light Mode" className="rounded-[14px] w-full block" width="2140" height="1456" data-path="images/light_mode/variables_simple-emplacement3.jpg" />
            </div>
          </Frame>
        </div>

        <div className="hidden dark:block">
          <Frame>
            <div className="p-0 pb-0">
              <img src="https://mintcdn.com/nlpearl/LRcBocnC9aRvHcb-/images/dark_mode/variables_simple-emplacement3.jpg?fit=max&auto=format&n=LRcBocnC9aRvHcb-&q=85&s=042699fe24ac541c8ae36028569f8d62" alt="Frame 2 – Dark Mode" className="rounded-[14px] w-full block" width="2140" height="1456" data-path="images/dark_mode/variables_simple-emplacement3.jpg" />
            </div>
          </Frame>
        </div>
      </div>
    </div>

    <br />
  </Step>

  <Step title="From a Text Field">
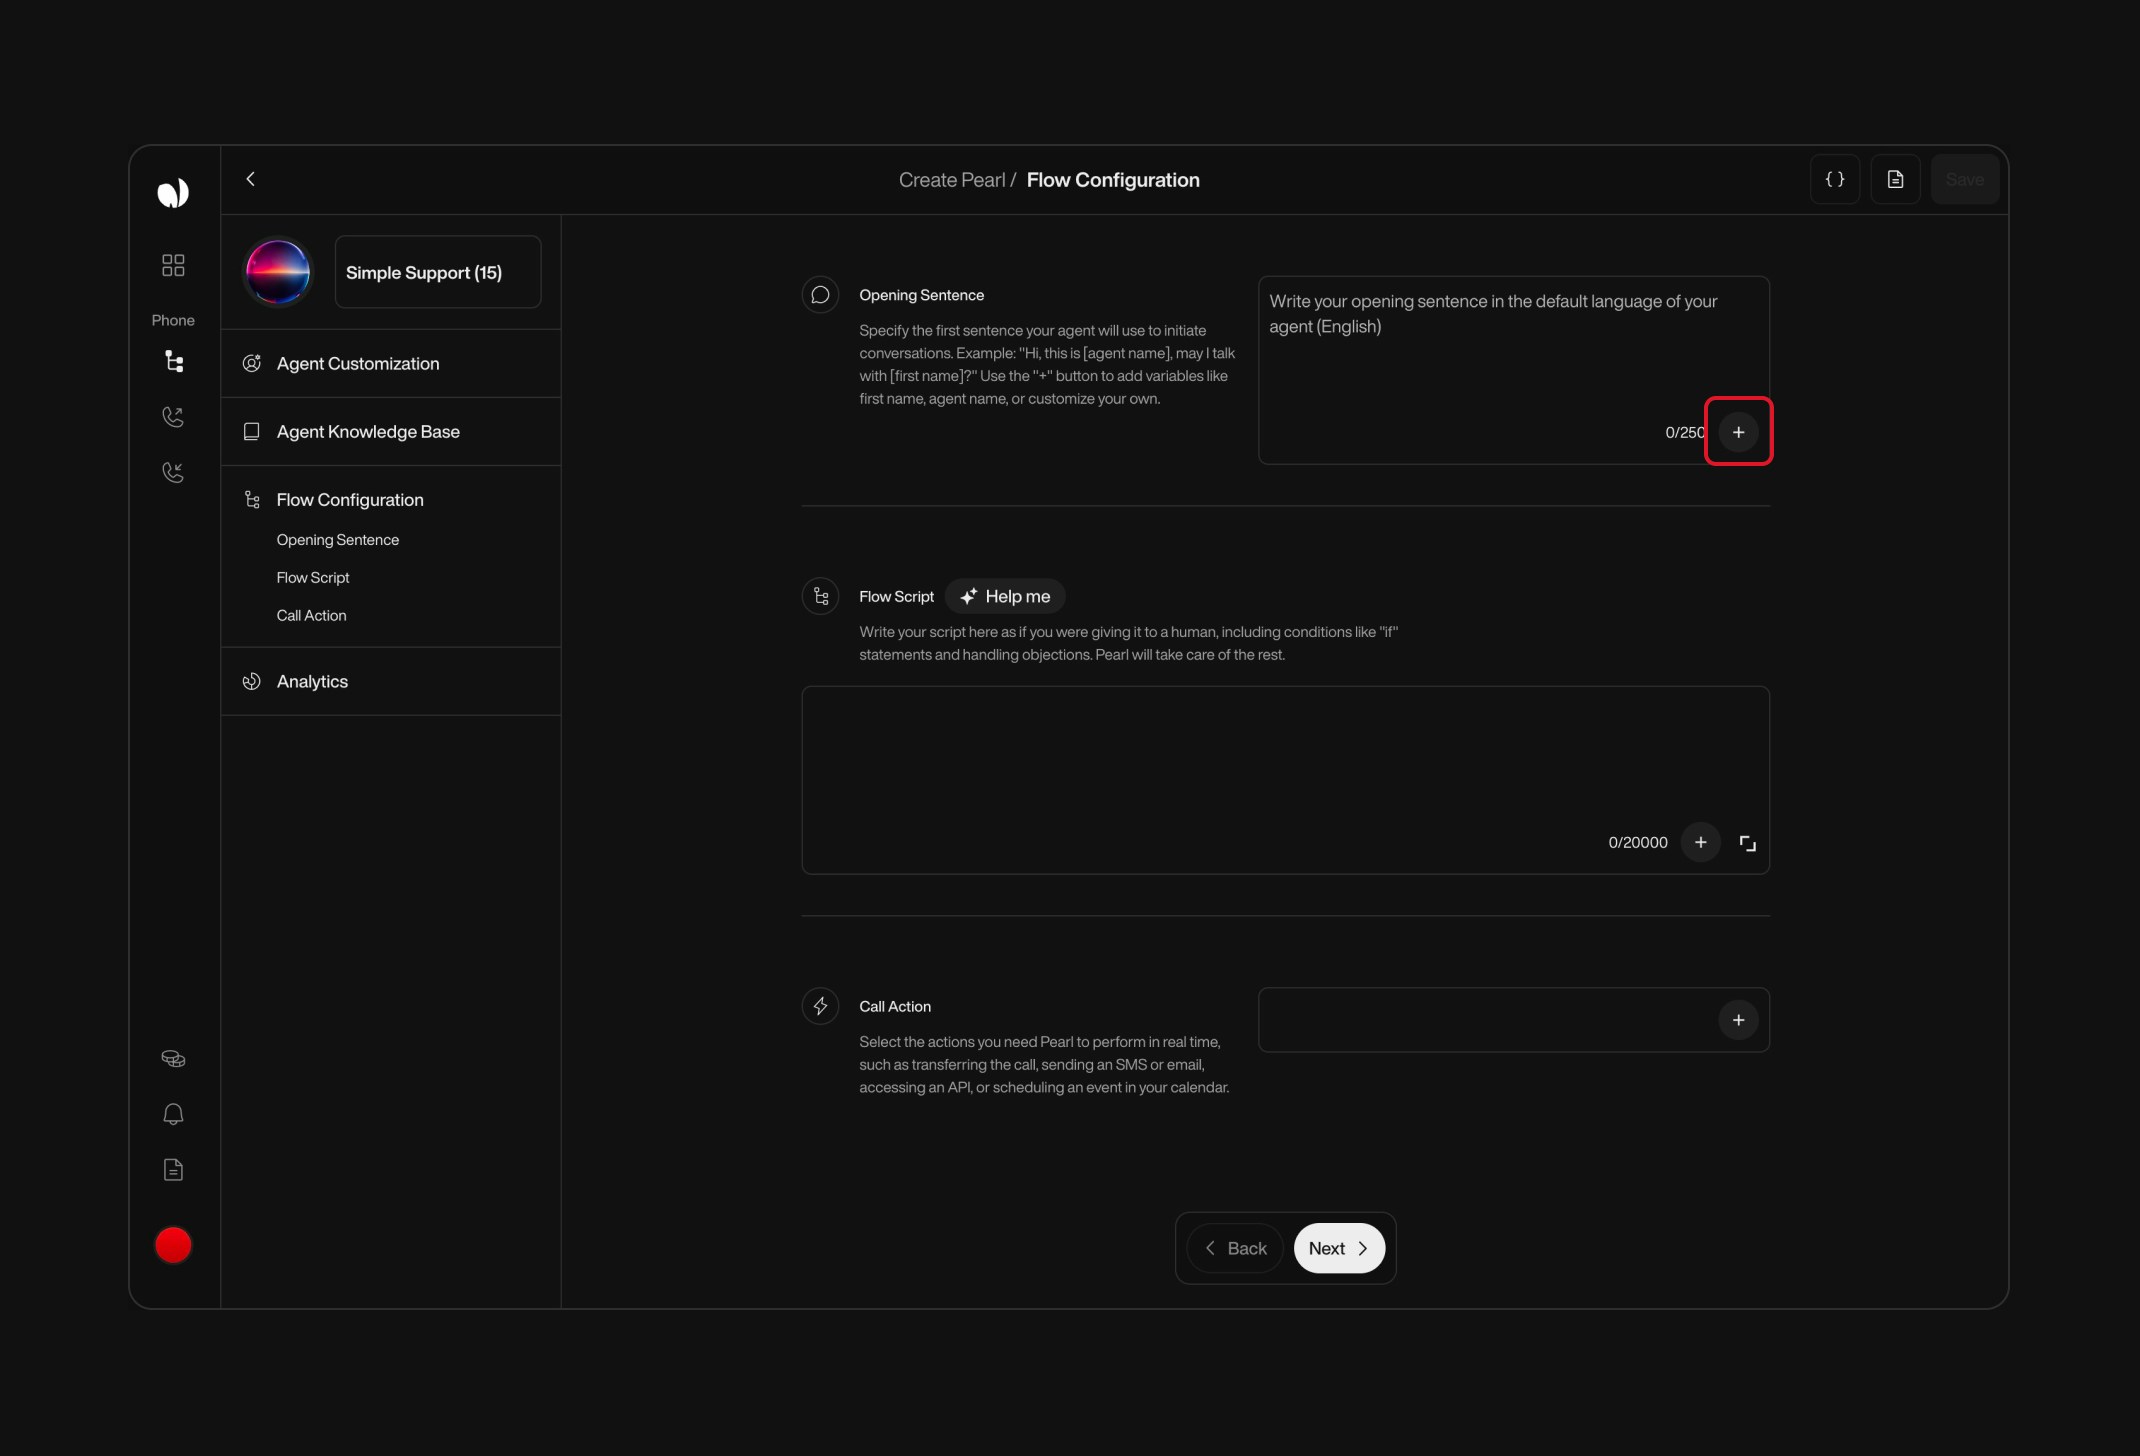
    You can also access the **Variable Manager** from a text field — in both **Simple** and **Advanced Mode** — whenever the `+` icon is available.

    <Note>
      Only fields that support variables will display the **“+”** icon.\
      For example, some duration or static option fields won’t offer variable insertion.
    </Note>

    * Go to the **Flow Configuration** page (Simple Mode), or open a **Node** (Advanced Mode).
    * Click the **“+” icon** inside the supported text input field.
    * At the bottom of the dropdown, click **“Variable Manager”**.

    <div className="flex gap-6">
      <div className="w-1/2">
        <div className="block dark:hidden">
          <Frame>
            <div className="p-0 pb-0">
              <img src="https://mintcdn.com/nlpearl/yjNN1PpSs3yxoZOQ/images/light_mode/variables_simple-emplacement2.jpg?fit=max&auto=format&n=yjNN1PpSs3yxoZOQ&q=85&s=b48ffc6dbfc55dee3e64db5dfee6d294" alt="Frame 1 – Light Mode" className="rounded-[14px] w-full block" width="2140" height="1456" data-path="images/light_mode/variables_simple-emplacement2.jpg" />
            </div>
          </Frame>
        </div>

        <div className="hidden dark:block">
          <Frame>
            <div className="p-0 pb-0">
              <img src="https://mintcdn.com/nlpearl/LRcBocnC9aRvHcb-/images/dark_mode/variables_simple-emplacement2.jpg?fit=max&auto=format&n=LRcBocnC9aRvHcb-&q=85&s=f8dd0b6a36a4df67b4056c22b96cc98d" alt="Frame 1 – Dark Mode" className="rounded-[14px] w-full block" width="2140" height="1456" data-path="images/dark_mode/variables_simple-emplacement2.jpg" />
            </div>
          </Frame>
        </div>
      </div>

      <div className="w-1/2">
        <div className="block dark:hidden">
          <Frame>
            <div className="p-0 pb-0">
              <img src="https://mintcdn.com/nlpearl/yjNN1PpSs3yxoZOQ/images/light_mode/variables_simple-emplacement4.jpg?fit=max&auto=format&n=yjNN1PpSs3yxoZOQ&q=85&s=2cc5cc4b7112175d5fd4d3a1fbf0c667" alt="Frame 2 – Light Mode" className="rounded-[14px] w-full block" width="2140" height="1456" data-path="images/light_mode/variables_simple-emplacement4.jpg" />
            </div>
          </Frame>
        </div>

        <div className="hidden dark:block">
          <Frame>
            <div className="p-0 pb-0">
              <img src="https://mintcdn.com/nlpearl/LRcBocnC9aRvHcb-/images/dark_mode/variables_simple-emplacement4.jpg?fit=max&auto=format&n=LRcBocnC9aRvHcb-&q=85&s=22a6fbeb95323a0c220c88bb81b7b81f" alt="Frame 2 – Dark Mode" className="rounded-[14px] w-full block" width="2140" height="1456" data-path="images/dark_mode/variables_simple-emplacement4.jpg" />
            </div>
          </Frame>
        </div>
      </div>
    </div>
  </Step>
</Steps>

***

#### Creating and Managing Variables

Variables help you store and reuse dynamic information throughout your flows. Here's how to create, edit, and manage them from the **Variable Manager**.

<Steps>
  <Step title="Open the Variable Manager">
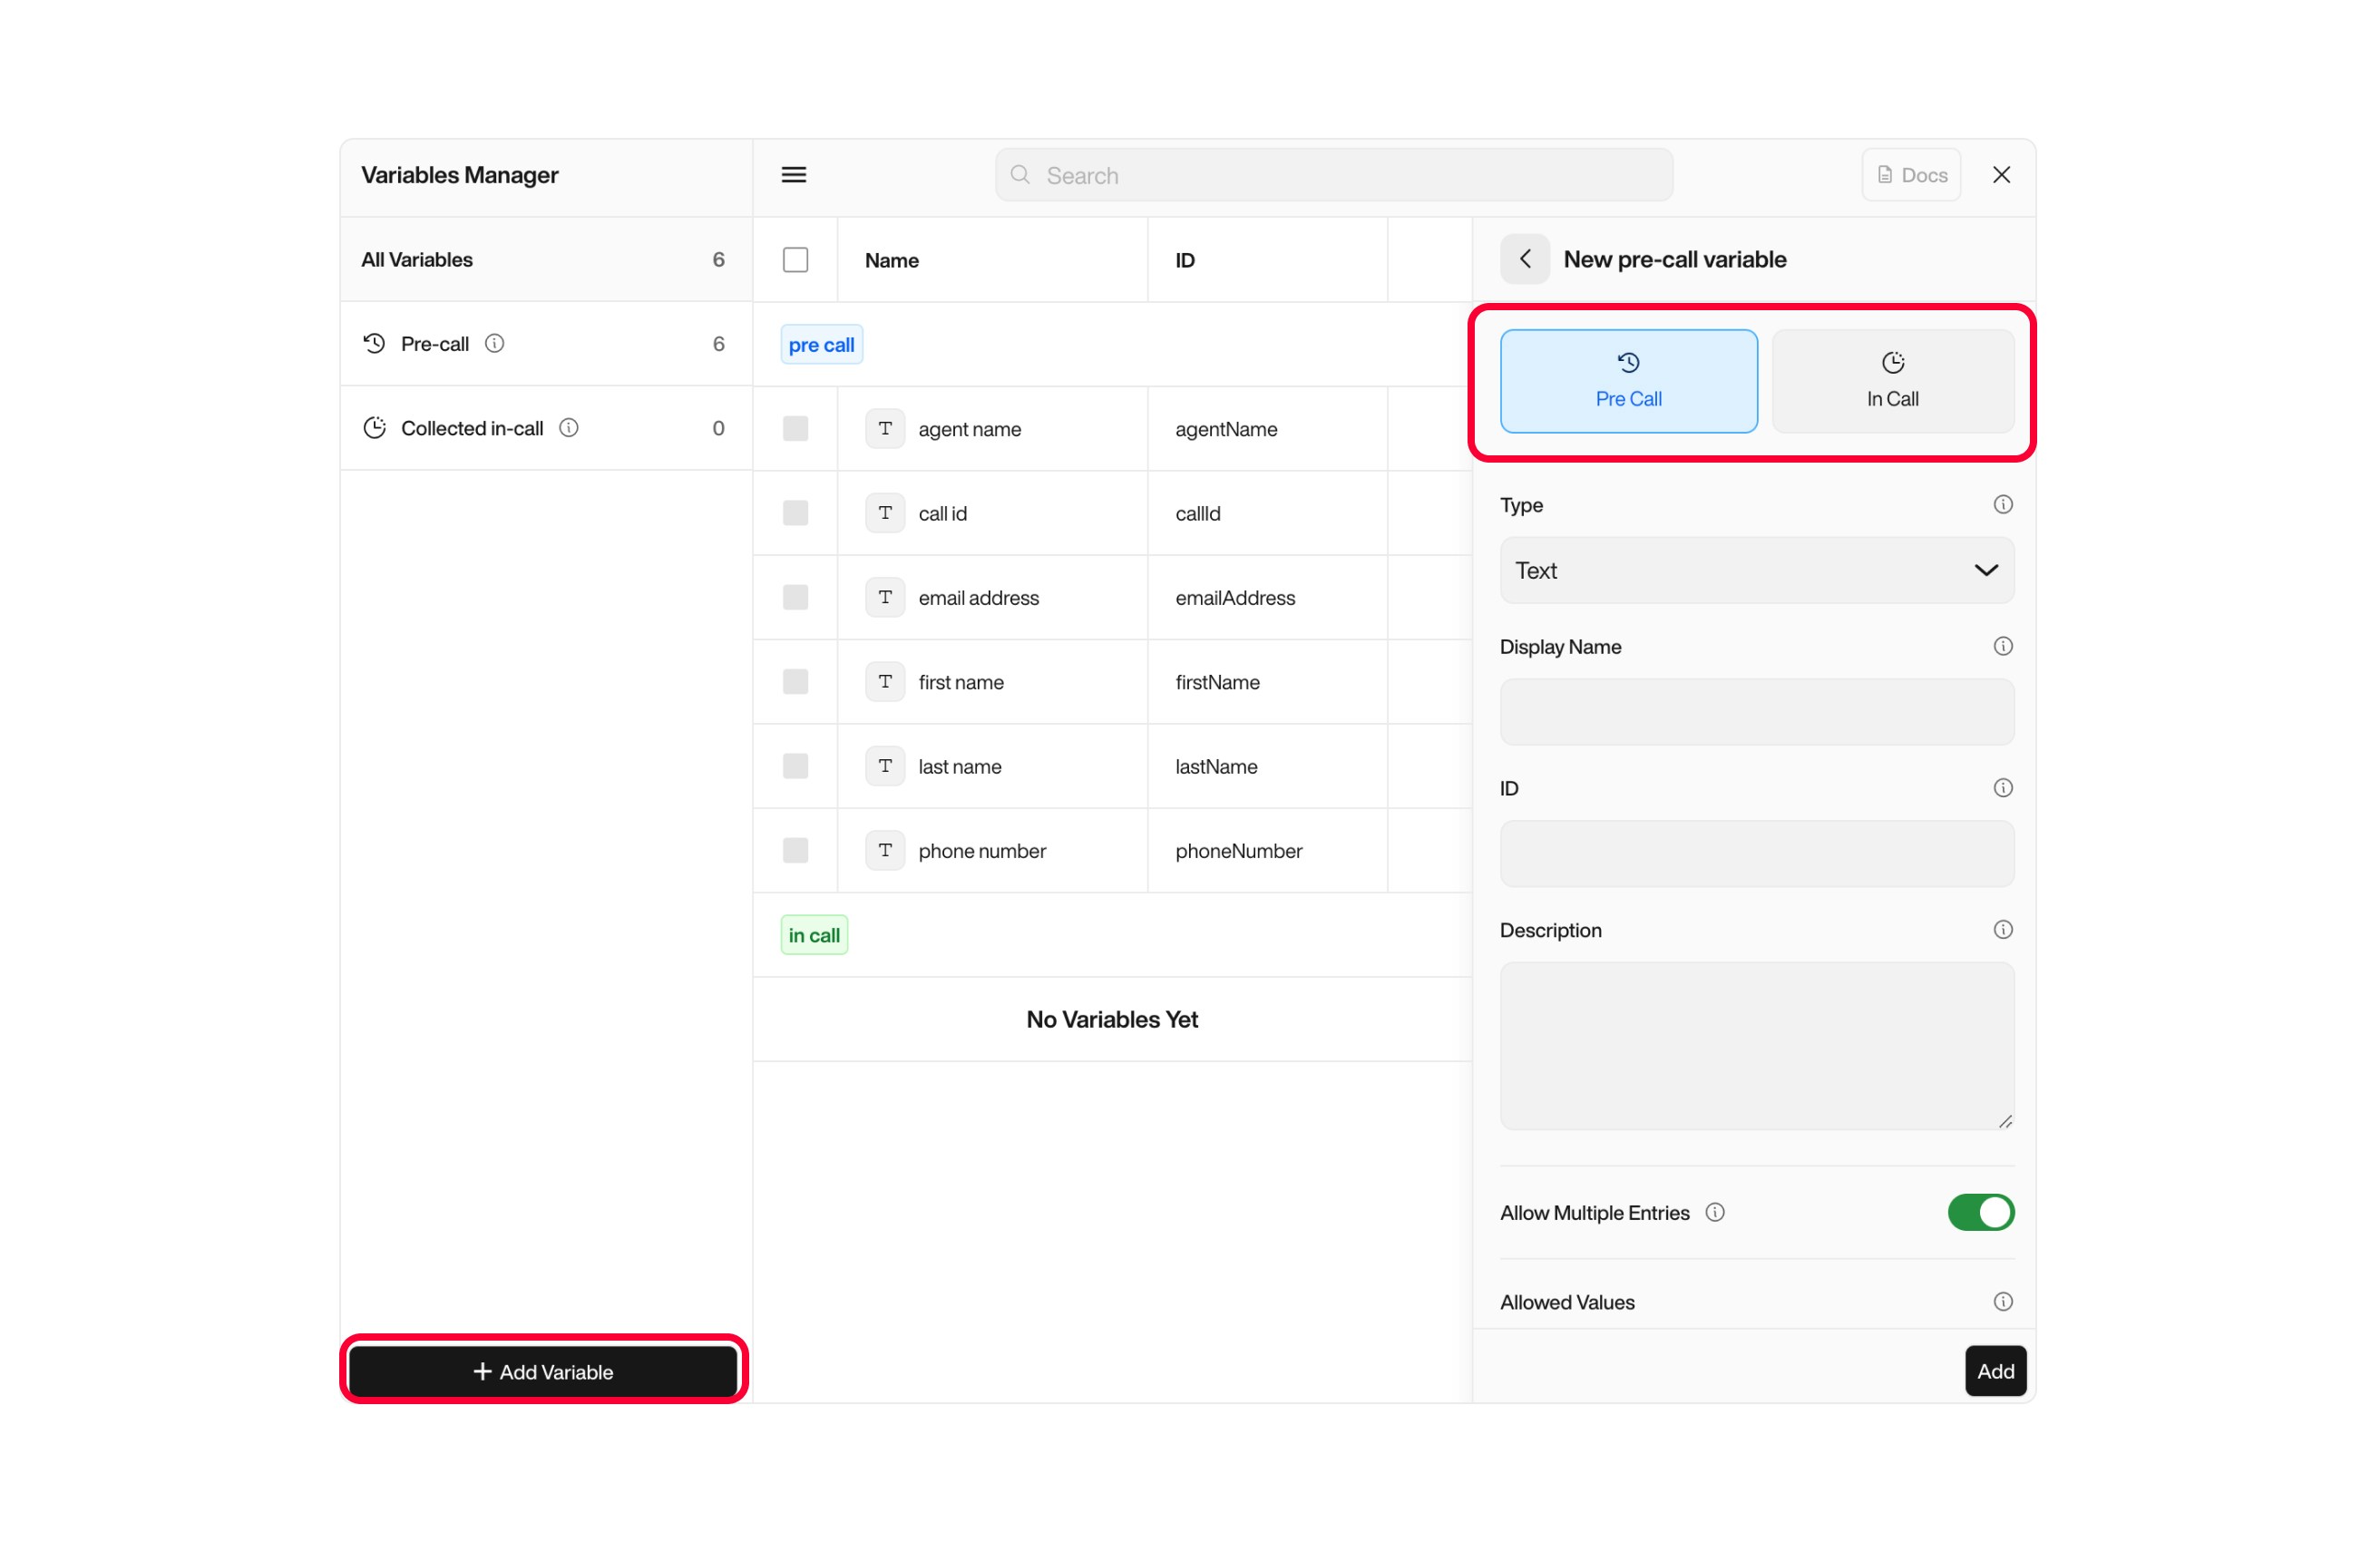
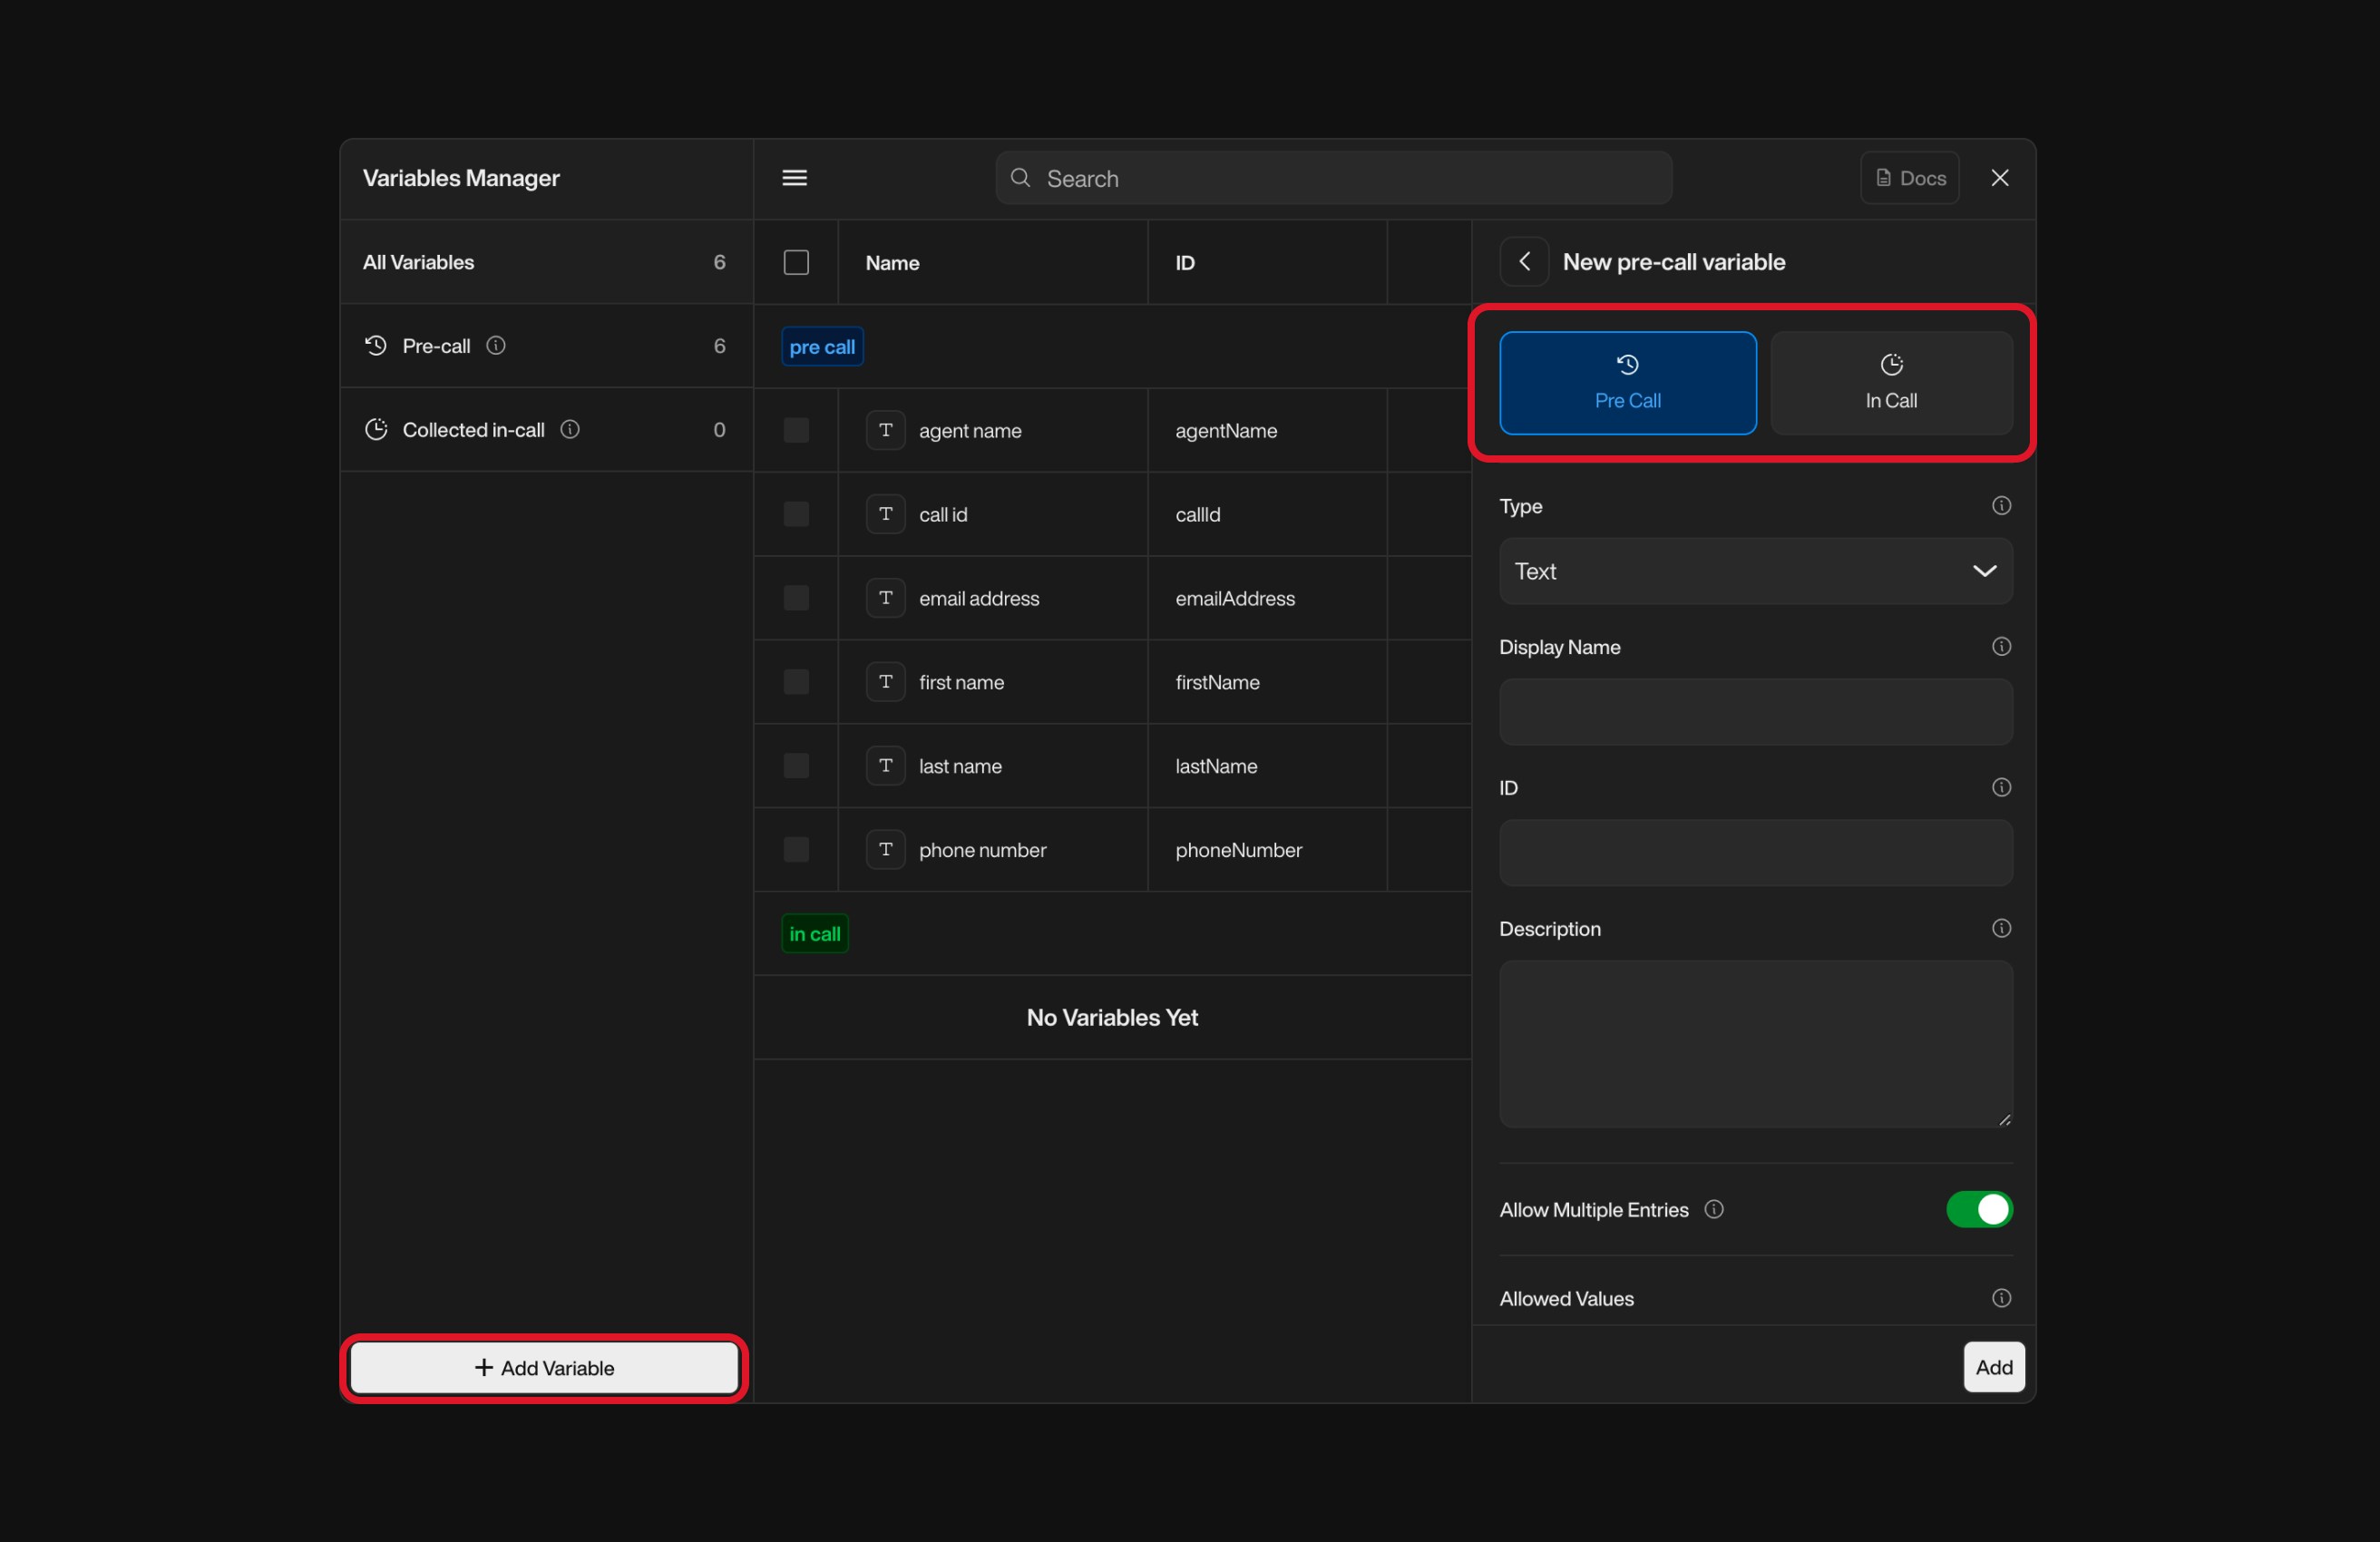
    Click the **“+”** icon in a text field or use the **Variable Manager** button (in the header or tree editor).
  </Step>

  <Step title="Select the Variable Category">
    * **Pre-call** (available before the call starts)
    * **Collected In-call** (captured during the conversation)

    <Warning>
      Post-call variables are predefined by our team and cannot be created manually. They are only available inside End Call Notifications.
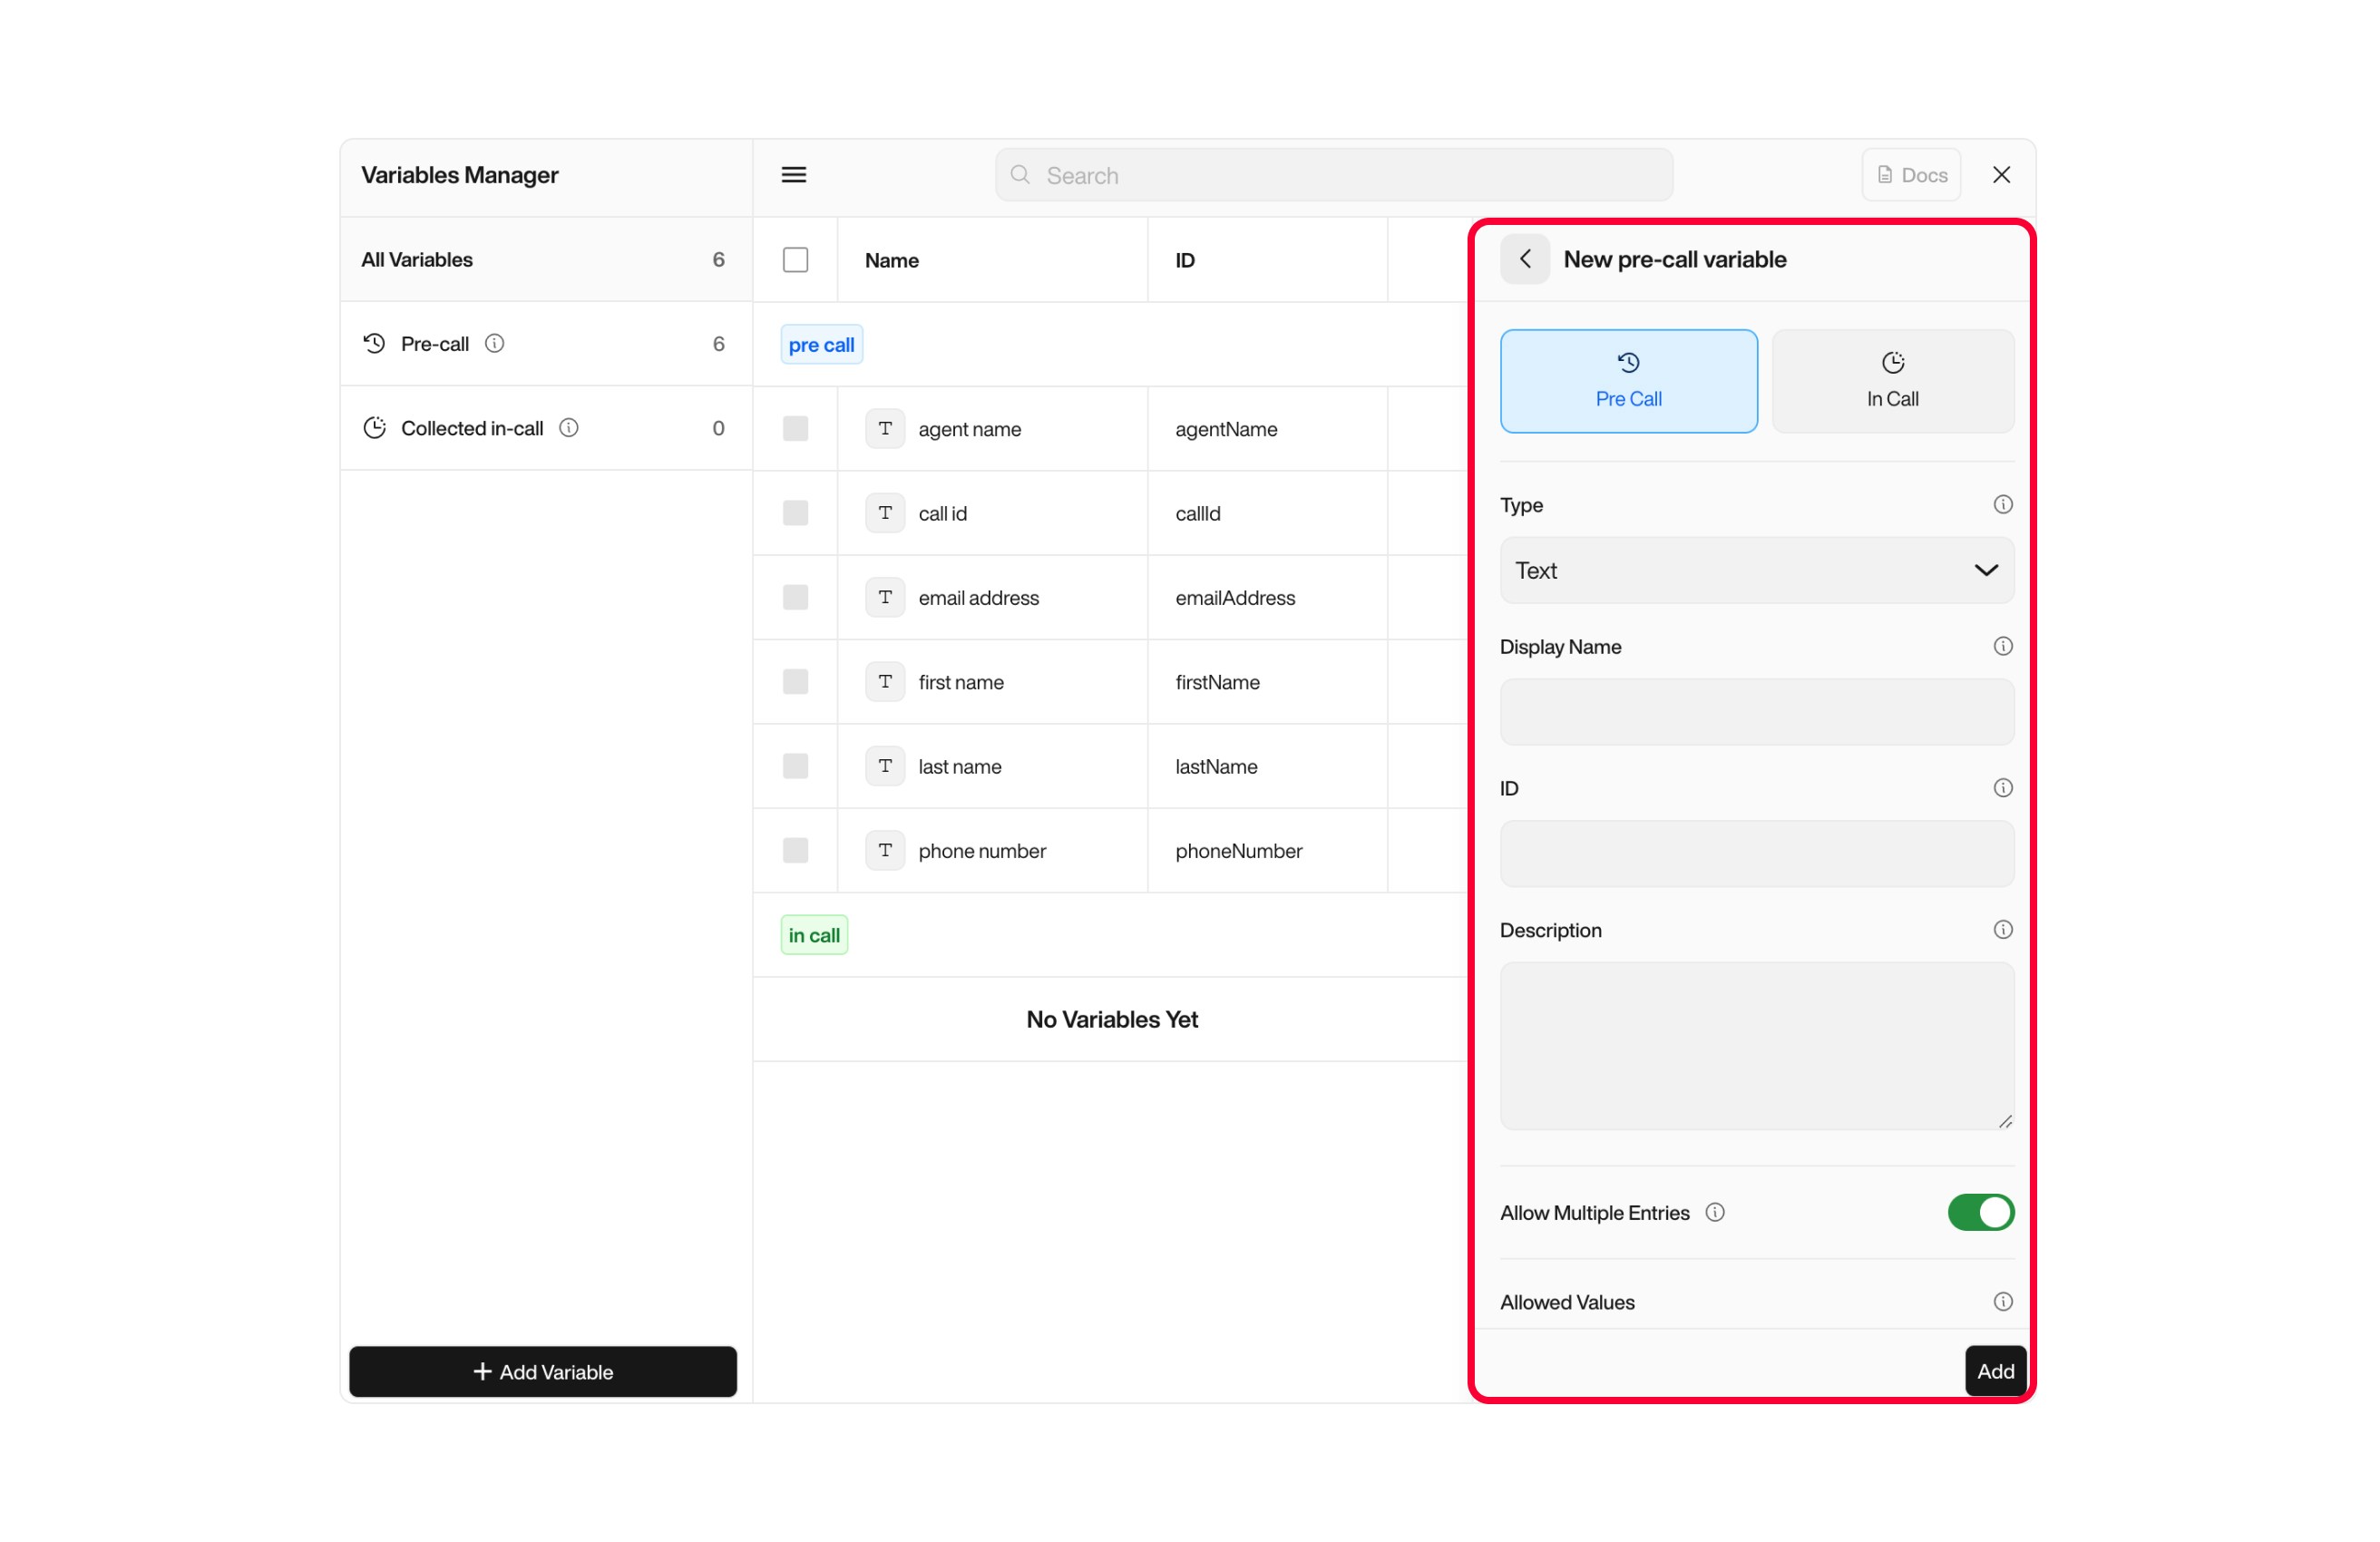
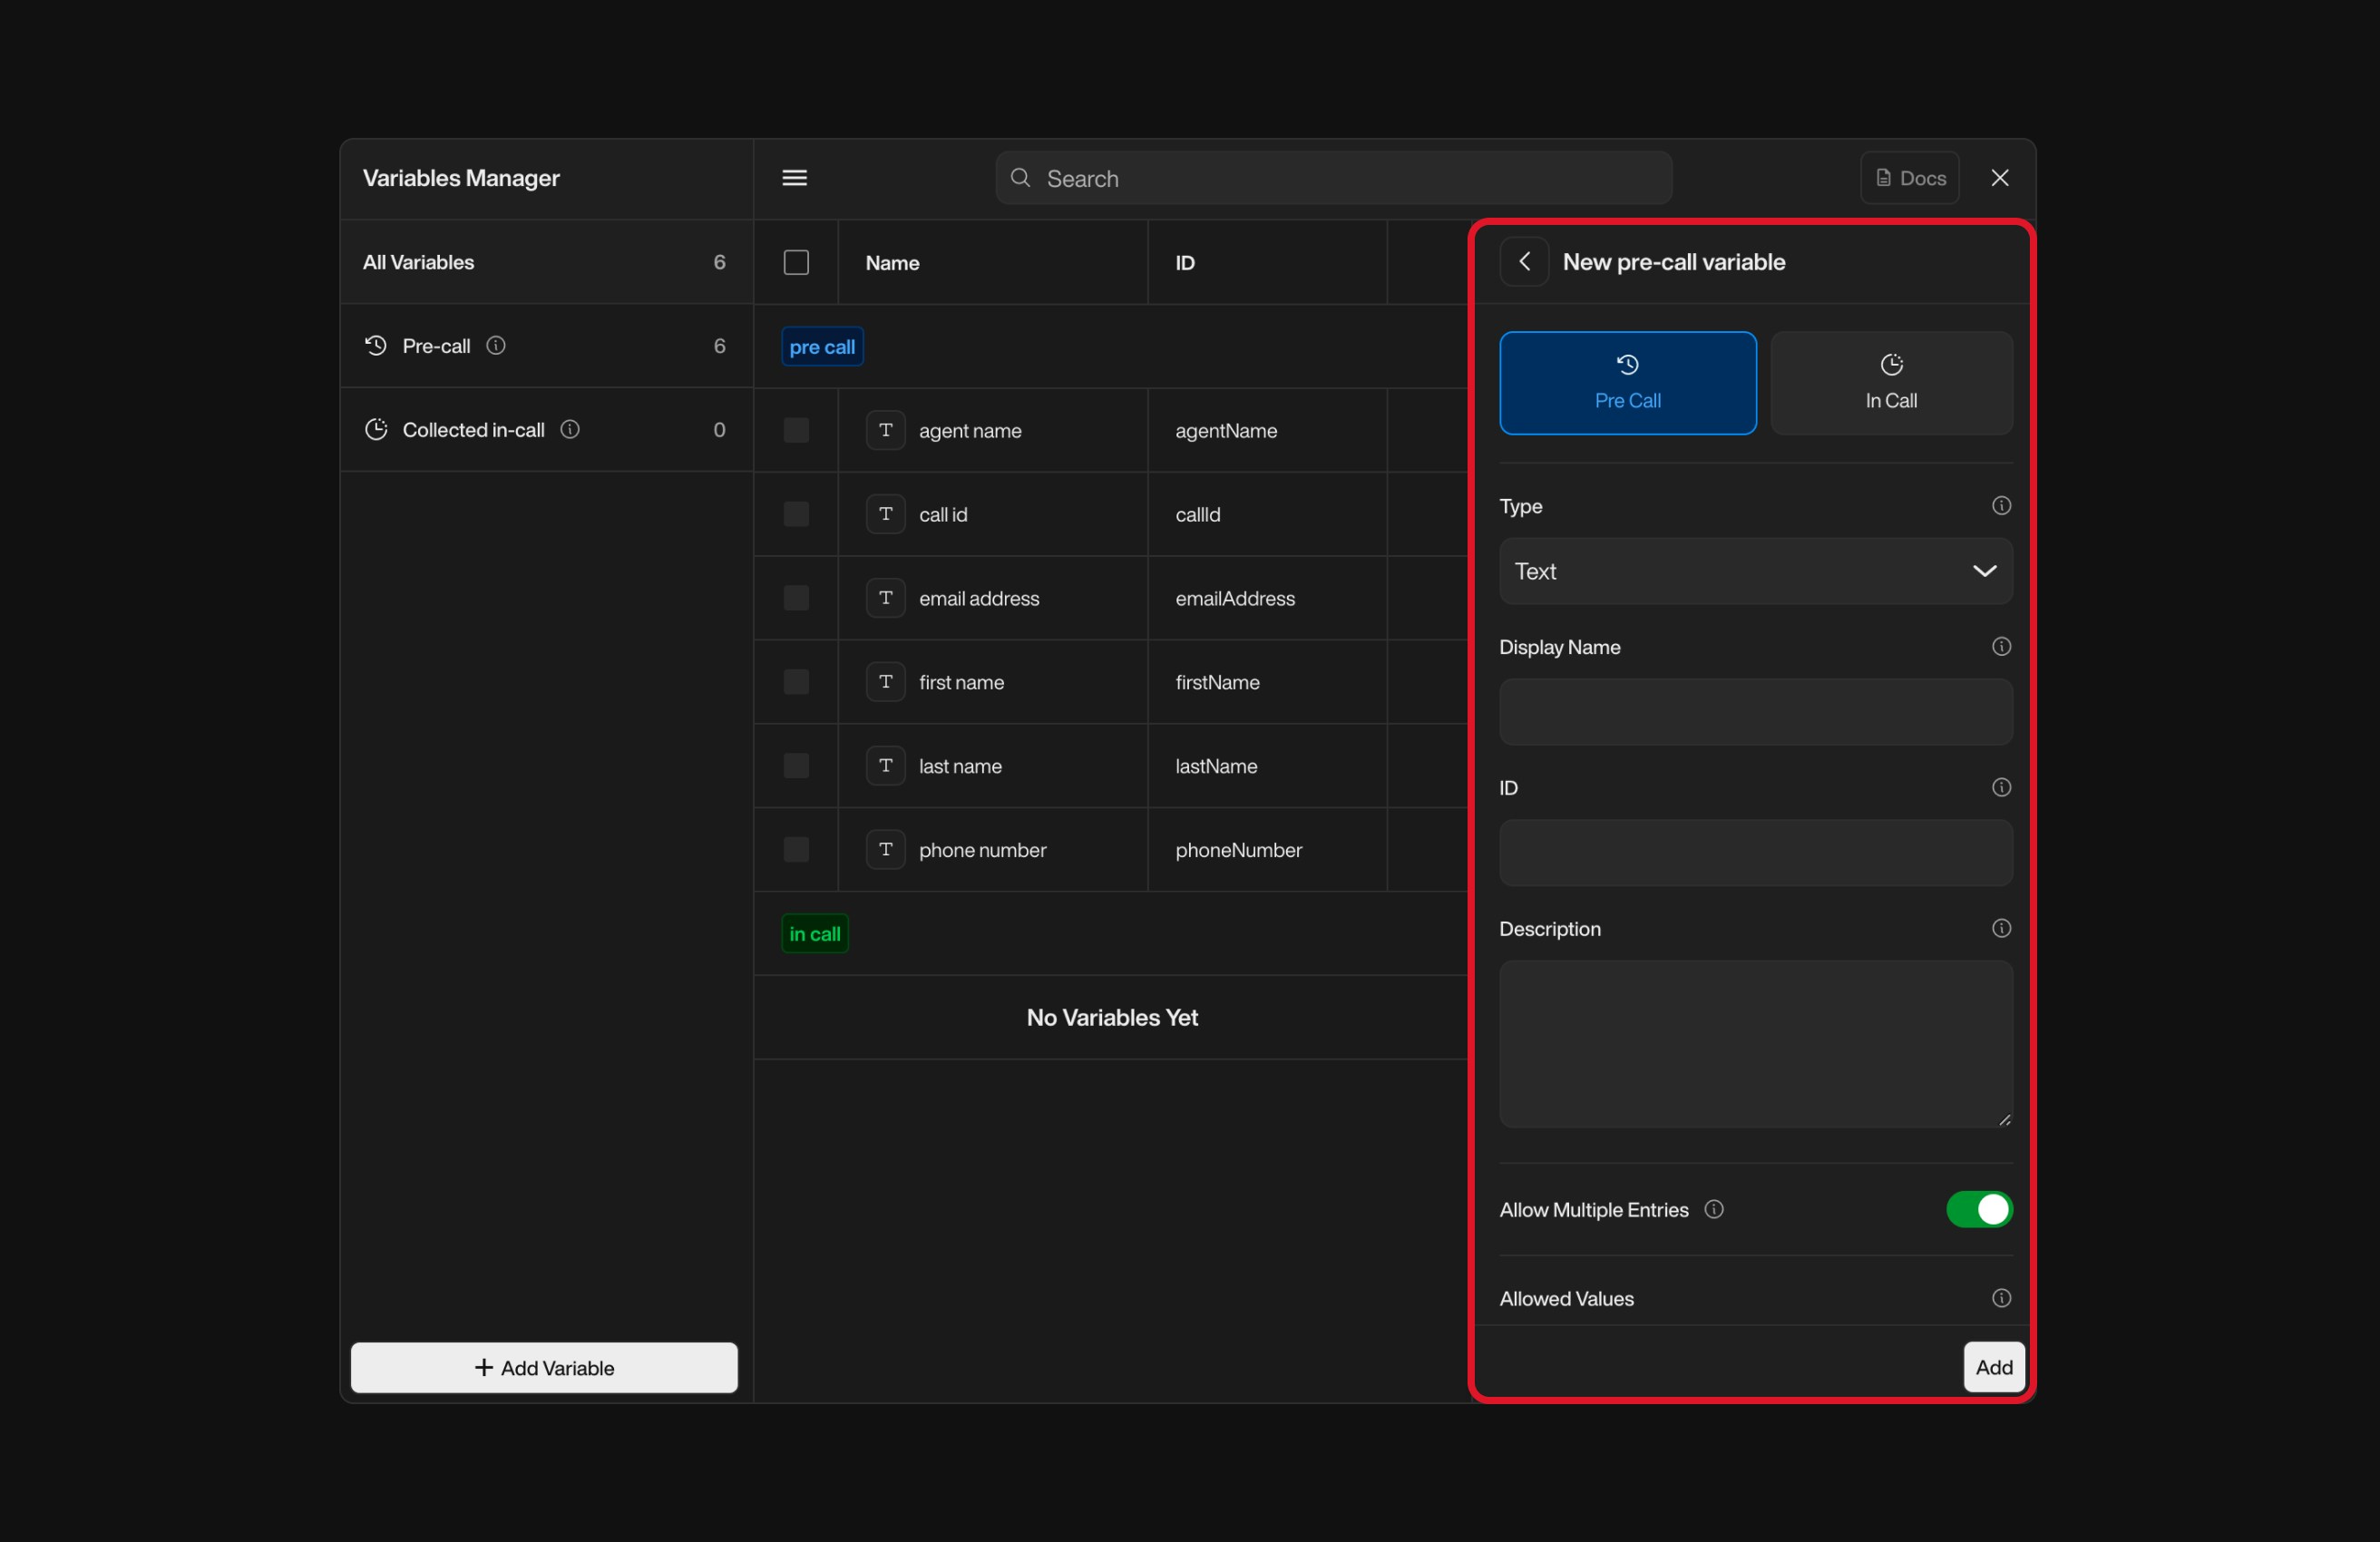
    </Warning>

    <div className="block dark:hidden">
      <Frame>
        <div className="p-1">
          <img src="https://mintcdn.com/nlpearl/yjNN1PpSs3yxoZOQ/images/light_mode/variables_manager-create.jpg?fit=max&auto=format&n=yjNN1PpSs3yxoZOQ&q=85&s=d4daf2cc5bcdf5f42919f10cbeb1aad1" alt="Send Email action interface on light mode" className="rounded-[14px]" width="2624" height="1700" data-path="images/light_mode/variables_manager-create.jpg" />
        </div>
      </Frame>
    </div>

    <div className="hidden dark:block">
      <Frame>
        <div className="p-1">
          <img src="https://mintcdn.com/nlpearl/LRcBocnC9aRvHcb-/images/dark_mode/variables_manager-create.jpg?fit=max&auto=format&n=LRcBocnC9aRvHcb-&q=85&s=9666546626058bf8e646acf9ad22b876" alt="Send Email action interface on dark mode" className="rounded-[14px]" width="2624" height="1700" data-path="images/dark_mode/variables_manager-create.jpg" />
        </div>
      </Frame>
    </div>

    <br />
  </Step>

  <Step title="Fill in the Variable Details">
    | Field                        | Description                                                                           |
    | ---------------------------- | ------------------------------------------------------------------------------------- |
    | **Type**                     | Select the data type: `Text`, `Whole Number`, `Decimal`, `Boolean`, or `Date & Time`. |
    | **Display Name**             | Use a clear, descriptive label (e.g. `Customer Name`).                                |
    | **ID**                       | Auto-generated from the Display Name — you can edit it.                               |
    | **Description** *(optional)* | Explain the purpose or usage of this variable.                                        |
    | **Allow Multiple Entries**   | Toggle this if the variable needs to hold multiple values (e.g. list of dates).       |

    <div className="block dark:hidden">
      <Frame>
        <div className="p-1">
          <img src="https://mintcdn.com/nlpearl/yjNN1PpSs3yxoZOQ/images/light_mode/variables_manager-create2.jpg?fit=max&auto=format&n=yjNN1PpSs3yxoZOQ&q=85&s=fec9202a549d060042134aa753ddf1d5" alt="Send Email action interface on light mode" className="rounded-[14px]" width="2624" height="1700" data-path="images/light_mode/variables_manager-create2.jpg" />
        </div>
      </Frame>
    </div>

    <div className="hidden dark:block">
      <Frame>
        <div className="p-1">
          <img src="https://mintcdn.com/nlpearl/LRcBocnC9aRvHcb-/images/dark_mode/variables_manager-create2.jpg?fit=max&auto=format&n=LRcBocnC9aRvHcb-&q=85&s=5874db0688b5a676d3c518b091150f28" alt="Send Email action interface on dark mode" className="rounded-[14px]" width="2624" height="1700" data-path="images/dark_mode/variables_manager-create2.jpg" />
        </div>
      </Frame>
    </div>

    <br />
  </Step>

  <Step title="Define Allowed Values (Optional)">
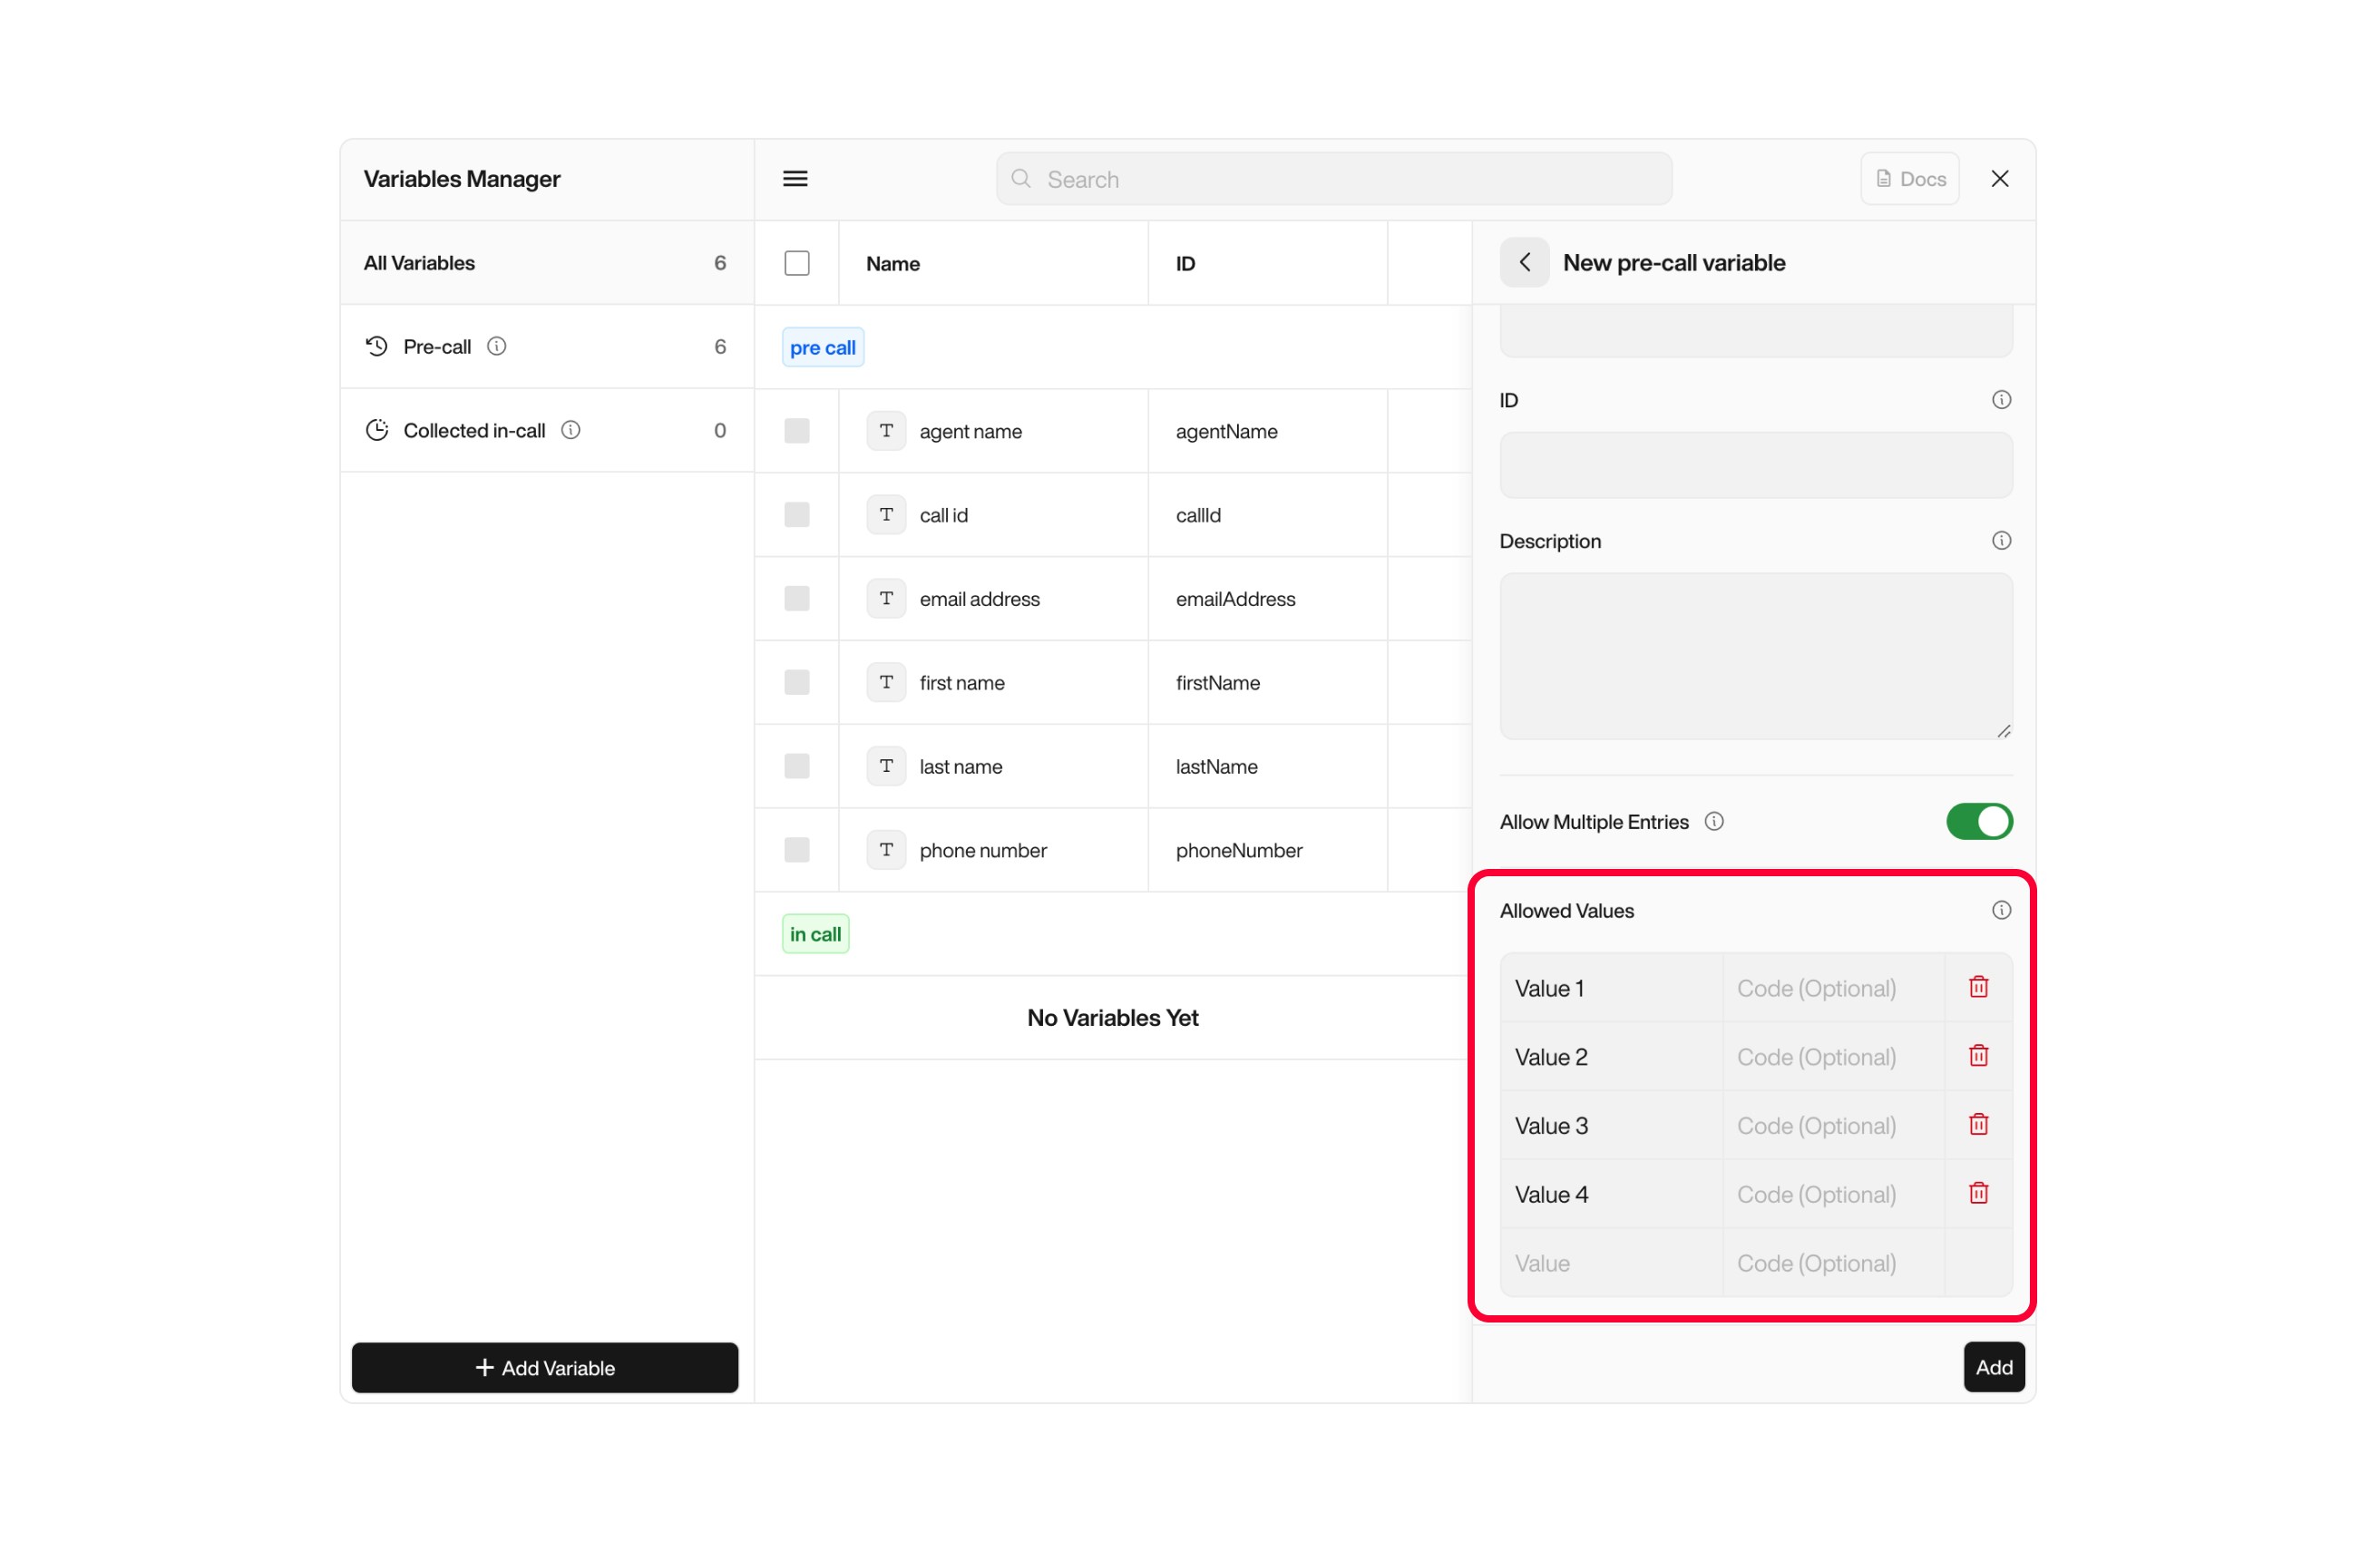
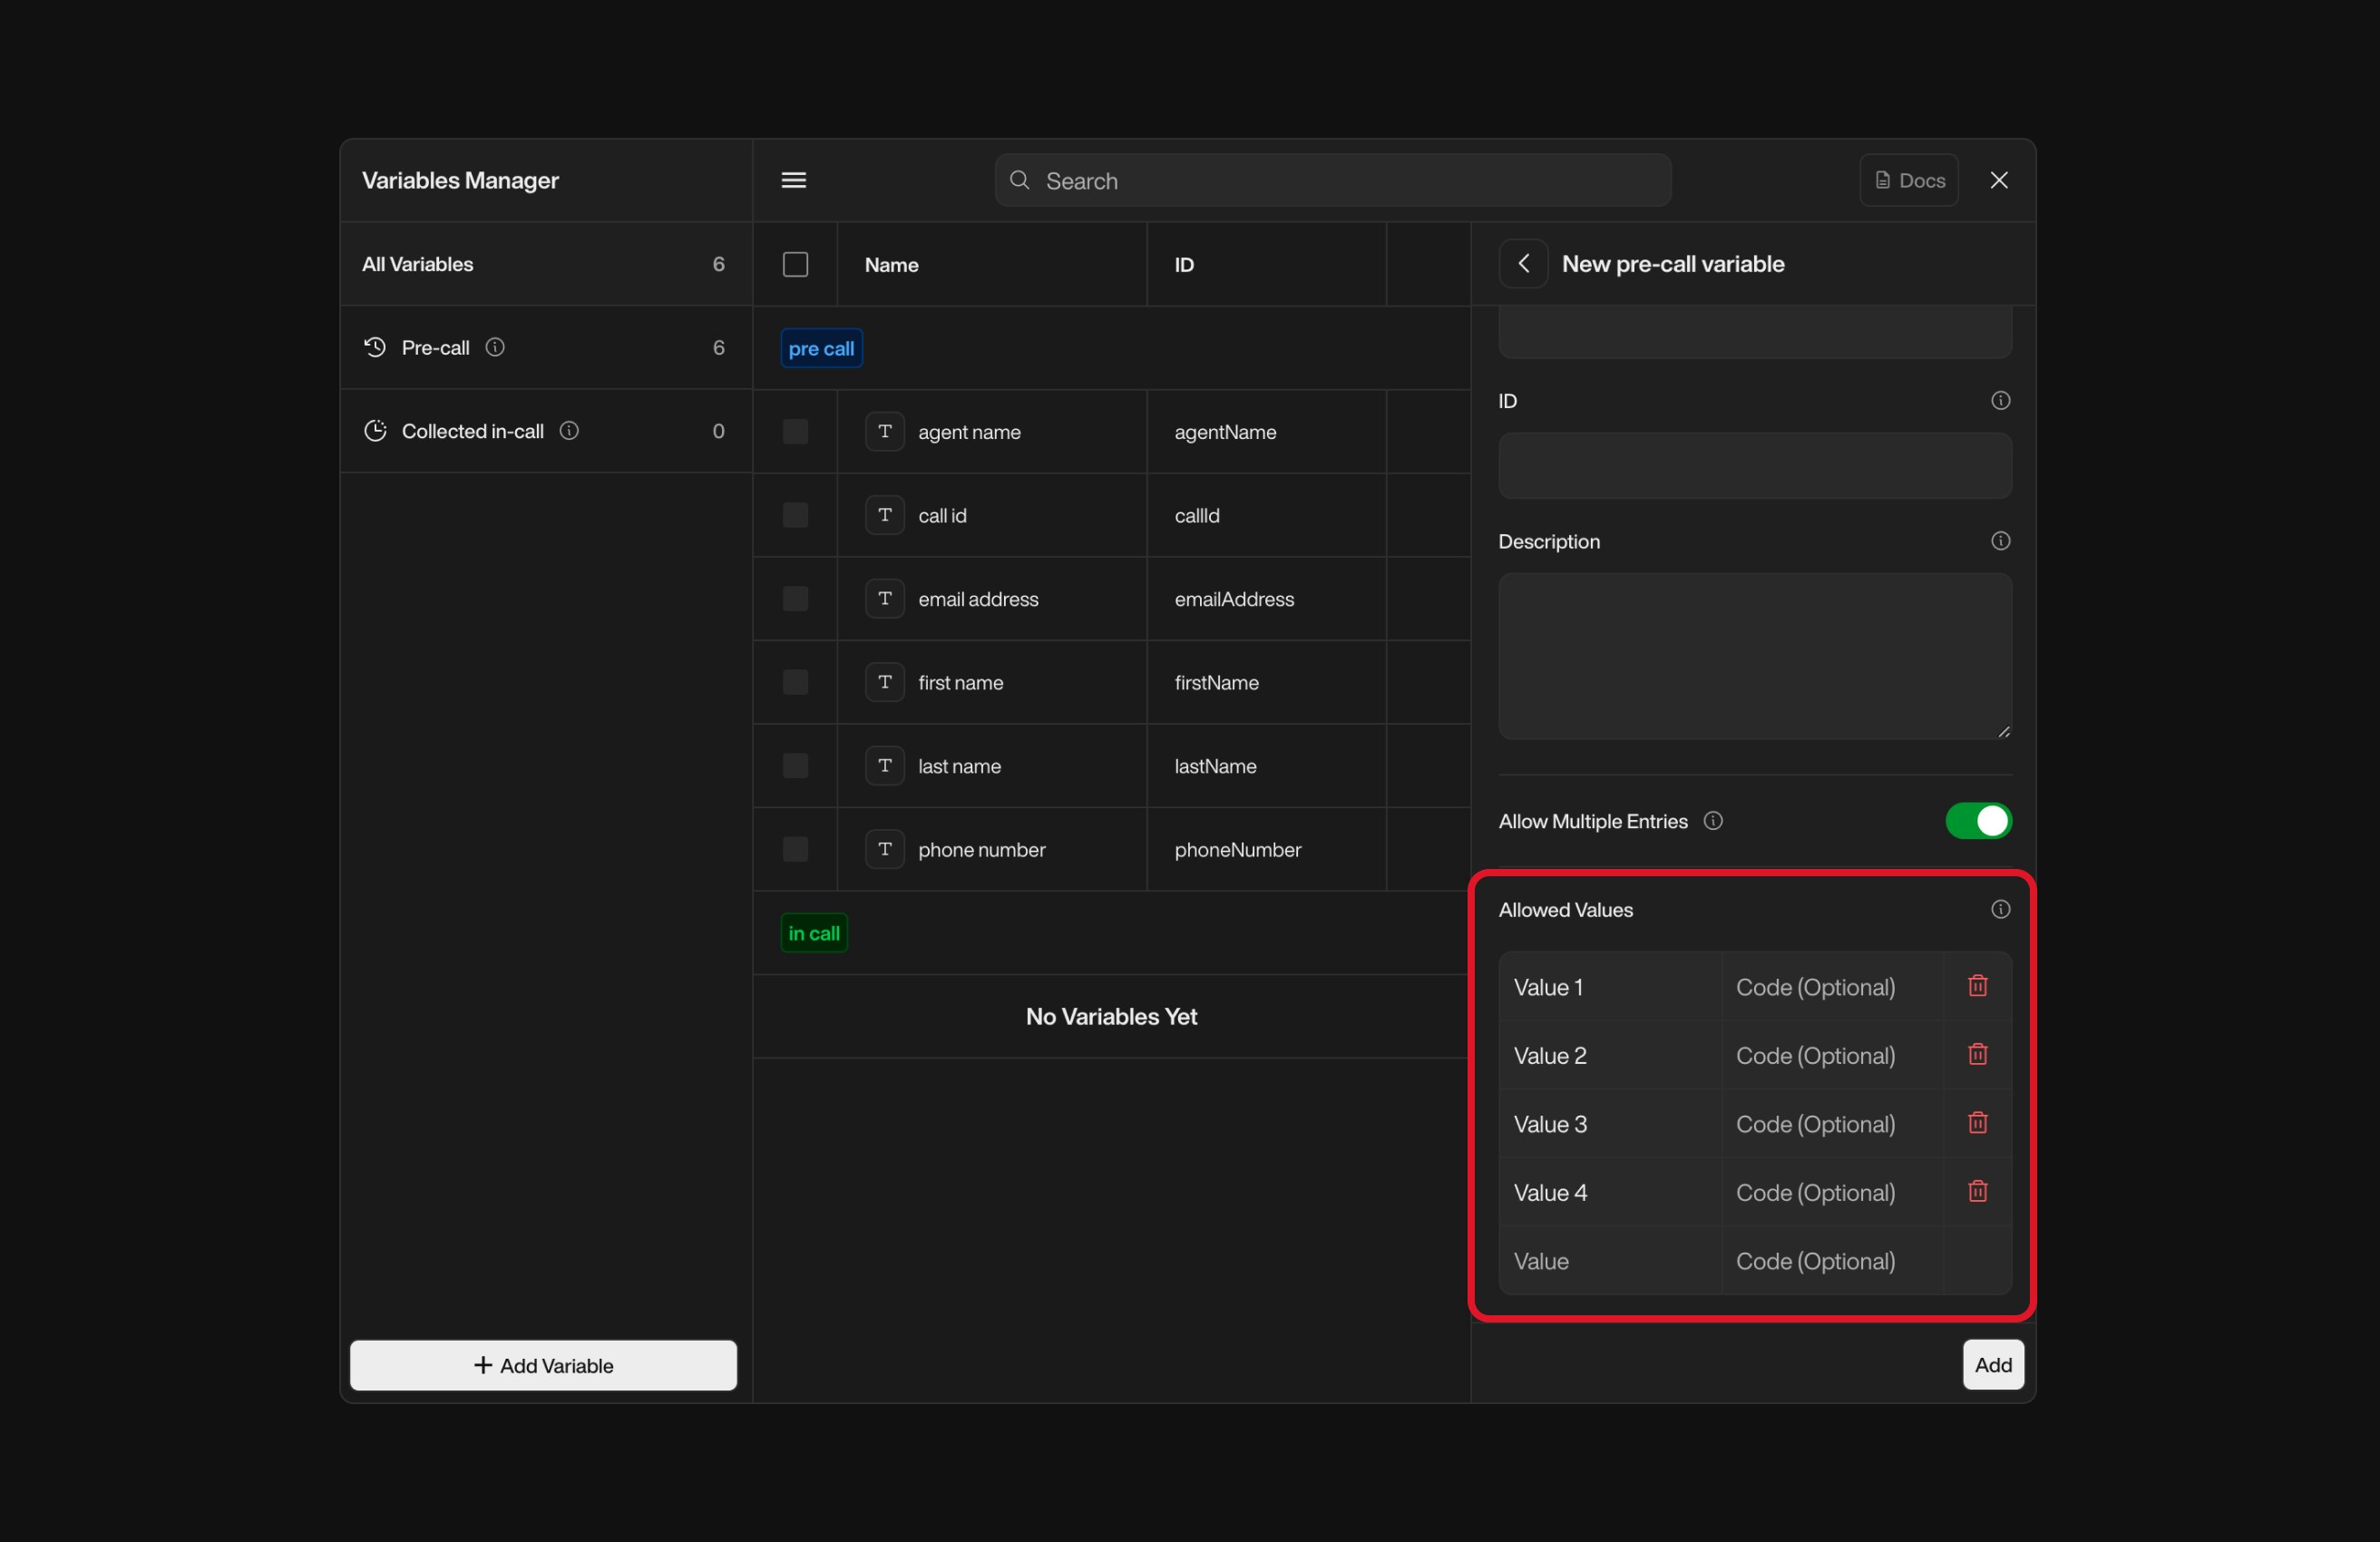
    Use this section to limit inputs to specific options.

    * Add a list of accepted values.
    * Optionally assign **backend codes** to each value.
    * Toggle **Allow Multiple Entries** if more than one value can be selected.

    <div className="block dark:hidden">
      <Frame>
        <div className="p-1">
          <img src="https://mintcdn.com/nlpearl/yjNN1PpSs3yxoZOQ/images/light_mode/variables_manager-create3.jpg?fit=max&auto=format&n=yjNN1PpSs3yxoZOQ&q=85&s=7c23ea789de73b60b04005b273361c77" alt="Send Email action interface on light mode" className="rounded-[14px]" width="2624" height="1700" data-path="images/light_mode/variables_manager-create3.jpg" />
        </div>
      </Frame>
    </div>

    <div className="hidden dark:block">
      <Frame>
        <div className="p-1">
          <img src="https://mintcdn.com/nlpearl/LRcBocnC9aRvHcb-/images/dark_mode/variables_manager-create3.jpg?fit=max&auto=format&n=LRcBocnC9aRvHcb-&q=85&s=f77518bb868b8df7dbf84ee4206558c7" alt="Send Email action interface on dark mode" className="rounded-[14px]" width="2624" height="1700" data-path="images/dark_mode/variables_manager-create3.jpg" />
        </div>
      </Frame>
    </div>

    <Info>
      This is ideal for dropdowns or structured inputs (e.g. `Issue Type`, `Region`, etc.).
    </Info>
  </Step>

  <Step title="Save the Variable">
    It will now be available anywhere in your flow where variables are supported.
  </Step>

  <Step title="Use your variables wherever applicable">
    <Info>
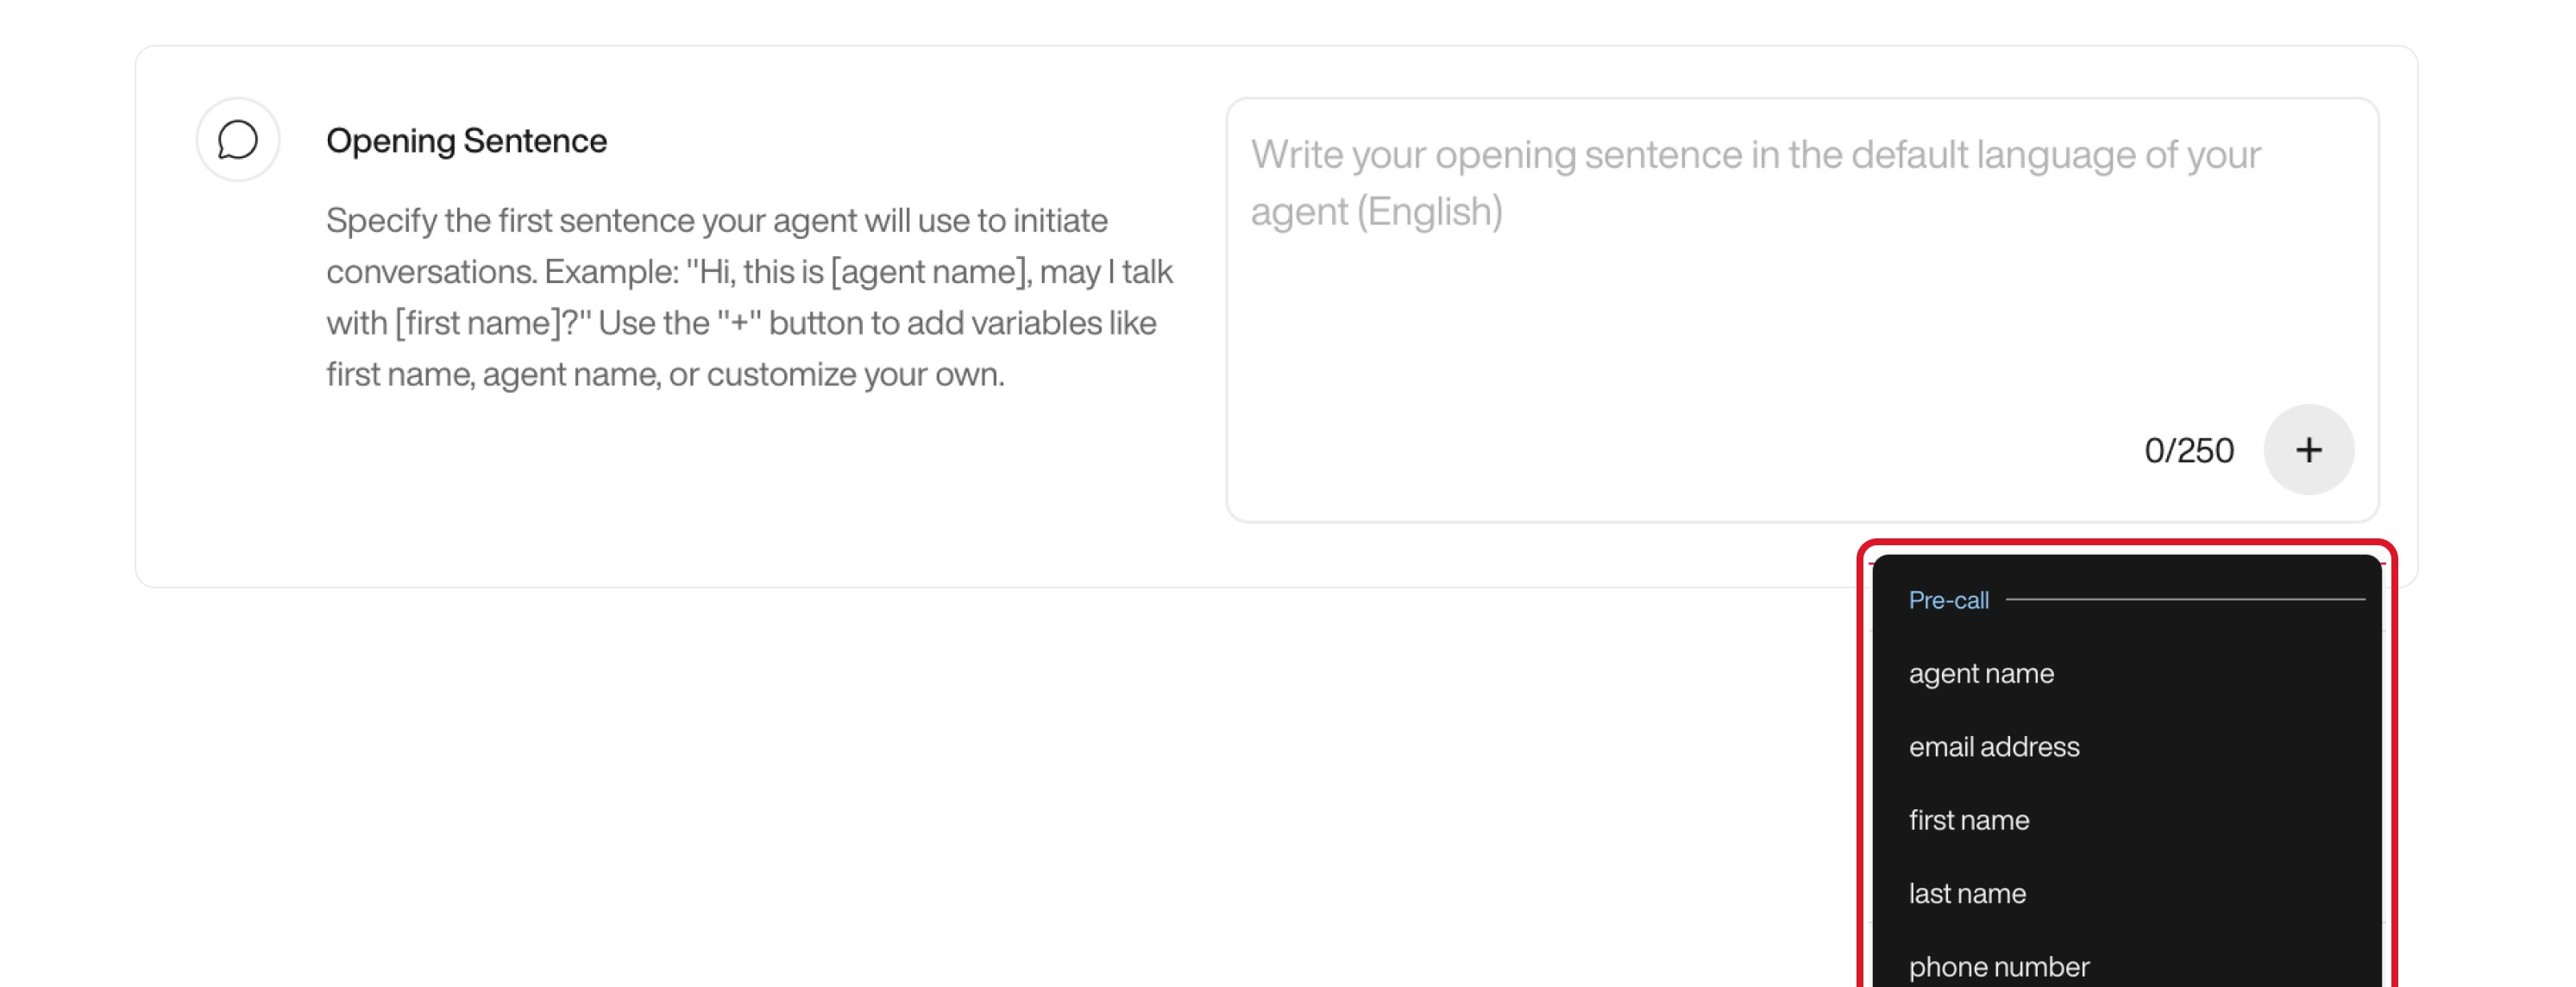
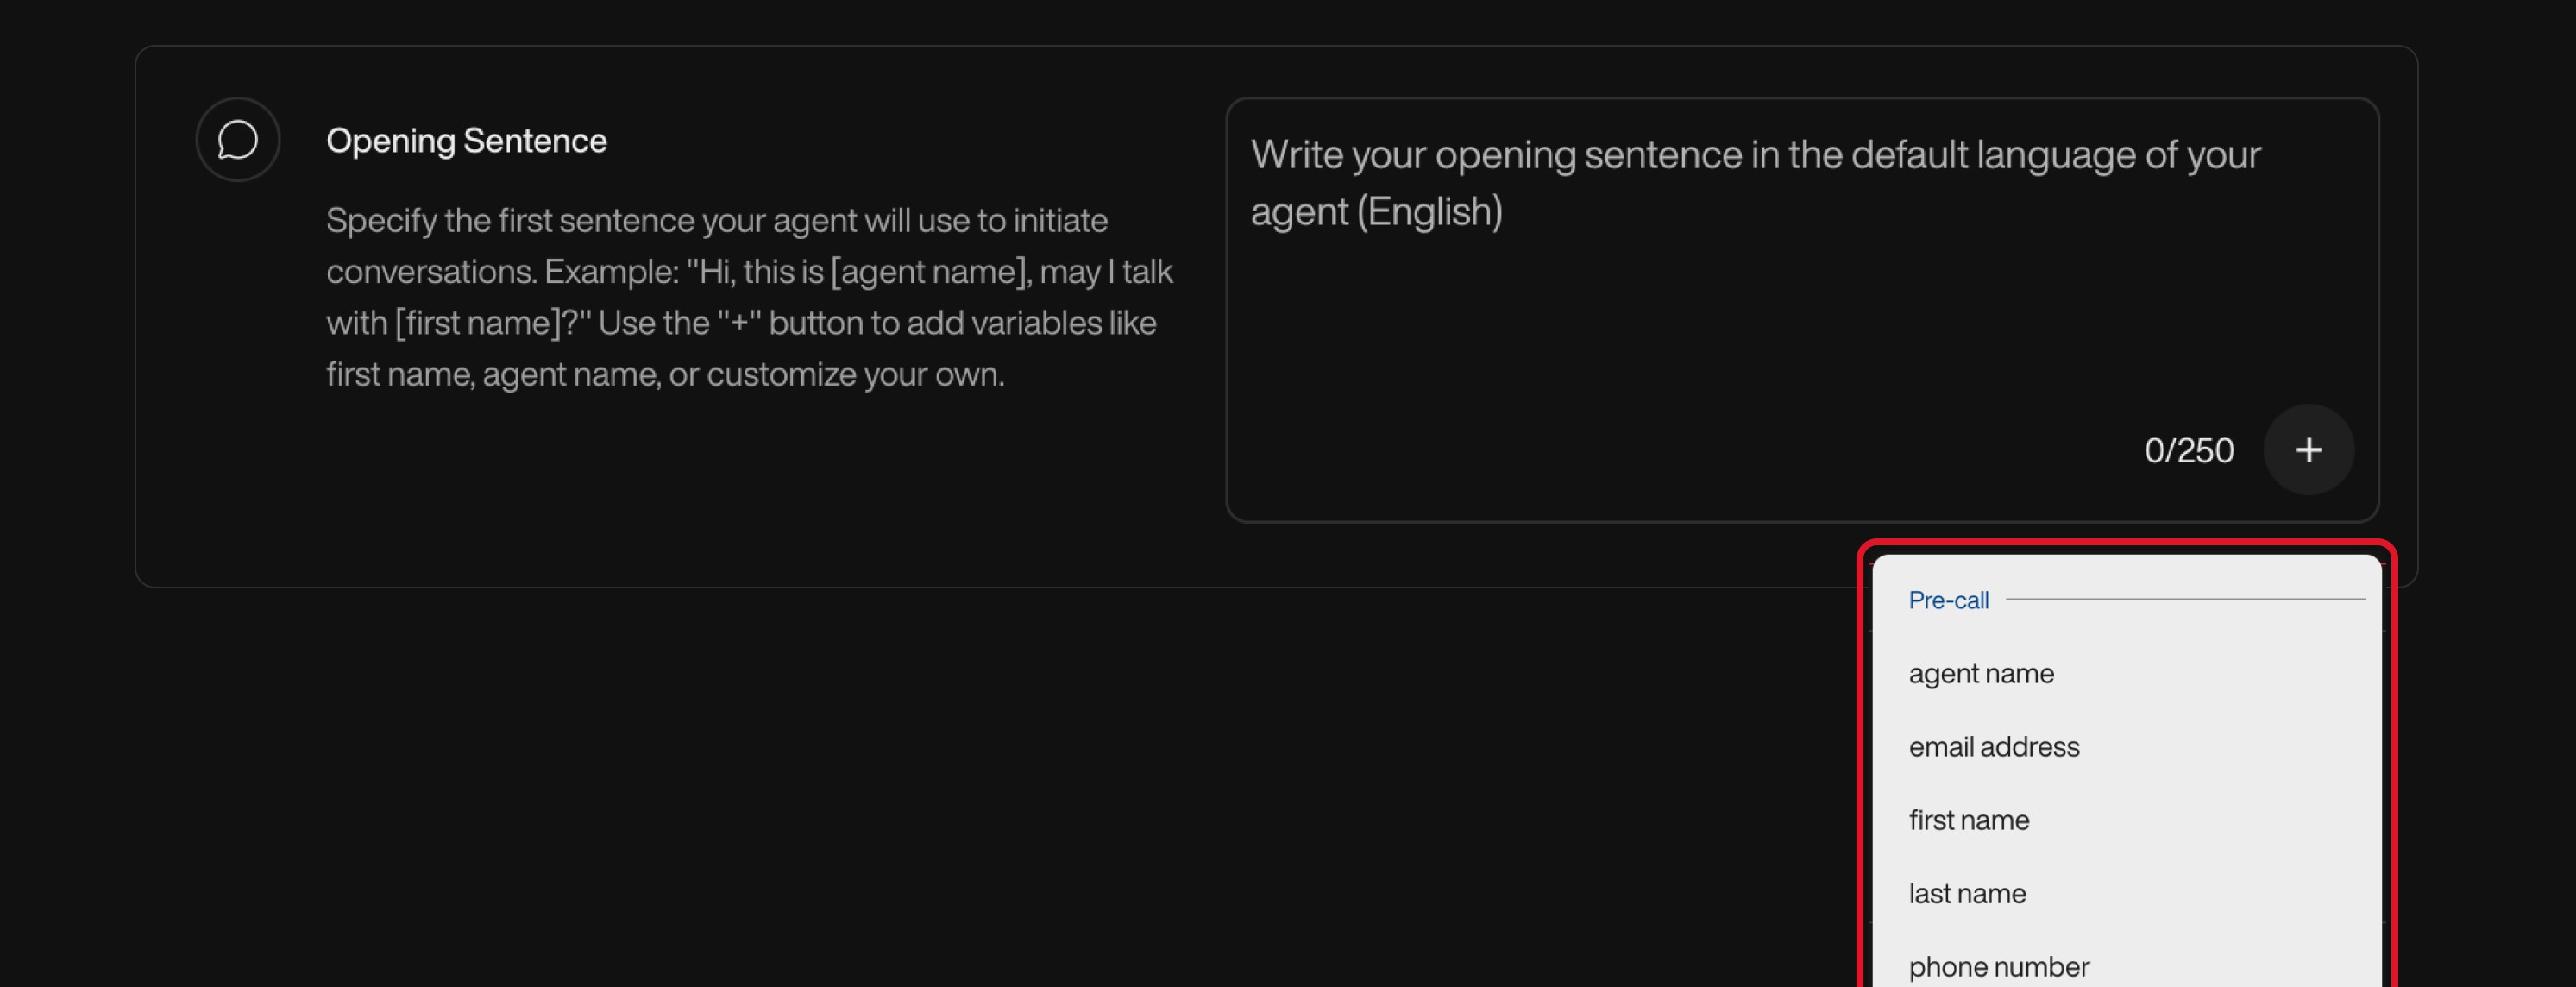
      Some fields — like the **Opening Sentence** — do not support the use of **in-call variables**.

      When testing your flows via **Test Calls**, note that **Pre-call variables are required**, while **In-call variables are optional**.

      Also, when uploading a lead file, **only the variables you've actually used** in your flows will appear in the platform’s lead mapping interface.

      In other words:\
      If you’ve created variables in the Variable Manager but haven’t used them anywhere, they **won’t show up** when setting up an outbound campaign or importing leads.
    </Info>

    <div className="block dark:hidden">
      <Frame>
        <div className="p-1">
          <img src="https://mintcdn.com/nlpearl/yjNN1PpSs3yxoZOQ/images/light_mode/variables_manager-add.jpg?fit=max&auto=format&n=yjNN1PpSs3yxoZOQ&q=85&s=2fc99df7d1a460da3d74f70e5f2986c8" alt="Send Email action interface on light mode" className="rounded-[14px]" width="2986" height="1144" data-path="images/light_mode/variables_manager-add.jpg" />
        </div>
      </Frame>
    </div>

    <div className="hidden dark:block">
      <Frame>
        <div className="p-1">
          <img src="https://mintcdn.com/nlpearl/LRcBocnC9aRvHcb-/images/dark_mode/variables_manager-add.jpg?fit=max&auto=format&n=LRcBocnC9aRvHcb-&q=85&s=47afbd84175239fbdef89b4d00bab509" alt="Send Email action interface on dark mode" className="rounded-[14px]" width="2986" height="1144" data-path="images/dark_mode/variables_manager-add.jpg" />
        </div>
      </Frame>
    </div>

    <br />
  </Step>
</Steps>

<Card icon="circle-info" iconType="light">
  <b>
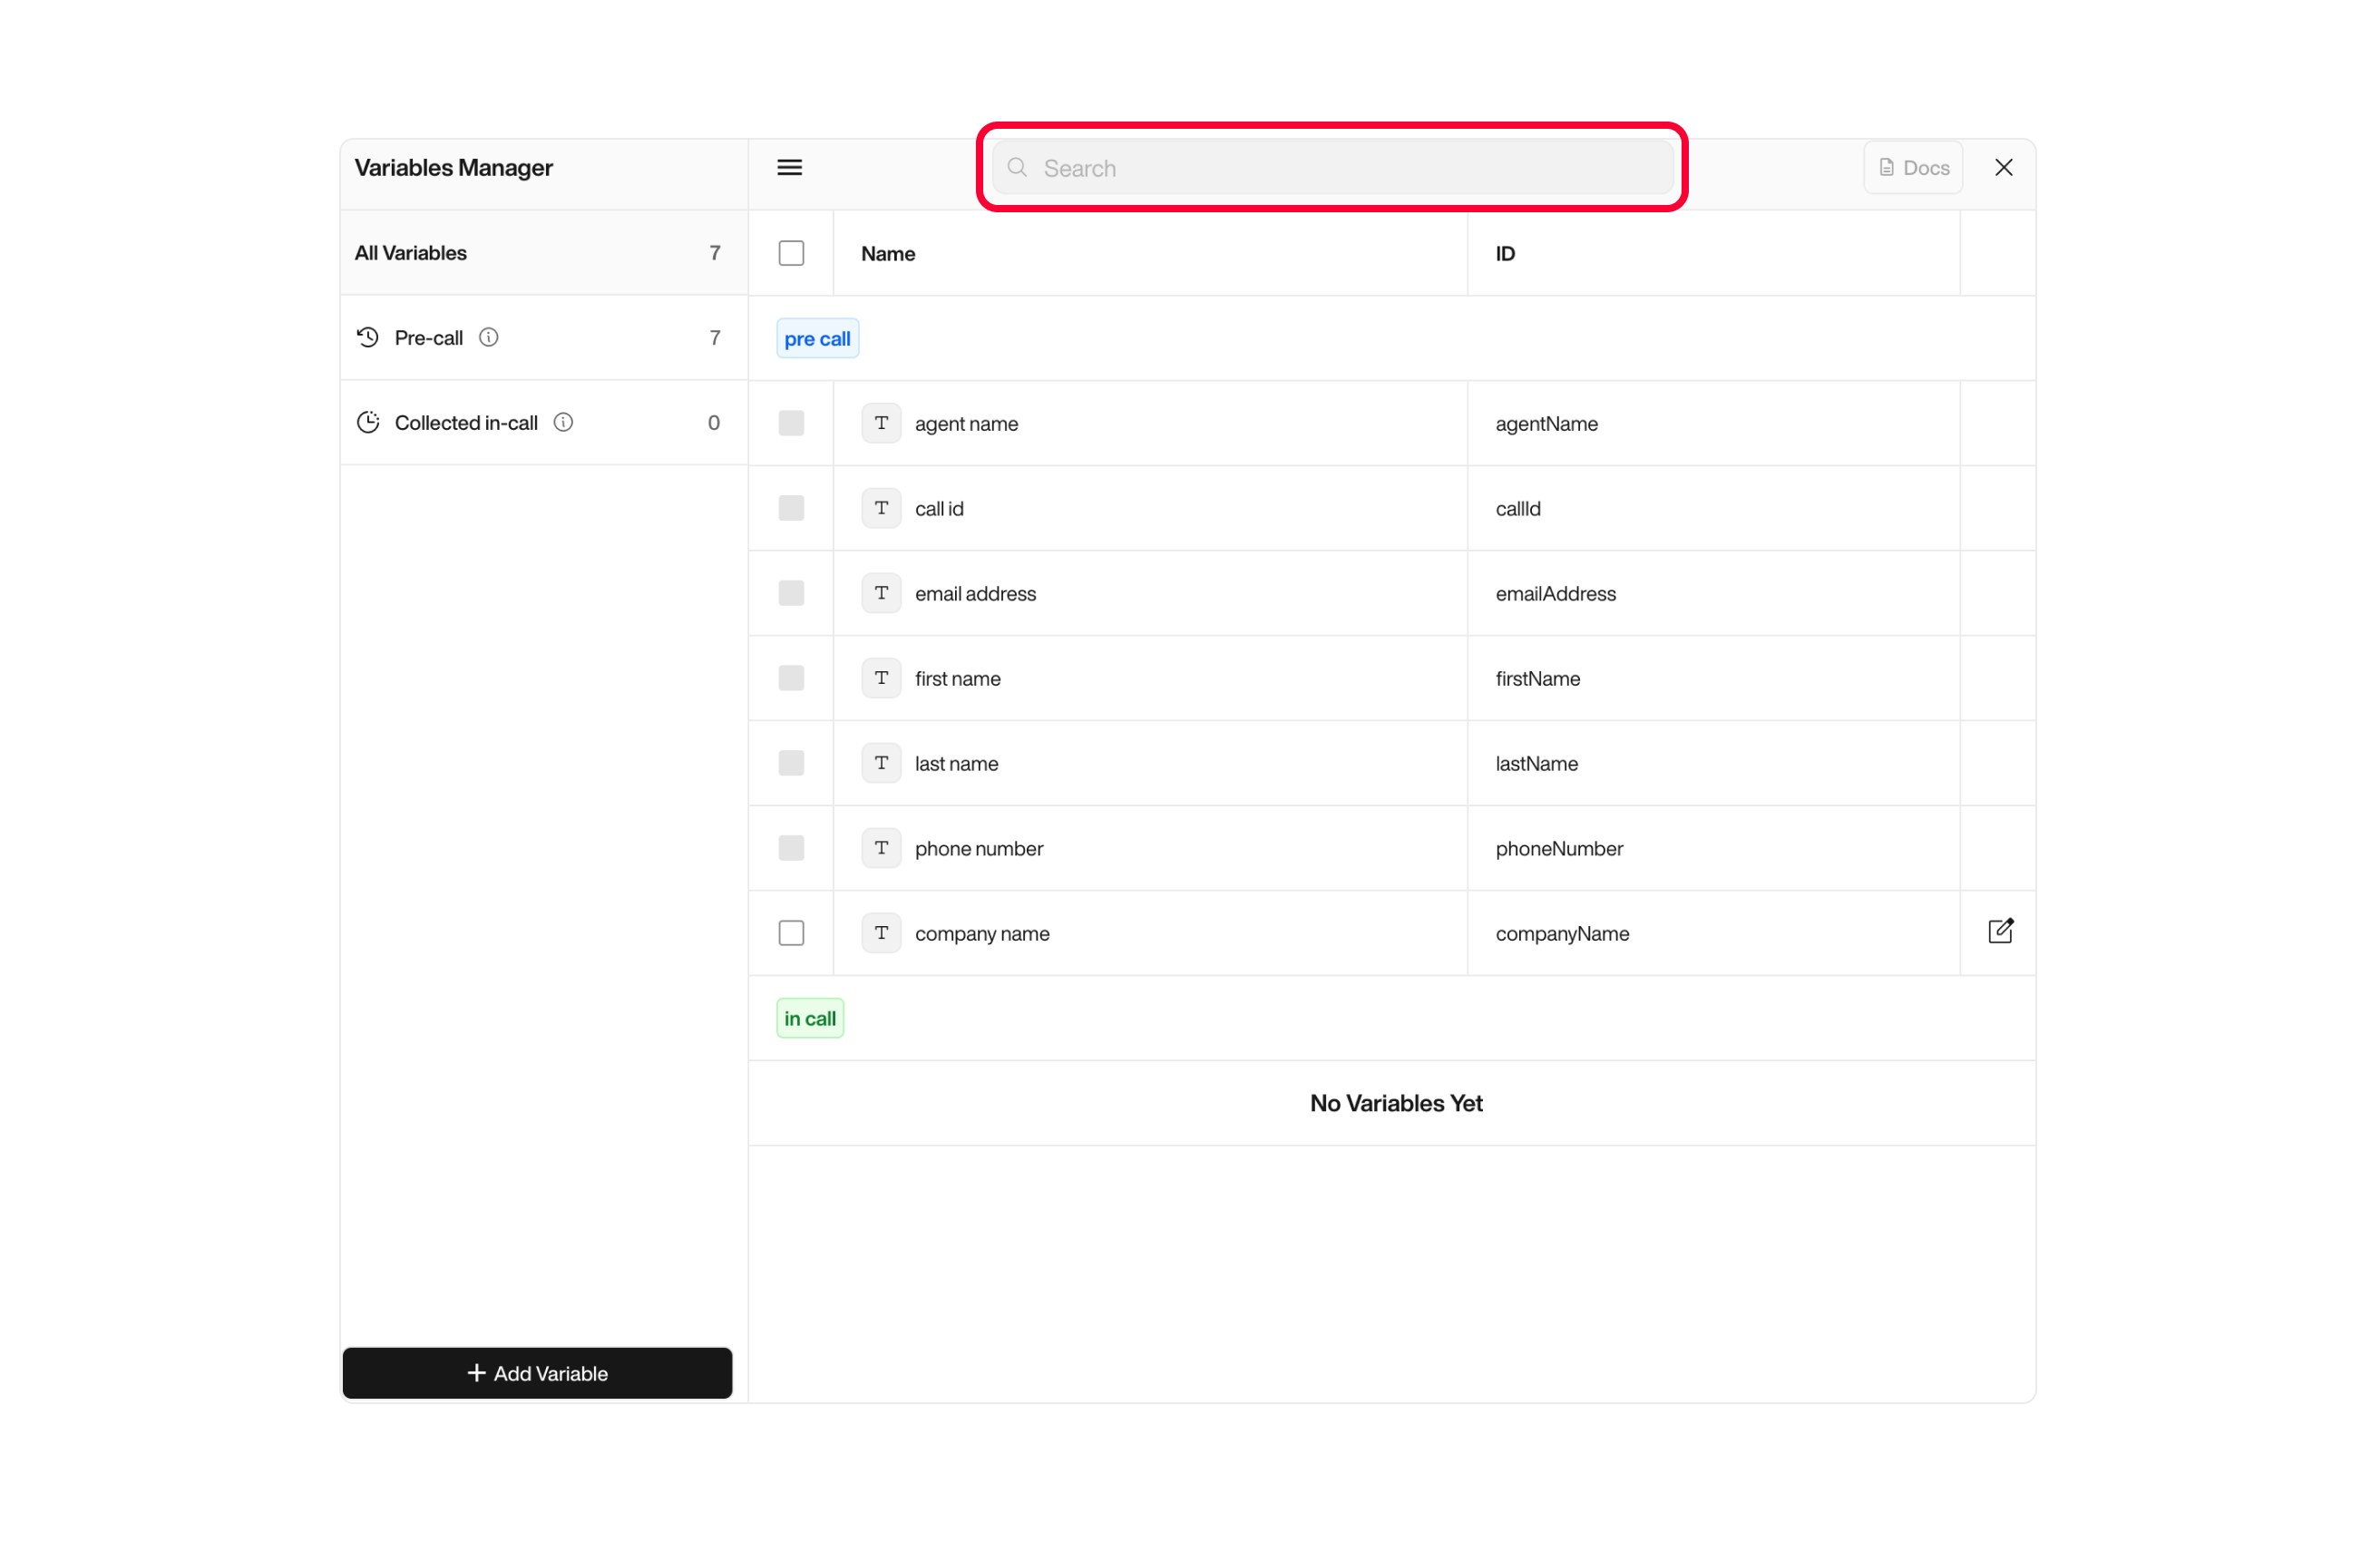
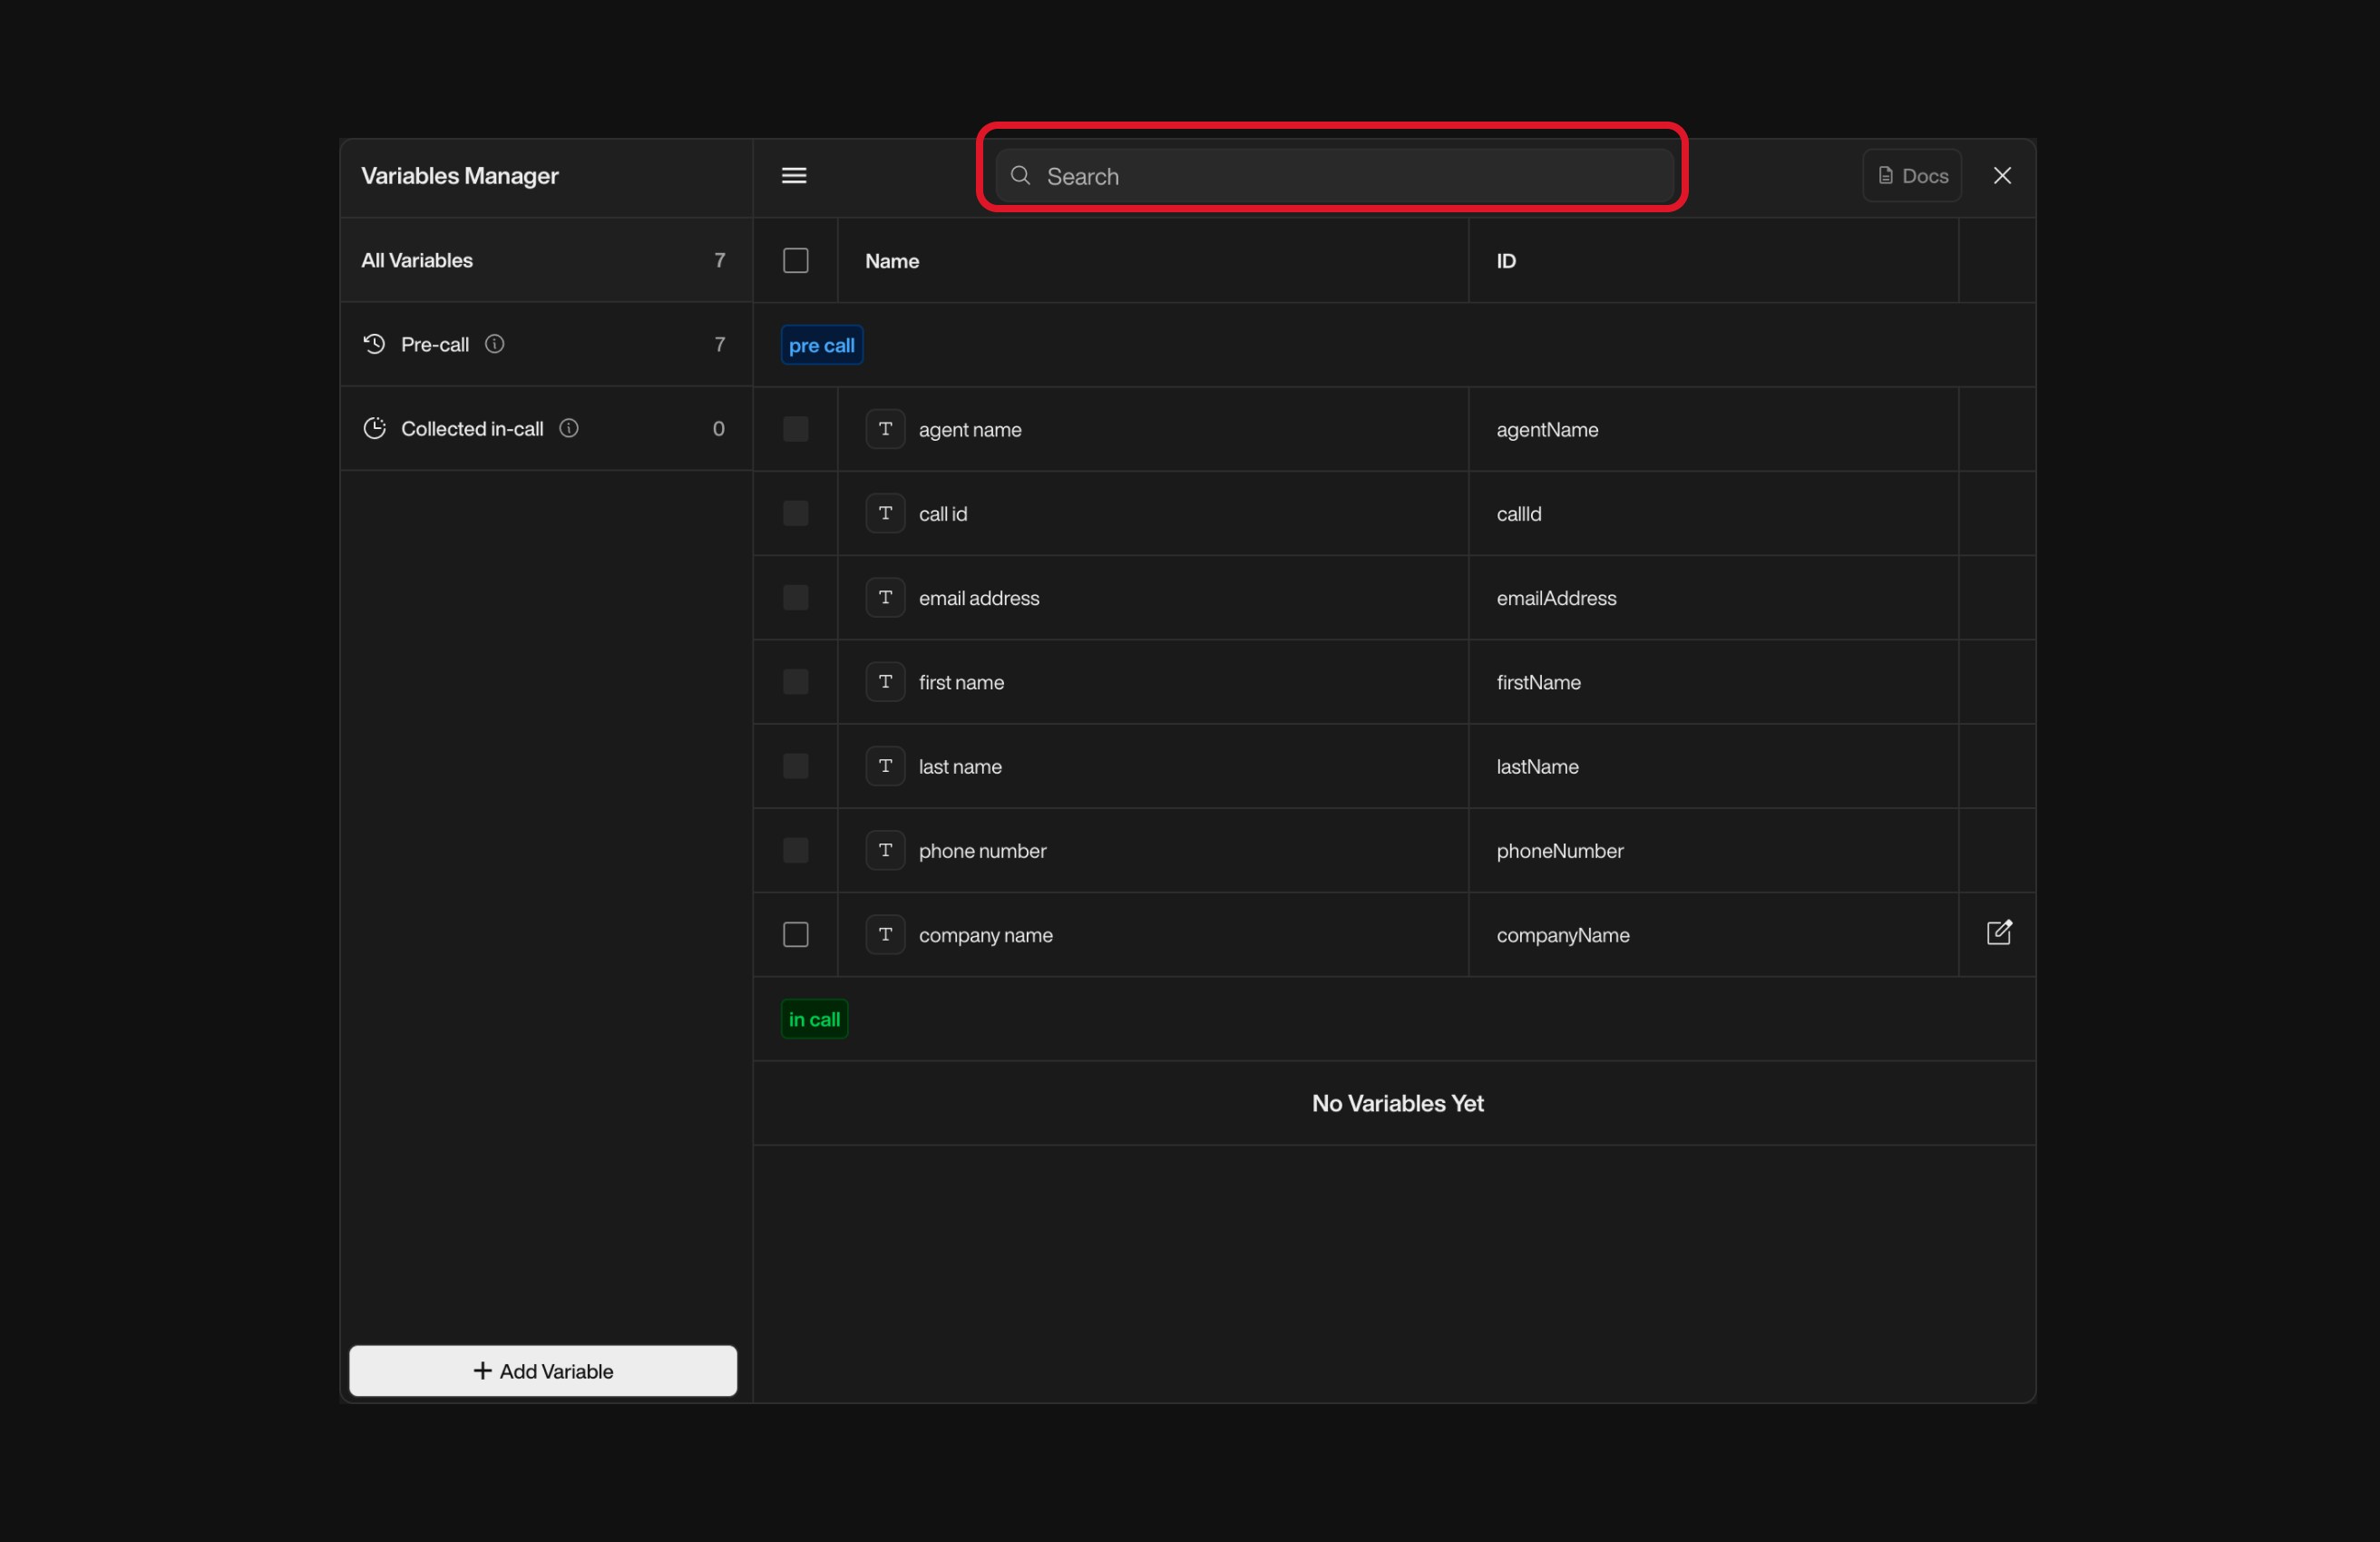
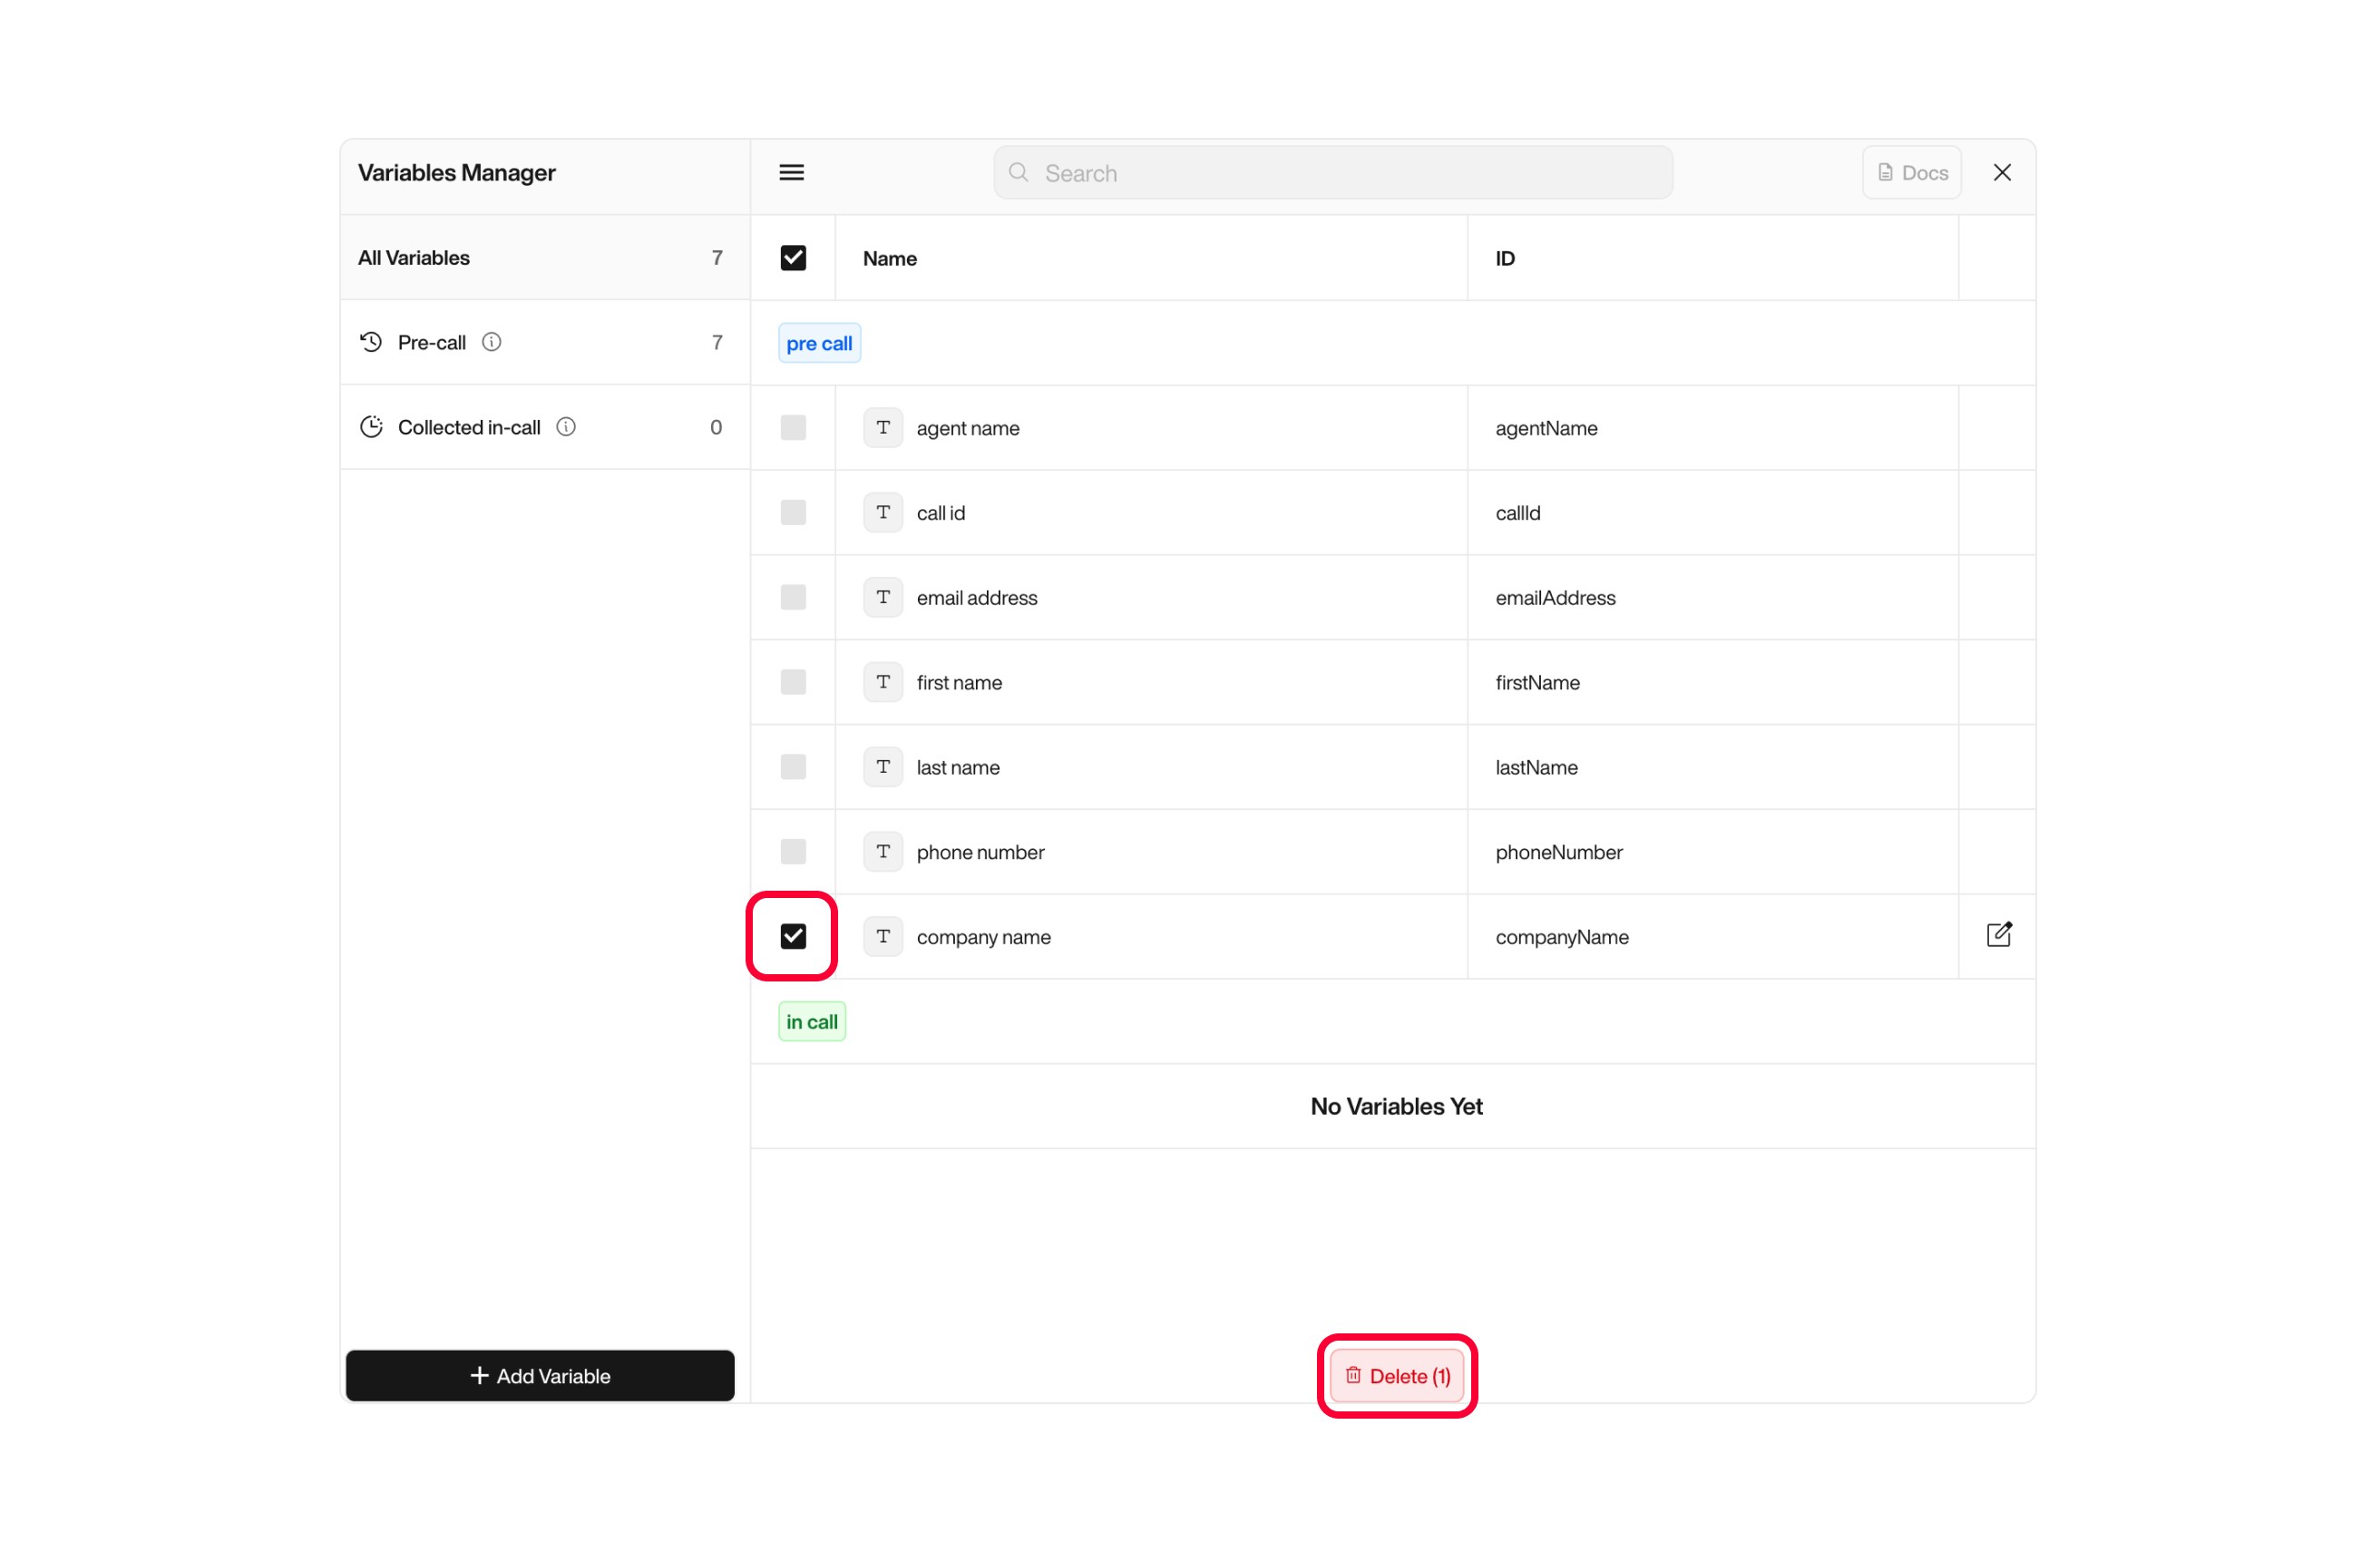
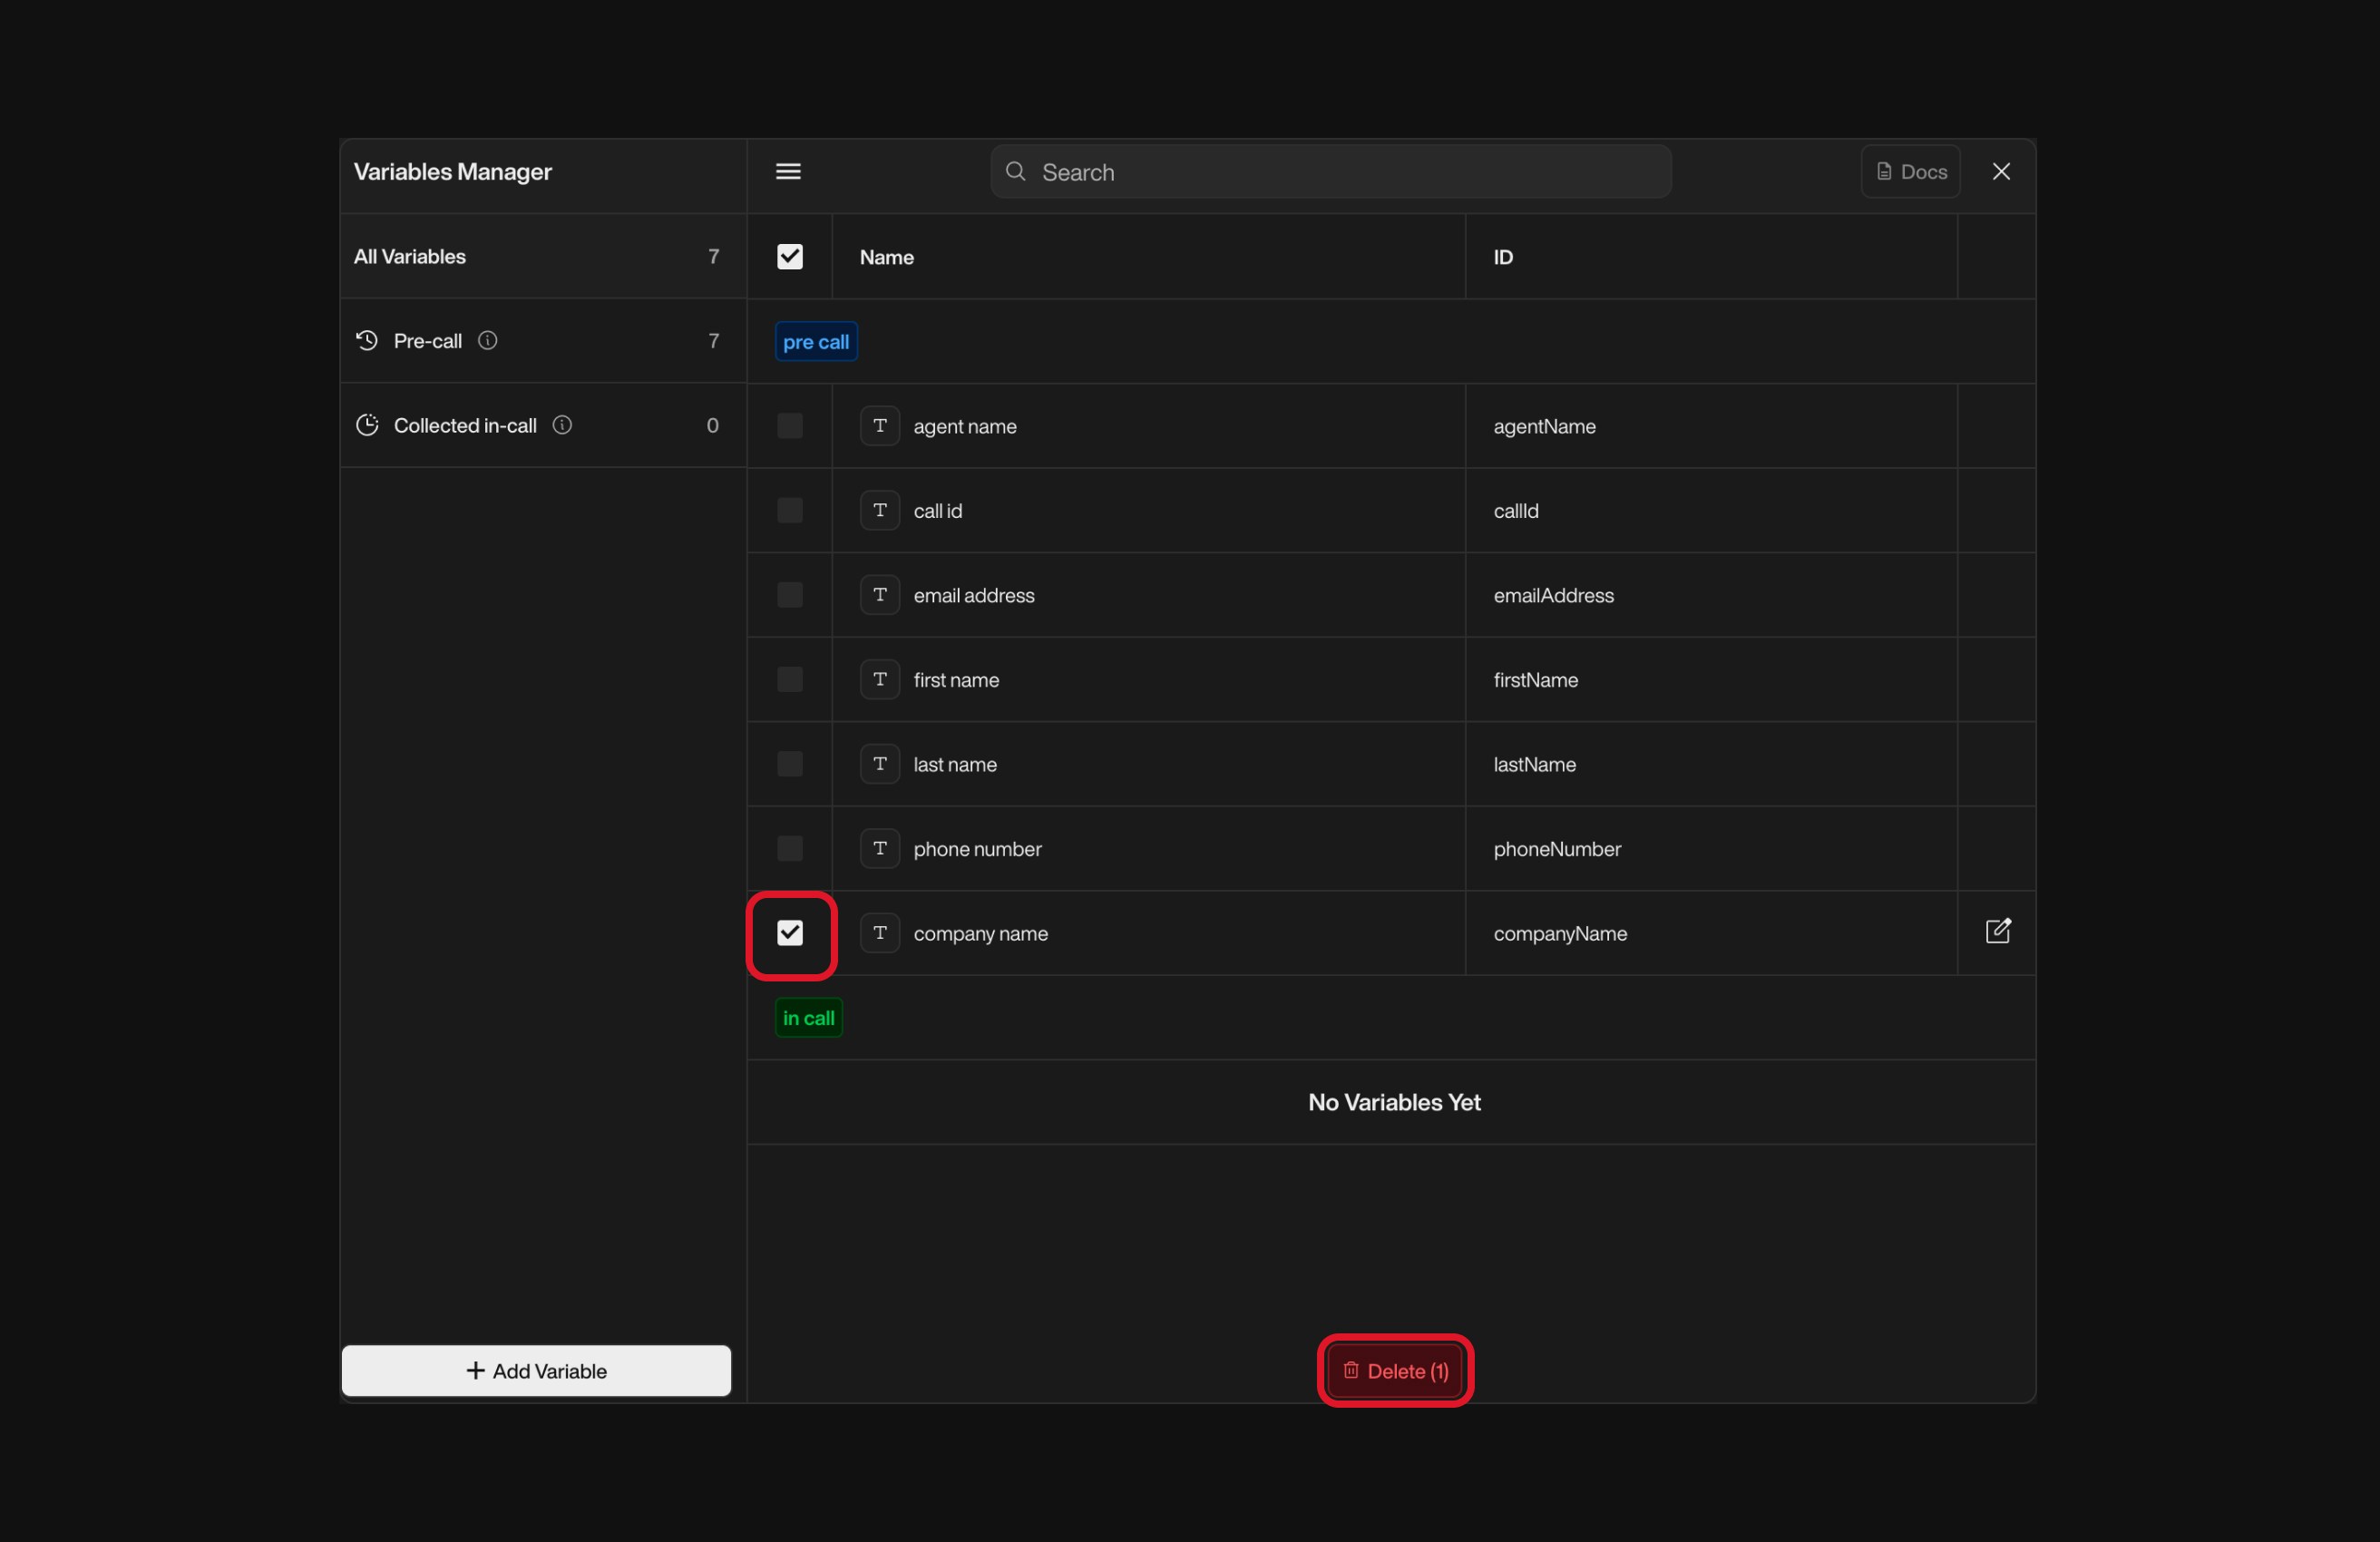
Search, Edit or Delete a Variable</b>

  **To search a variable:**

  * Open the **Variable Manager**.
  * Click on the search bar.
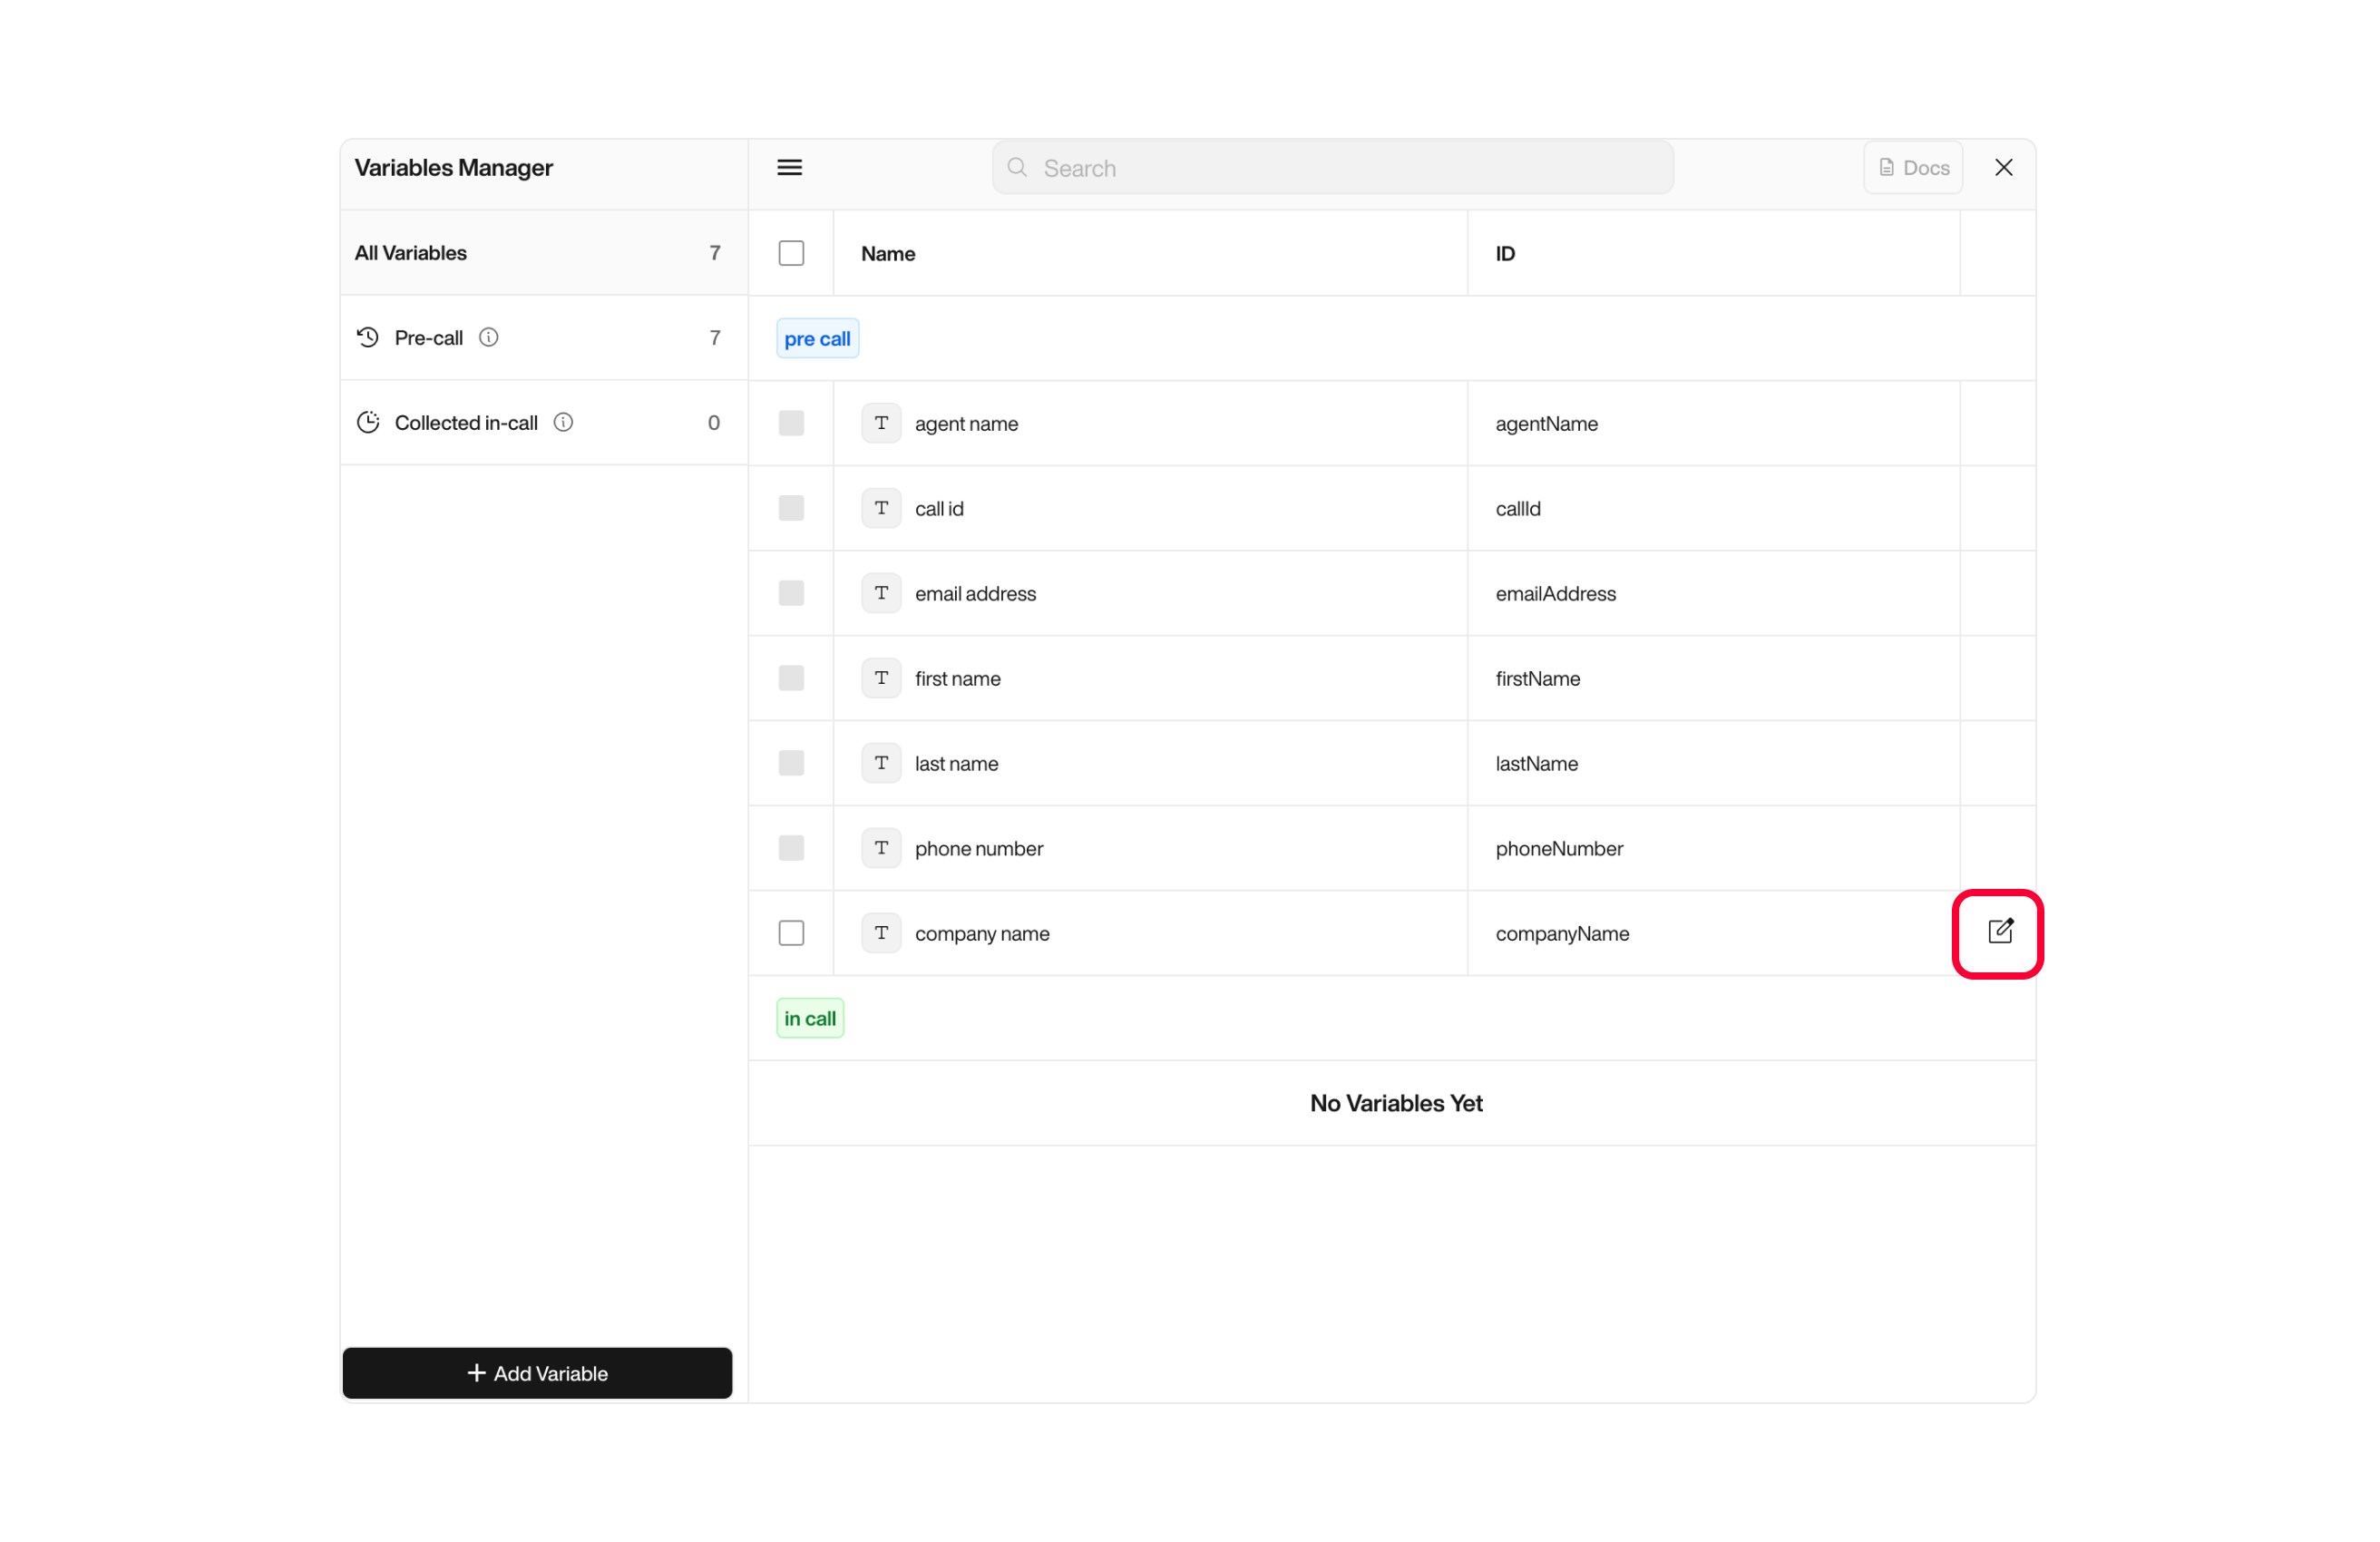
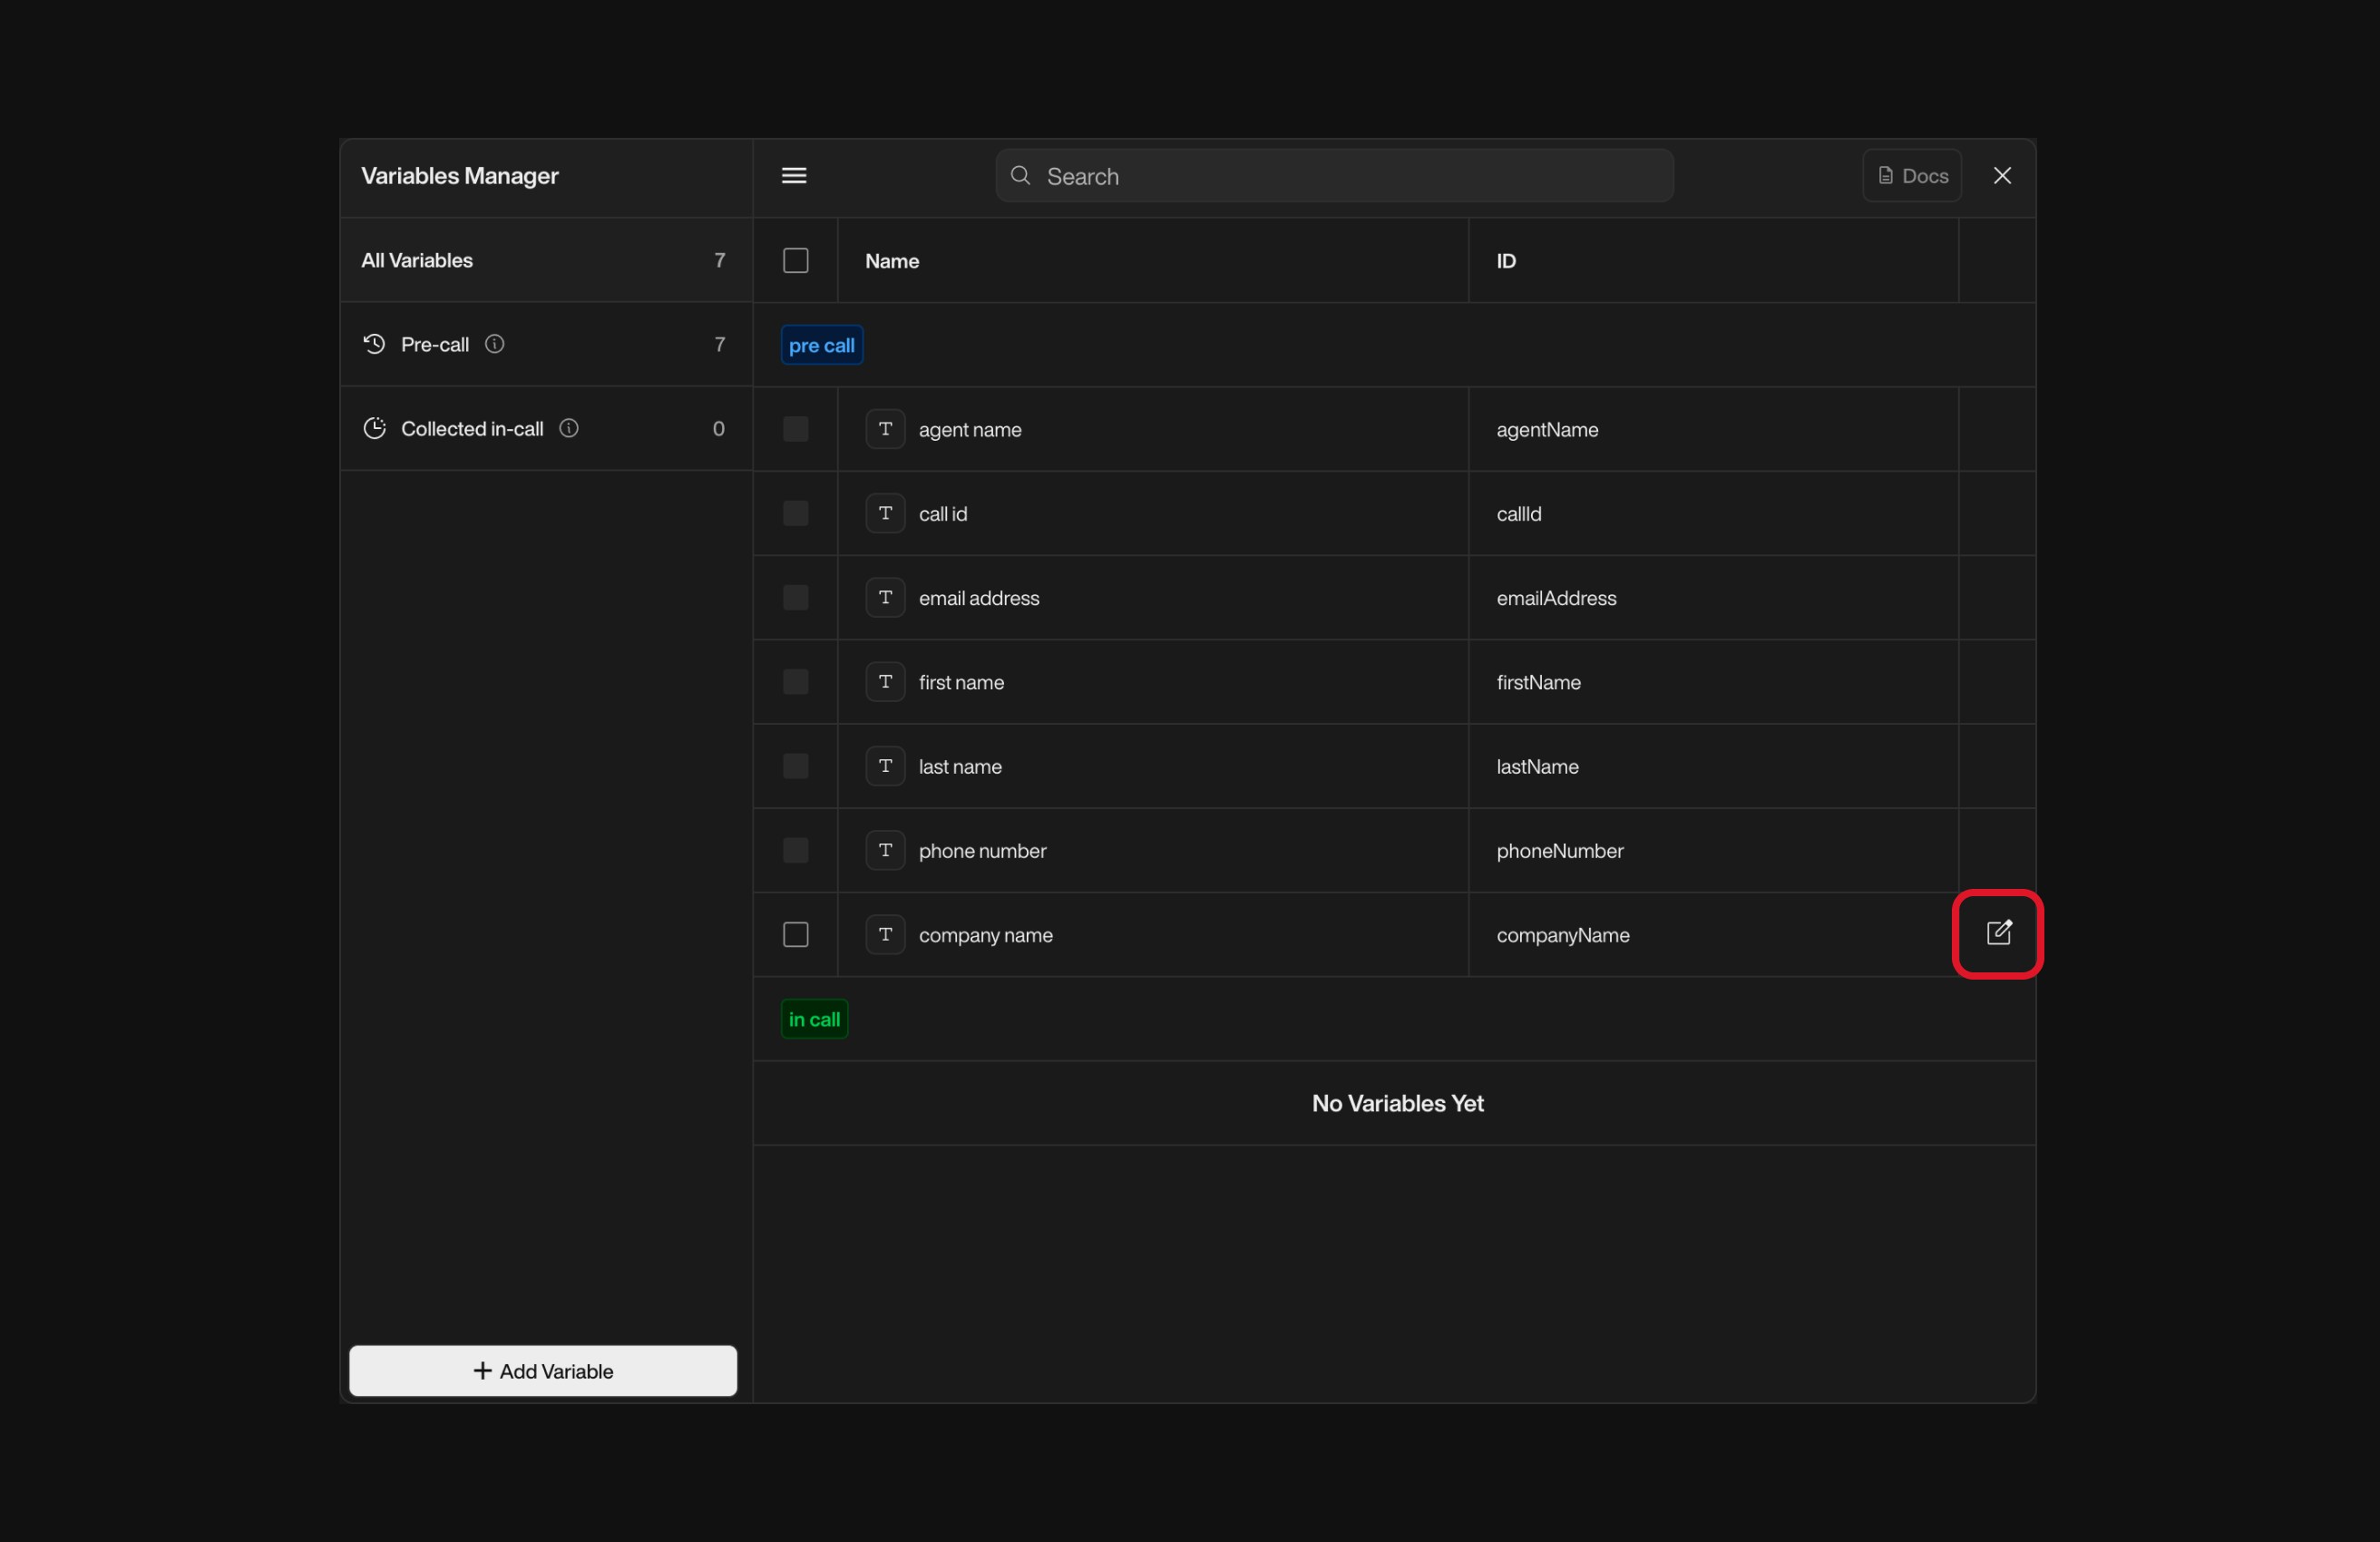
  <div className="block dark:hidden">
    <Frame>
      <div className="p-1">
        <img src="https://mintcdn.com/nlpearl/yjNN1PpSs3yxoZOQ/images/light_mode/variables_manager-search.jpg?fit=max&auto=format&n=yjNN1PpSs3yxoZOQ&q=85&s=2249d05e9b6b10359da9088b90b9b1fc" alt="Send Email action interface on light mode" className="rounded-[14px]" width="2624" height="1700" data-path="images/light_mode/variables_manager-search.jpg" />
      </div>
    </Frame>
  </div>

  <div className="hidden dark:block">
    <Frame>
      <div className="p-1">
        <img src="https://mintcdn.com/nlpearl/LRcBocnC9aRvHcb-/images/dark_mode/variables_manager-search.jpg?fit=max&auto=format&n=LRcBocnC9aRvHcb-&q=85&s=f0e46d2bb8875fa40016970fc9484c09" alt="Send Email action interface on dark mode" className="rounded-[14px]" width="2624" height="1700" data-path="images/dark_mode/variables_manager-search.jpg" />
      </div>
    </Frame>
  </div>

  <br />

  **To edit a variable:**

  * Open the **Variable Manager**.
  * Click on the variable name to open its edit form.

  <div className="block dark:hidden">
    <Frame>
      <div className="p-1">
        <img src="https://mintcdn.com/nlpearl/yjNN1PpSs3yxoZOQ/images/light_mode/variables_manager-edit.jpg?fit=max&auto=format&n=yjNN1PpSs3yxoZOQ&q=85&s=f24680243a513ea1529ba20cb6340018" alt="Send Email action interface on light mode" className="rounded-[14px]" width="2624" height="1700" data-path="images/light_mode/variables_manager-edit.jpg" />
      </div>
    </Frame>
  </div>

  <div className="hidden dark:block">
    <Frame>
      <div className="p-1">
        <img src="https://mintcdn.com/nlpearl/LRcBocnC9aRvHcb-/images/dark_mode/variables_manager-edit.jpg?fit=max&auto=format&n=LRcBocnC9aRvHcb-&q=85&s=1068cce4dedd222f2e391ab54dbf5c3d" alt="Send Email action interface on dark mode" className="rounded-[14px]" width="2624" height="1700" data-path="images/dark_mode/variables_manager-edit.jpg" />
      </div>
    </Frame>
  </div>

  <br />

  **To delete a variable:**

  * Click the **Trash icon** next to the variable.
  * Confirm the deletion in the dialog box.

  <Warning>
    Deleting a variable will remove it from all flows where it's used. Proceed with caution!
  </Warning>

  <div className="block dark:hidden">
    <Frame>
      <div className="p-1">
        <img src="https://mintcdn.com/nlpearl/yjNN1PpSs3yxoZOQ/images/light_mode/variables_manager-delete.jpg?fit=max&auto=format&n=yjNN1PpSs3yxoZOQ&q=85&s=78d0923de33f9f440e9ff21d7a31e8cb" alt="Send Email action interface on light mode" className="rounded-[14px]" width="2624" height="1700" data-path="images/light_mode/variables_manager-delete.jpg" />
      </div>
    </Frame>
  </div>

  <div className="hidden dark:block">
    <Frame>
      <div className="p-1">
        <img src="https://mintcdn.com/nlpearl/LRcBocnC9aRvHcb-/images/dark_mode/variables_manager-delete.jpg?fit=max&auto=format&n=LRcBocnC9aRvHcb-&q=85&s=44bc6600124133caff87bc867aae6ebd" alt="Send Email action interface on dark mode" className="rounded-[14px]" width="2624" height="1700" data-path="images/dark_mode/variables_manager-delete.jpg" />
      </div>
    </Frame>
  </div>
</Card>

***

## Using Variables in Conversations

<span style={{ fontSize: '18px', fontWeight: 600, color: 'white' }}>
  Collecting User Input into Variables
</span>

* **In Simple Mode**: Simply add a variable to the question step; this will automatically store the user's response into that variable.
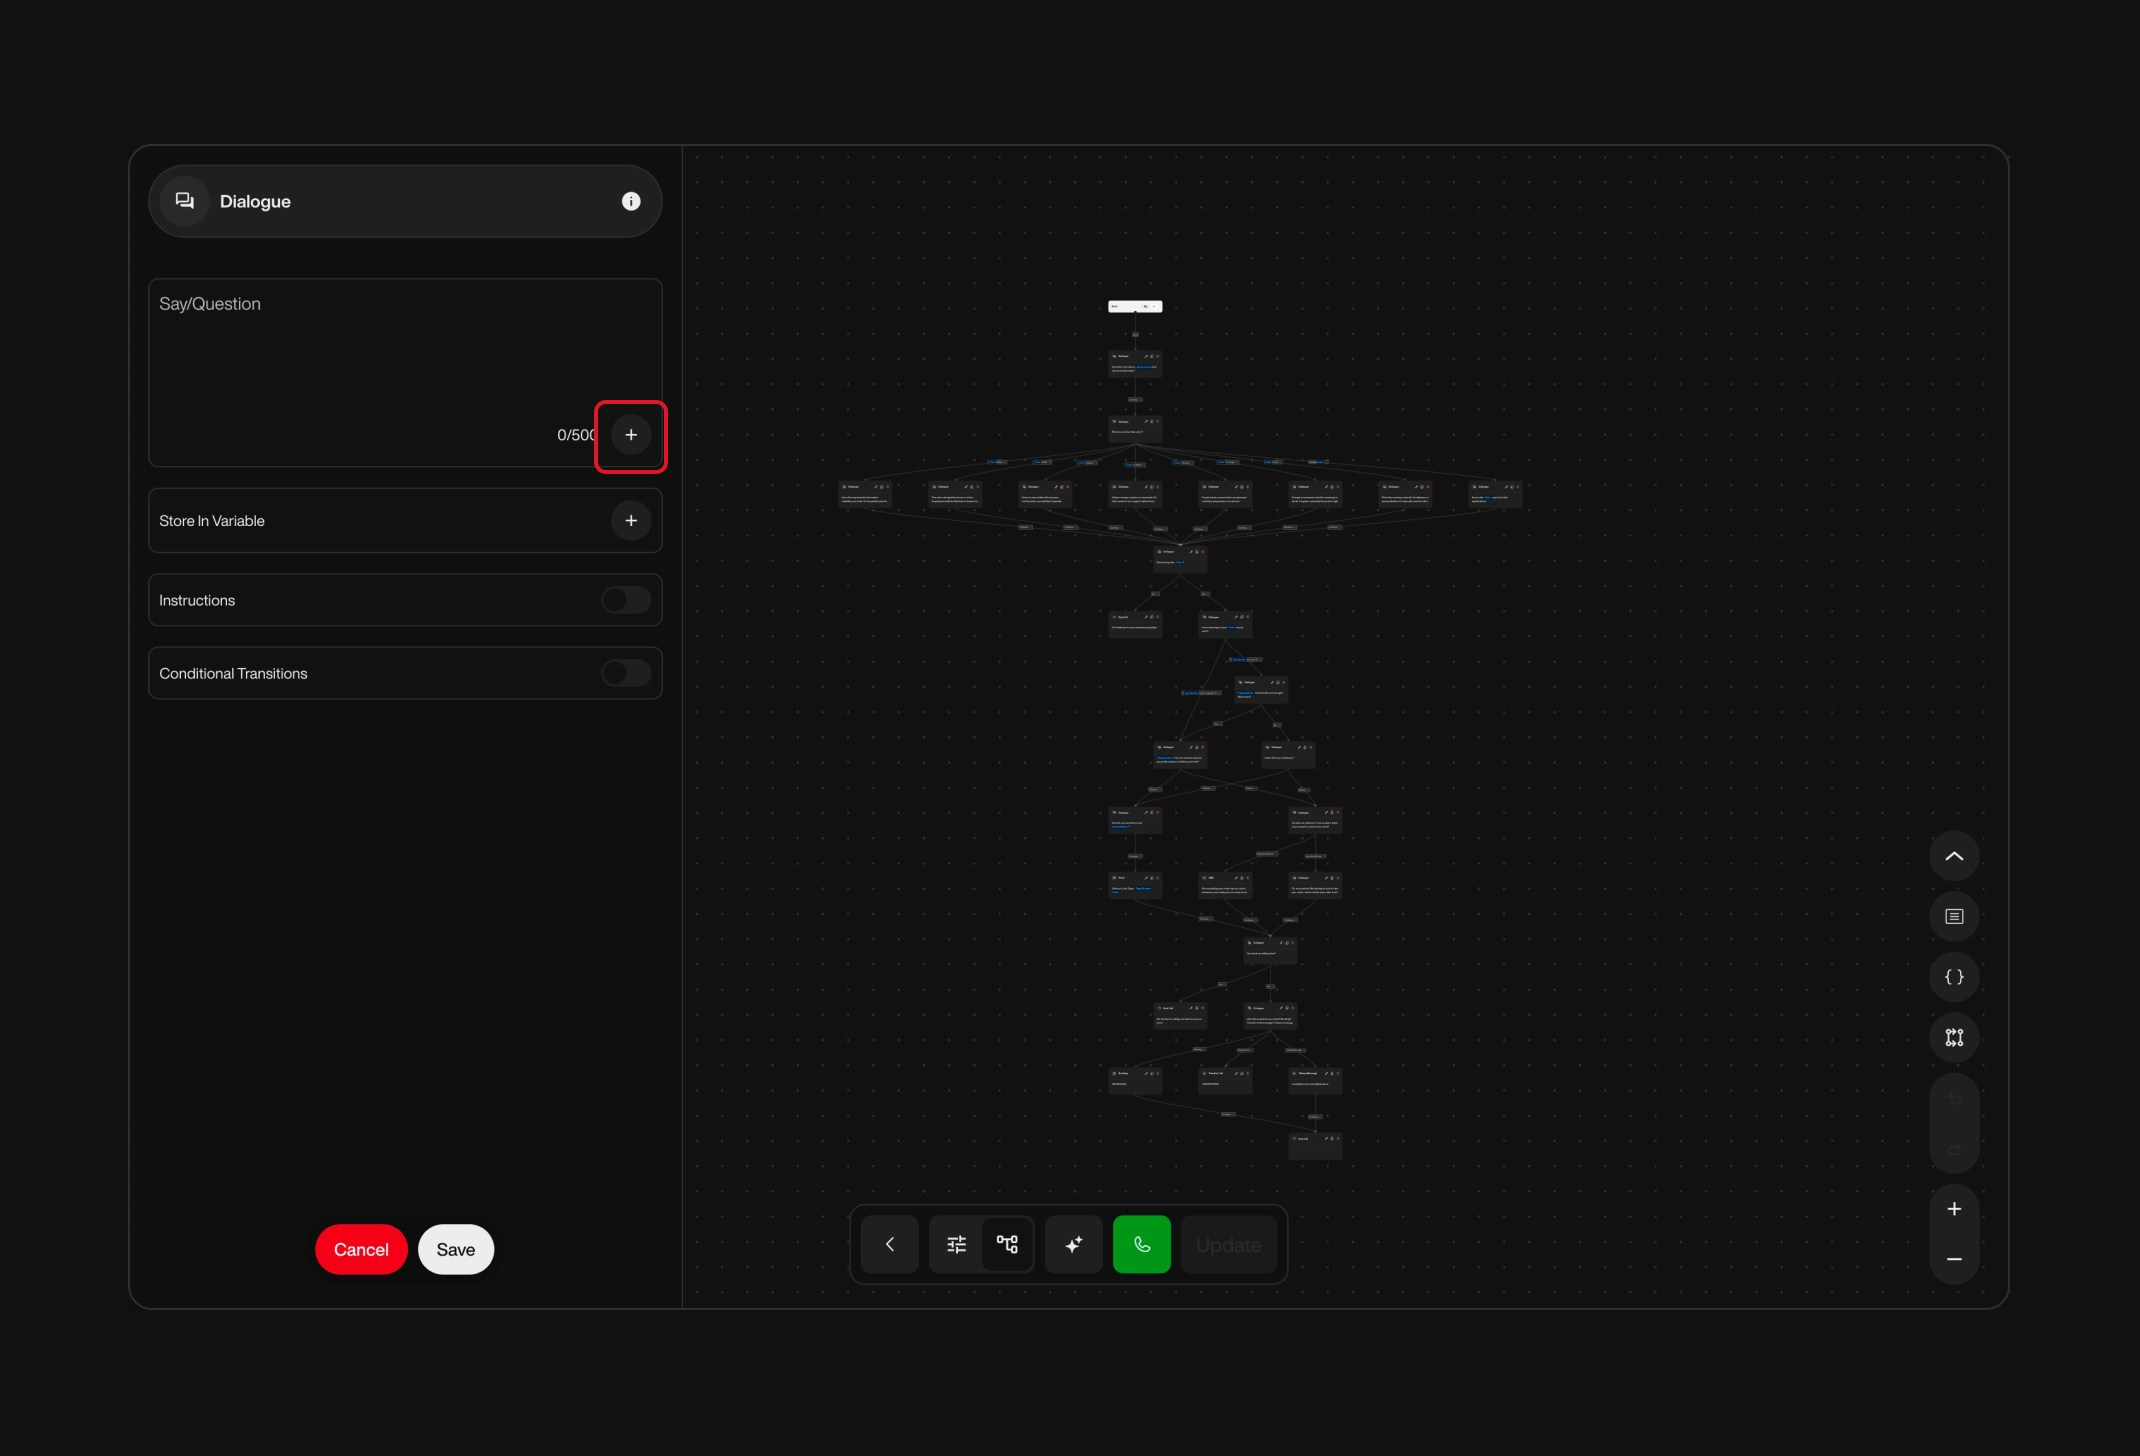
* **In Advanced Mode**: In the node's configuration, locate the **"Store In Variable"** field.

***

<span style={{ fontSize: '18px', fontWeight: 600, color: 'white' }}>
  Inserting Variables into Agent Scripts
</span>

1. **Compose the Agent's Script** in any text field within your flow.
2. **Insert Variable Placeholder**:
   * Click the **"+"** icon next to the text field.
   * Select the desired variable from the list.

<Card title="Example">
  **Script**: "Thank you for calling, `customerName`!"
</Card>

<br />

<div className="block dark:hidden">
  <Frame>
    <div className="p-1">
      <img src="https://mintcdn.com/nlpearl/yjNN1PpSs3yxoZOQ/images/light_mode/variables_manager-script.jpg?fit=max&auto=format&n=yjNN1PpSs3yxoZOQ&q=85&s=0a1306e758ccd644d95f44b159a08dc9" alt="Send Email action interface on light mode" className="rounded-[14px]" width="1848" height="526" data-path="images/light_mode/variables_manager-script.jpg" />
    </div>
  </Frame>
</div>

<div className="hidden dark:block">
  <Frame>
    <div className="p-1">
      <img src="https://mintcdn.com/nlpearl/LRcBocnC9aRvHcb-/images/dark_mode/variables_manager-script.jpg?fit=max&auto=format&n=LRcBocnC9aRvHcb-&q=85&s=740c7706cfd14aac20009fb0d7cf0383" alt="Send Email action interface on dark mode" className="rounded-[14px]" width="1848" height="526" data-path="images/dark_mode/variables_manager-script.jpg" />
    </div>
  </Frame>
</div>

***

<span style={{ fontSize: '18px', fontWeight: 600, color: 'white' }}>
  Using Variables in Actions
</span>

1. **Add an Action Node** (e.g., **Email Node**, **SMS Node**) to your flow.
2. **Configure the Action**:
   * **Message Content**: Include variables by clicking the **"+"** icon and selecting the desired variable.
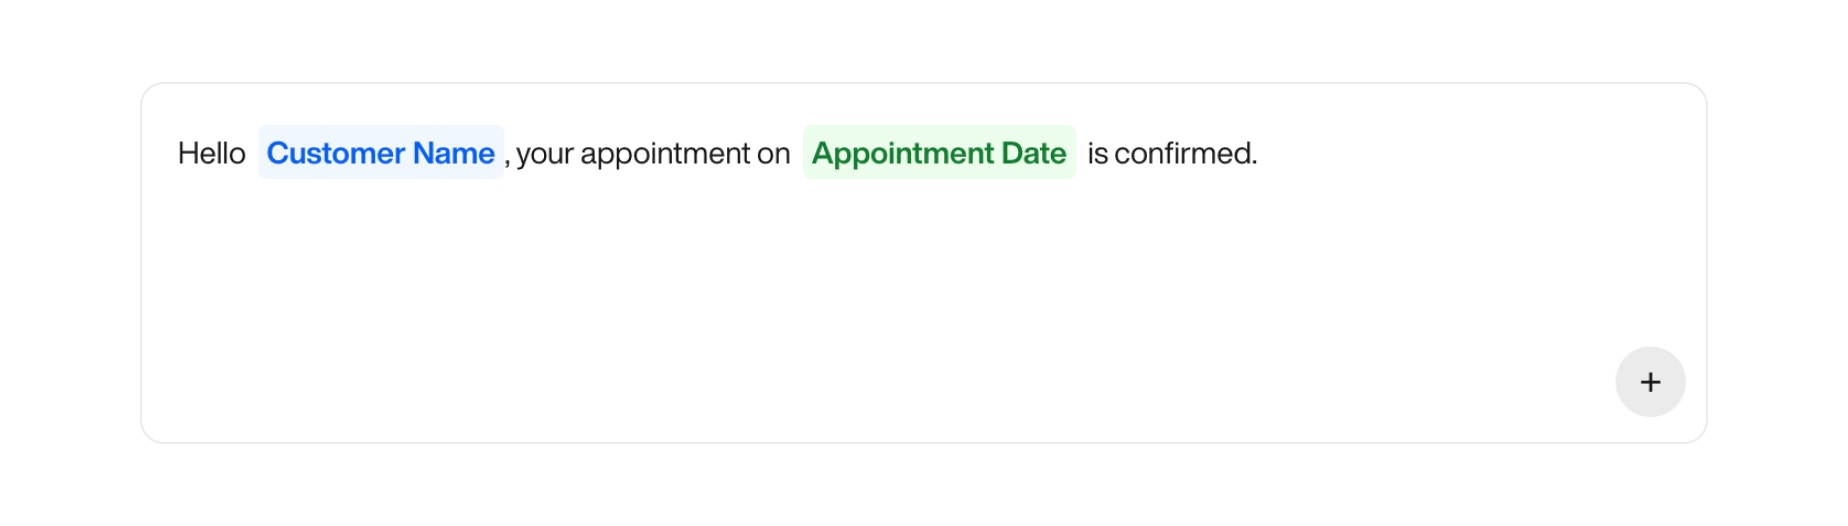
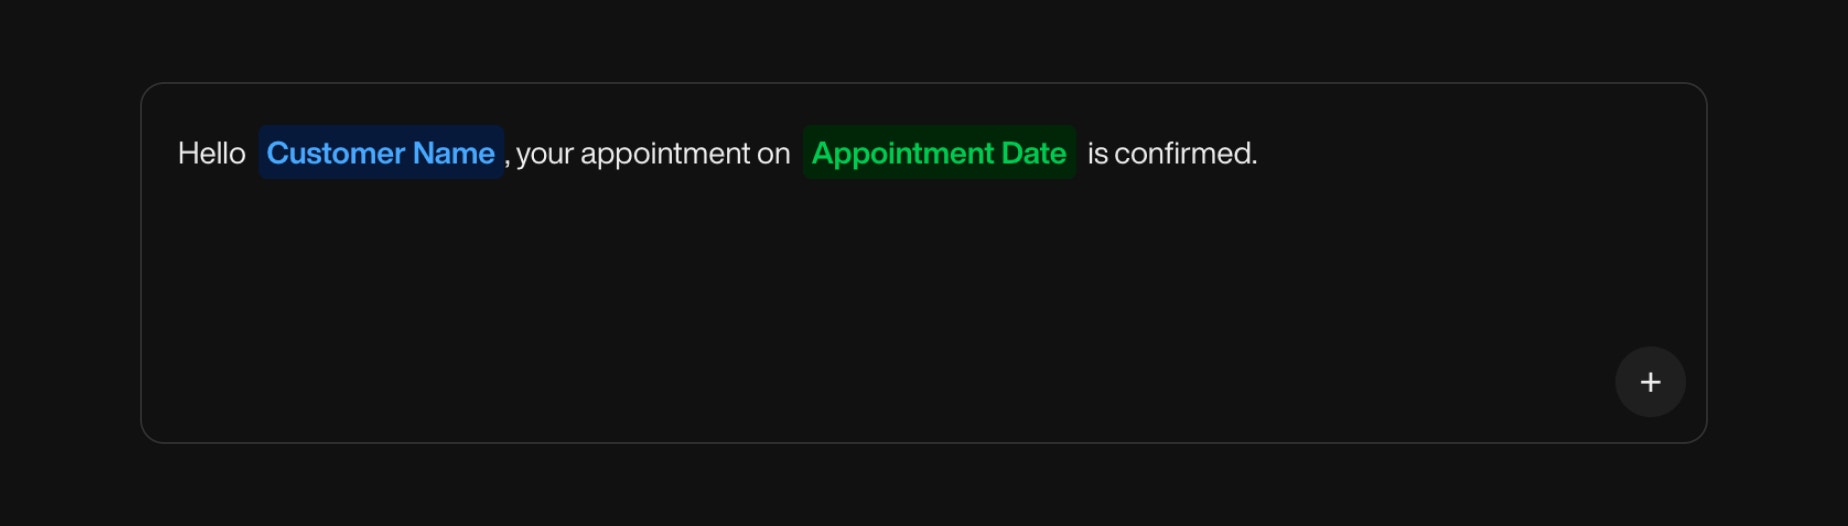
3. **Customize the Message** with variable placeholders.

<Card title="Example in SMS Node">
  **Message Content**: "Hello `customerName`, your appointment on `appointmentDate` is confirmed."
</Card>

<br />

<div className="block dark:hidden">
  <Frame>
    <div className="p-1">
      <img src="https://mintcdn.com/nlpearl/yjNN1PpSs3yxoZOQ/images/light_mode/variables_manager-smssend.jpg?fit=max&auto=format&n=yjNN1PpSs3yxoZOQ&q=85&s=cb8bdd0ac4e7ec1b055f1f9b1b9756ab" alt="Send Email action interface on light mode" className="rounded-[14px]" width="1848" height="526" data-path="images/light_mode/variables_manager-smssend.jpg" />
    </div>
  </Frame>
</div>

<div className="hidden dark:block">
  <Frame>
    <div className="p-1">
      <img src="https://mintcdn.com/nlpearl/LRcBocnC9aRvHcb-/images/dark_mode/variables_manager-smssend.jpg?fit=max&auto=format&n=LRcBocnC9aRvHcb-&q=85&s=377ac8920e35dff6084c896b8b16a448" alt="Send Email action interface on dark mode" className="rounded-[14px]" width="1848" height="526" data-path="images/dark_mode/variables_manager-smssend.jpg" />
    </div>
  </Frame>
</div>

***

<span style={{ fontSize: '18px', fontWeight: 600, color: 'white' }}>
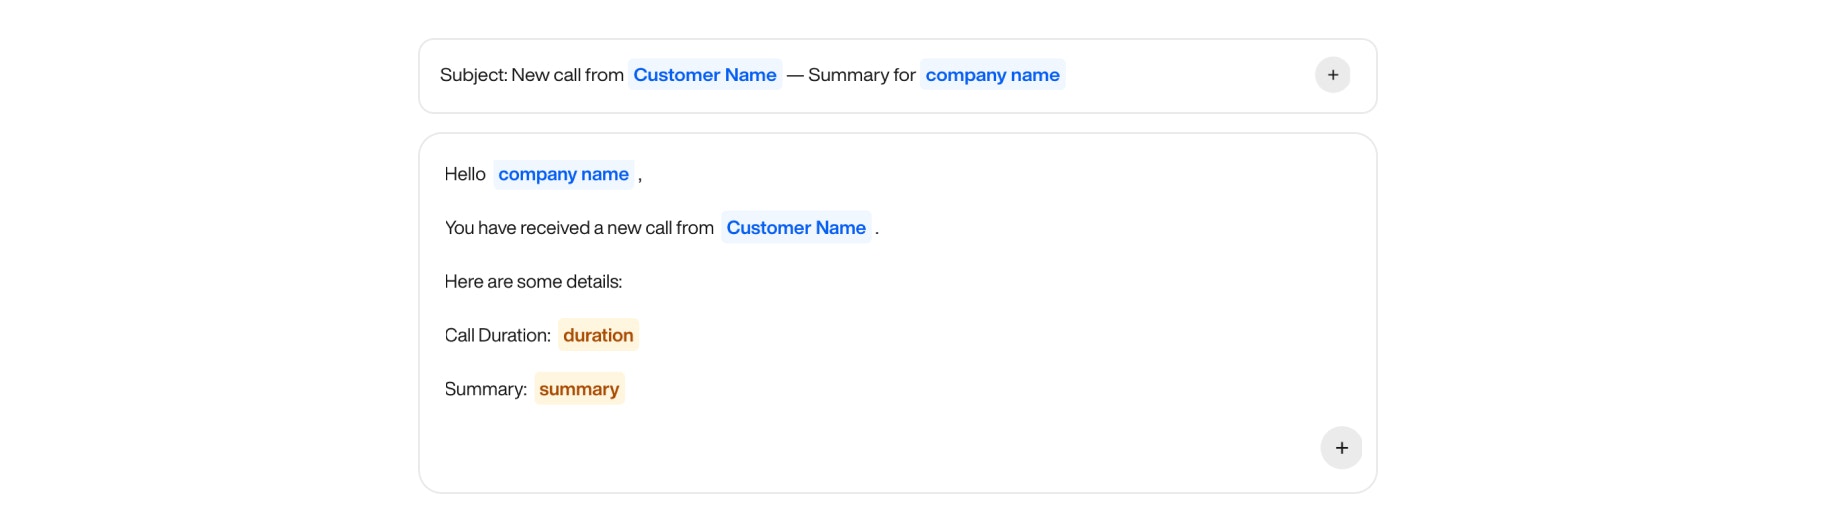
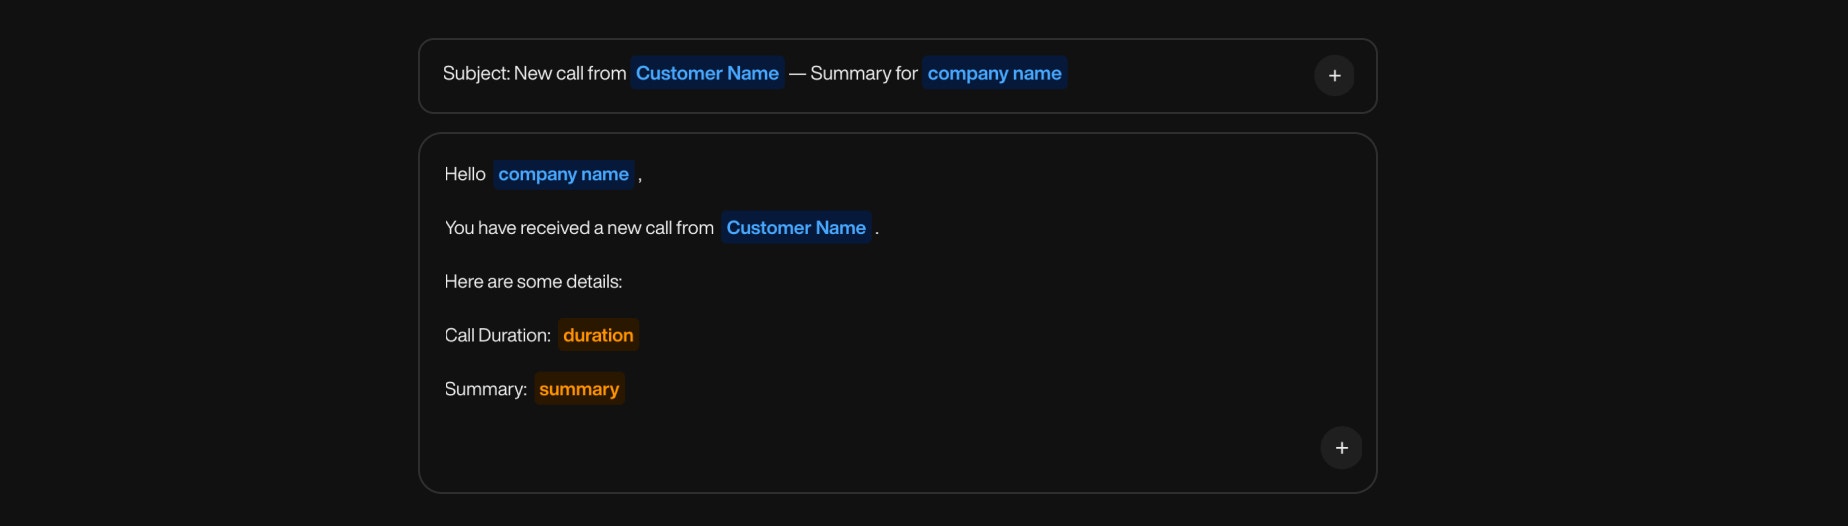
  Using Variables in EndCall Notifications
</span>

1. Add an EndCall Notification to your flow (`Email`, `Slack`, `API`).
2. Write the Notification Message, using the “+” icon to insert dynamic variables
3. Customize the content to provide a clear summary of each completed call.

<Card title="Example Email Notification to Client">
  **Subject**: New call from `customerName` — Summary for `companyName` <br /><br />
  **Message Content**: "Hello `companyName`, You have received a new call from `customerName`. Here are some details:

  * Call Duration: `callDuration`
  * Summary: `callSummary`"
</Card>

<br />

<div className="block dark:hidden">
  <Frame>
    <div className="p-1">
      <img src="https://mintcdn.com/nlpearl/yjNN1PpSs3yxoZOQ/images/light_mode/variables_manager-notification.jpg?fit=max&auto=format&n=yjNN1PpSs3yxoZOQ&q=85&s=d9c11f8c2b58b8b0e450039994f09ab2" alt="Send Email action interface on light mode" className="rounded-[14px]" width="1848" height="526" data-path="images/light_mode/variables_manager-notification.jpg" />
    </div>
  </Frame>
</div>

<div className="hidden dark:block">
  <Frame>
    <div className="p-1">
      <img src="https://mintcdn.com/nlpearl/LRcBocnC9aRvHcb-/images/dark_mode/variables_manager-notification.jpg?fit=max&auto=format&n=LRcBocnC9aRvHcb-&q=85&s=52dddbf2f41147d543bfc0fa2c7e48b3" alt="Send Email action interface on dark mode" className="rounded-[14px]" width="1848" height="526" data-path="images/dark_mode/variables_manager-notification.jpg" />
    </div>
  </Frame>
</div>

***

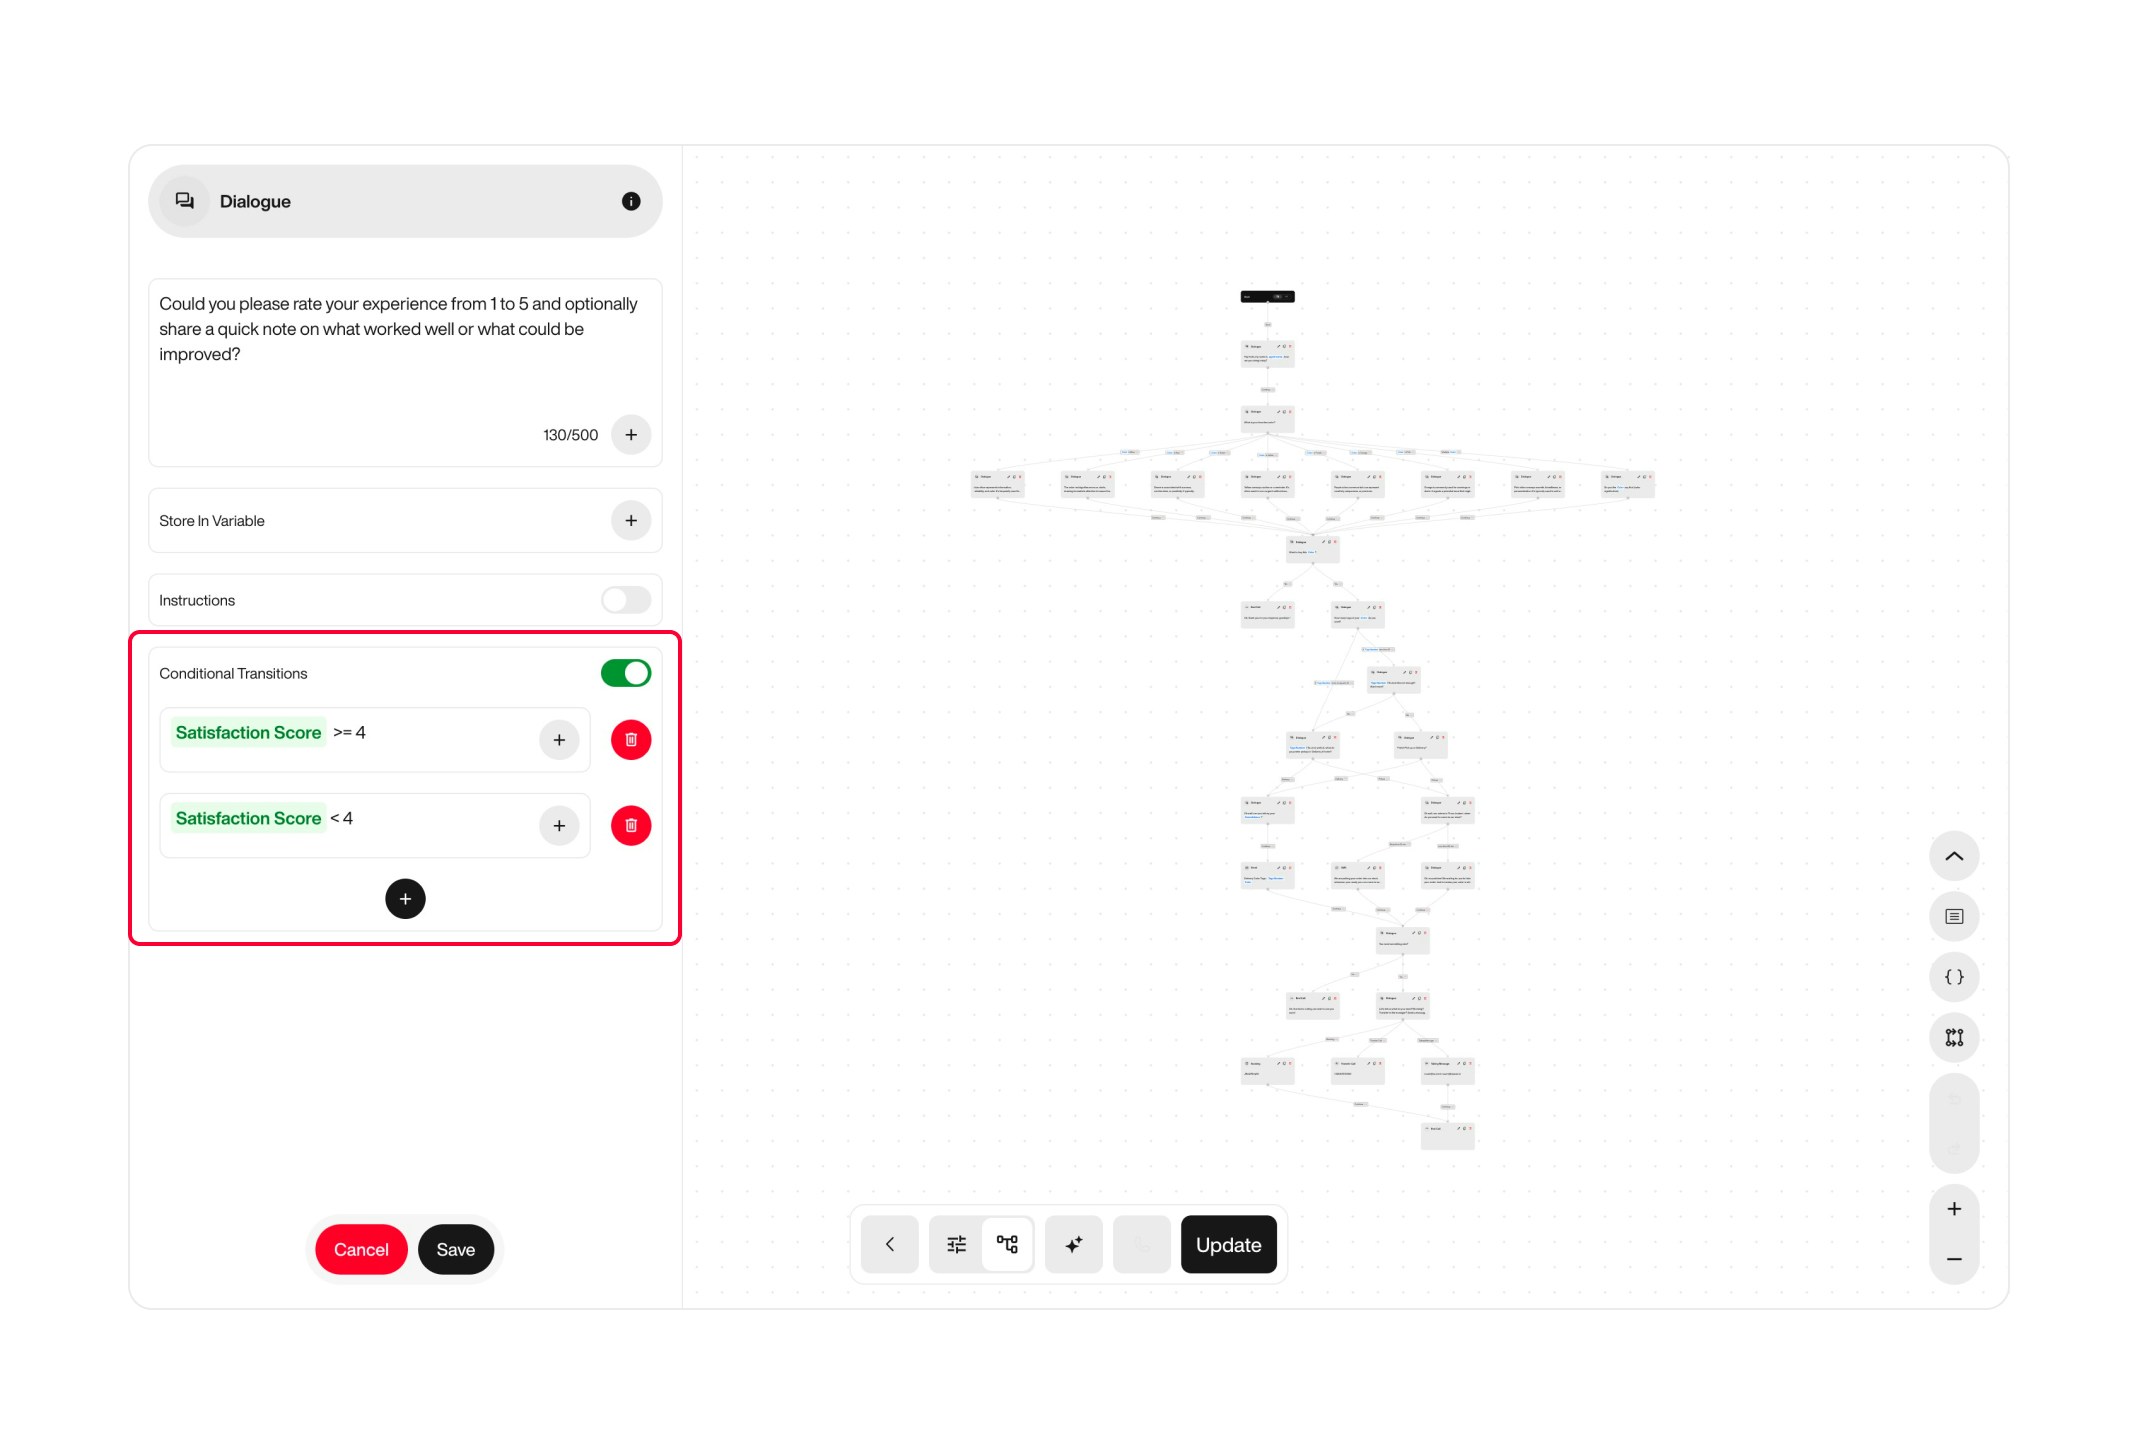
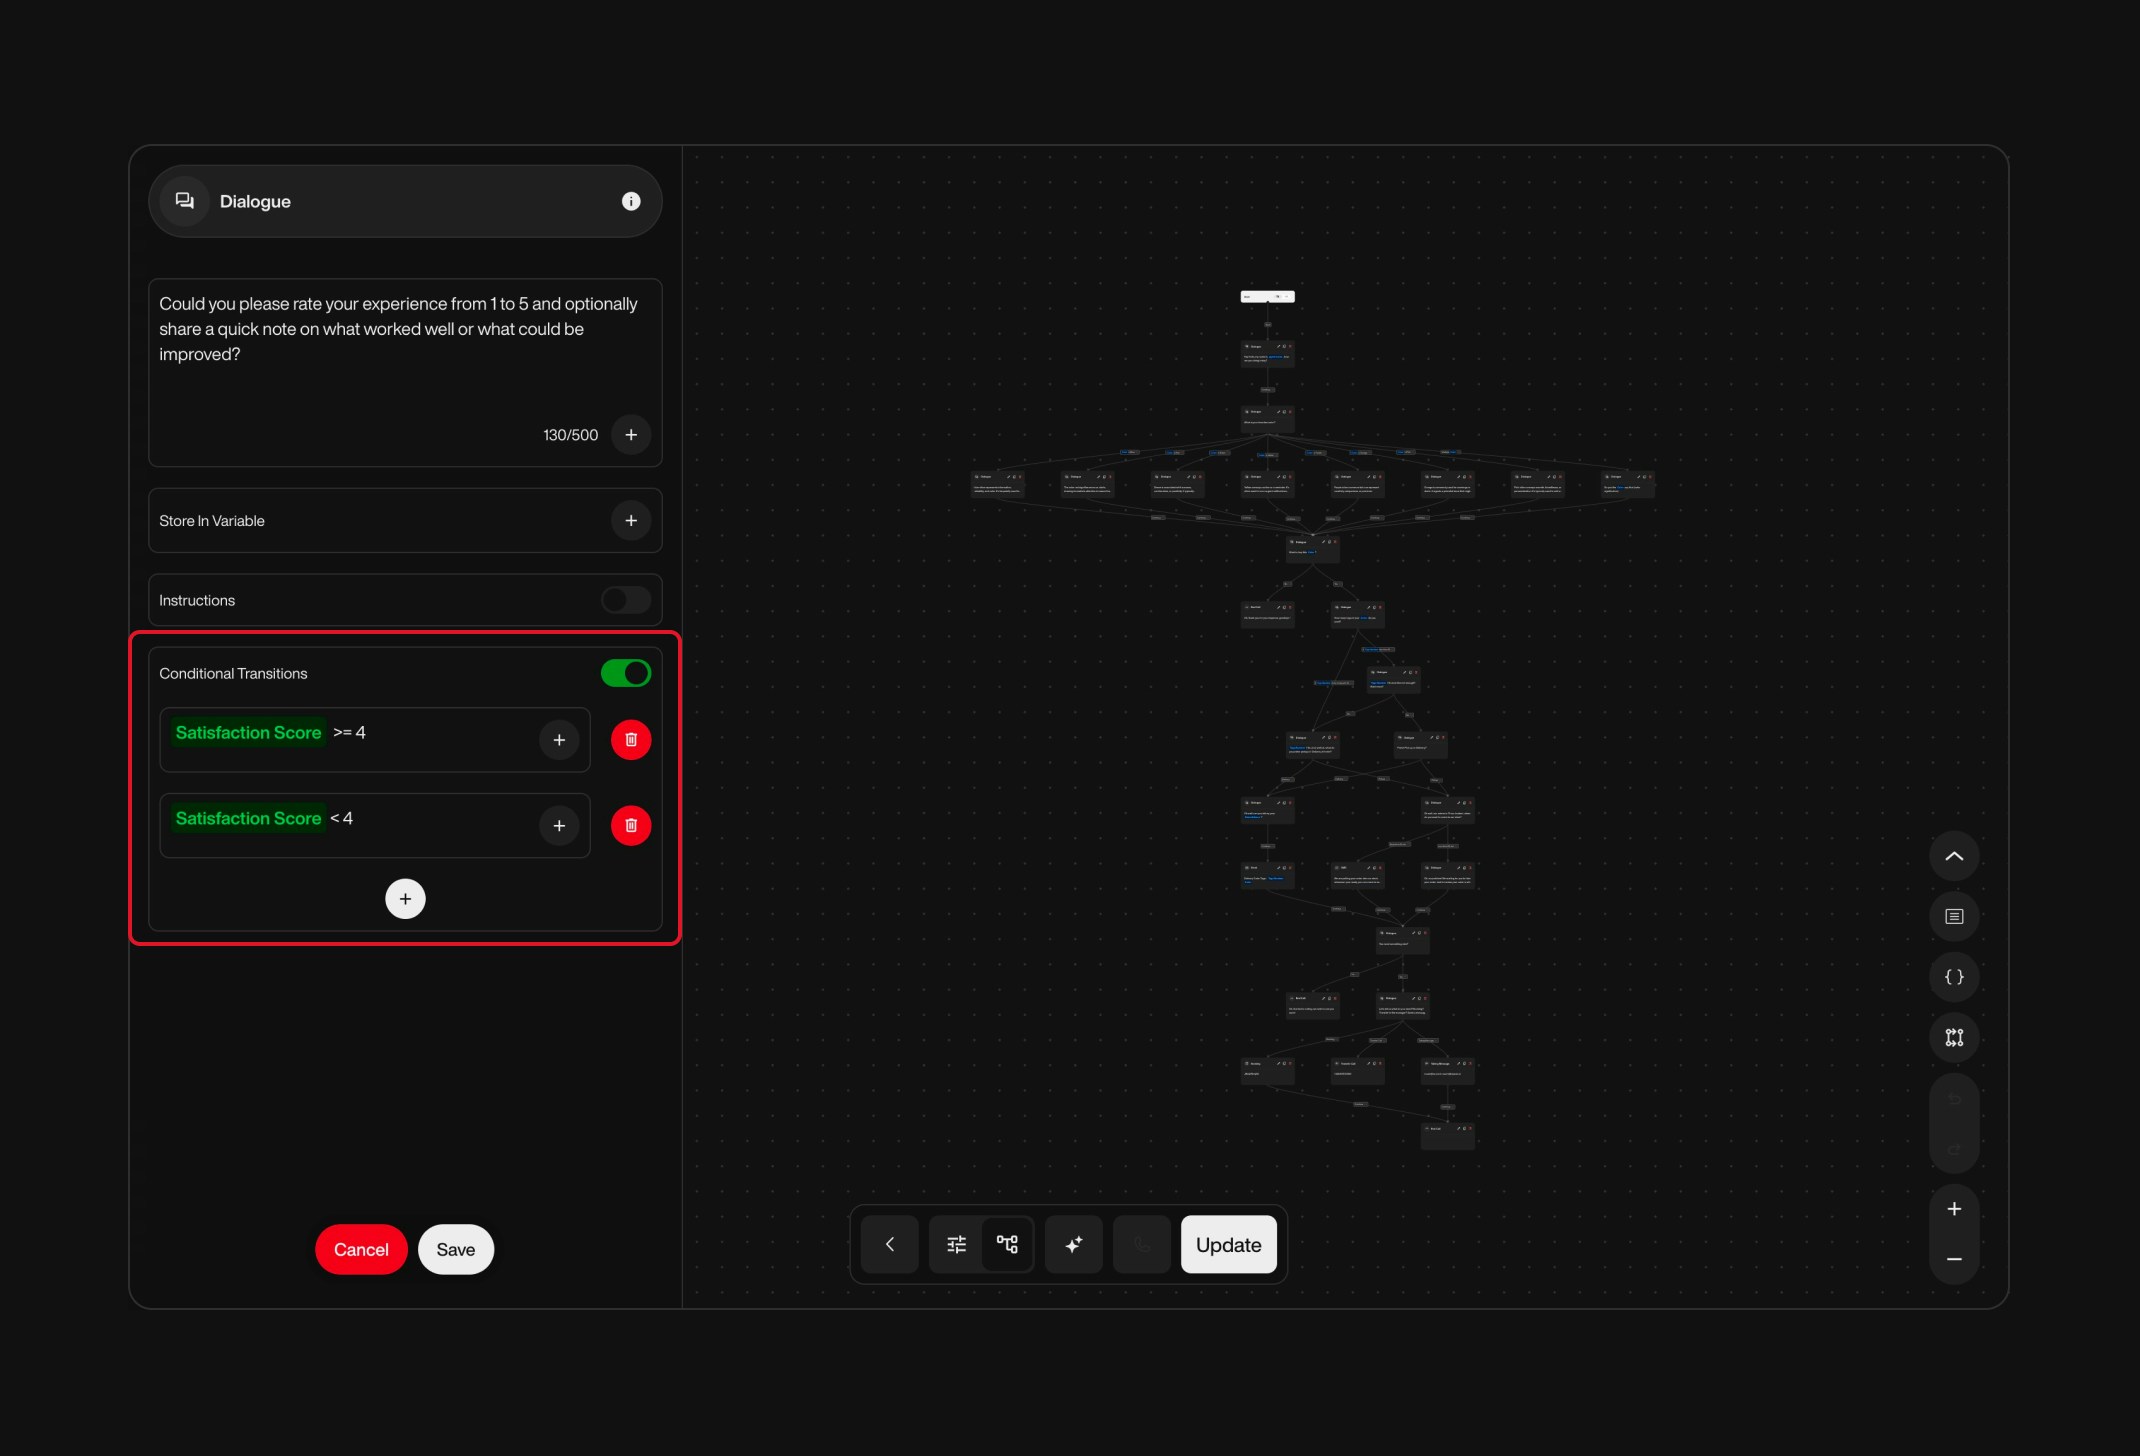
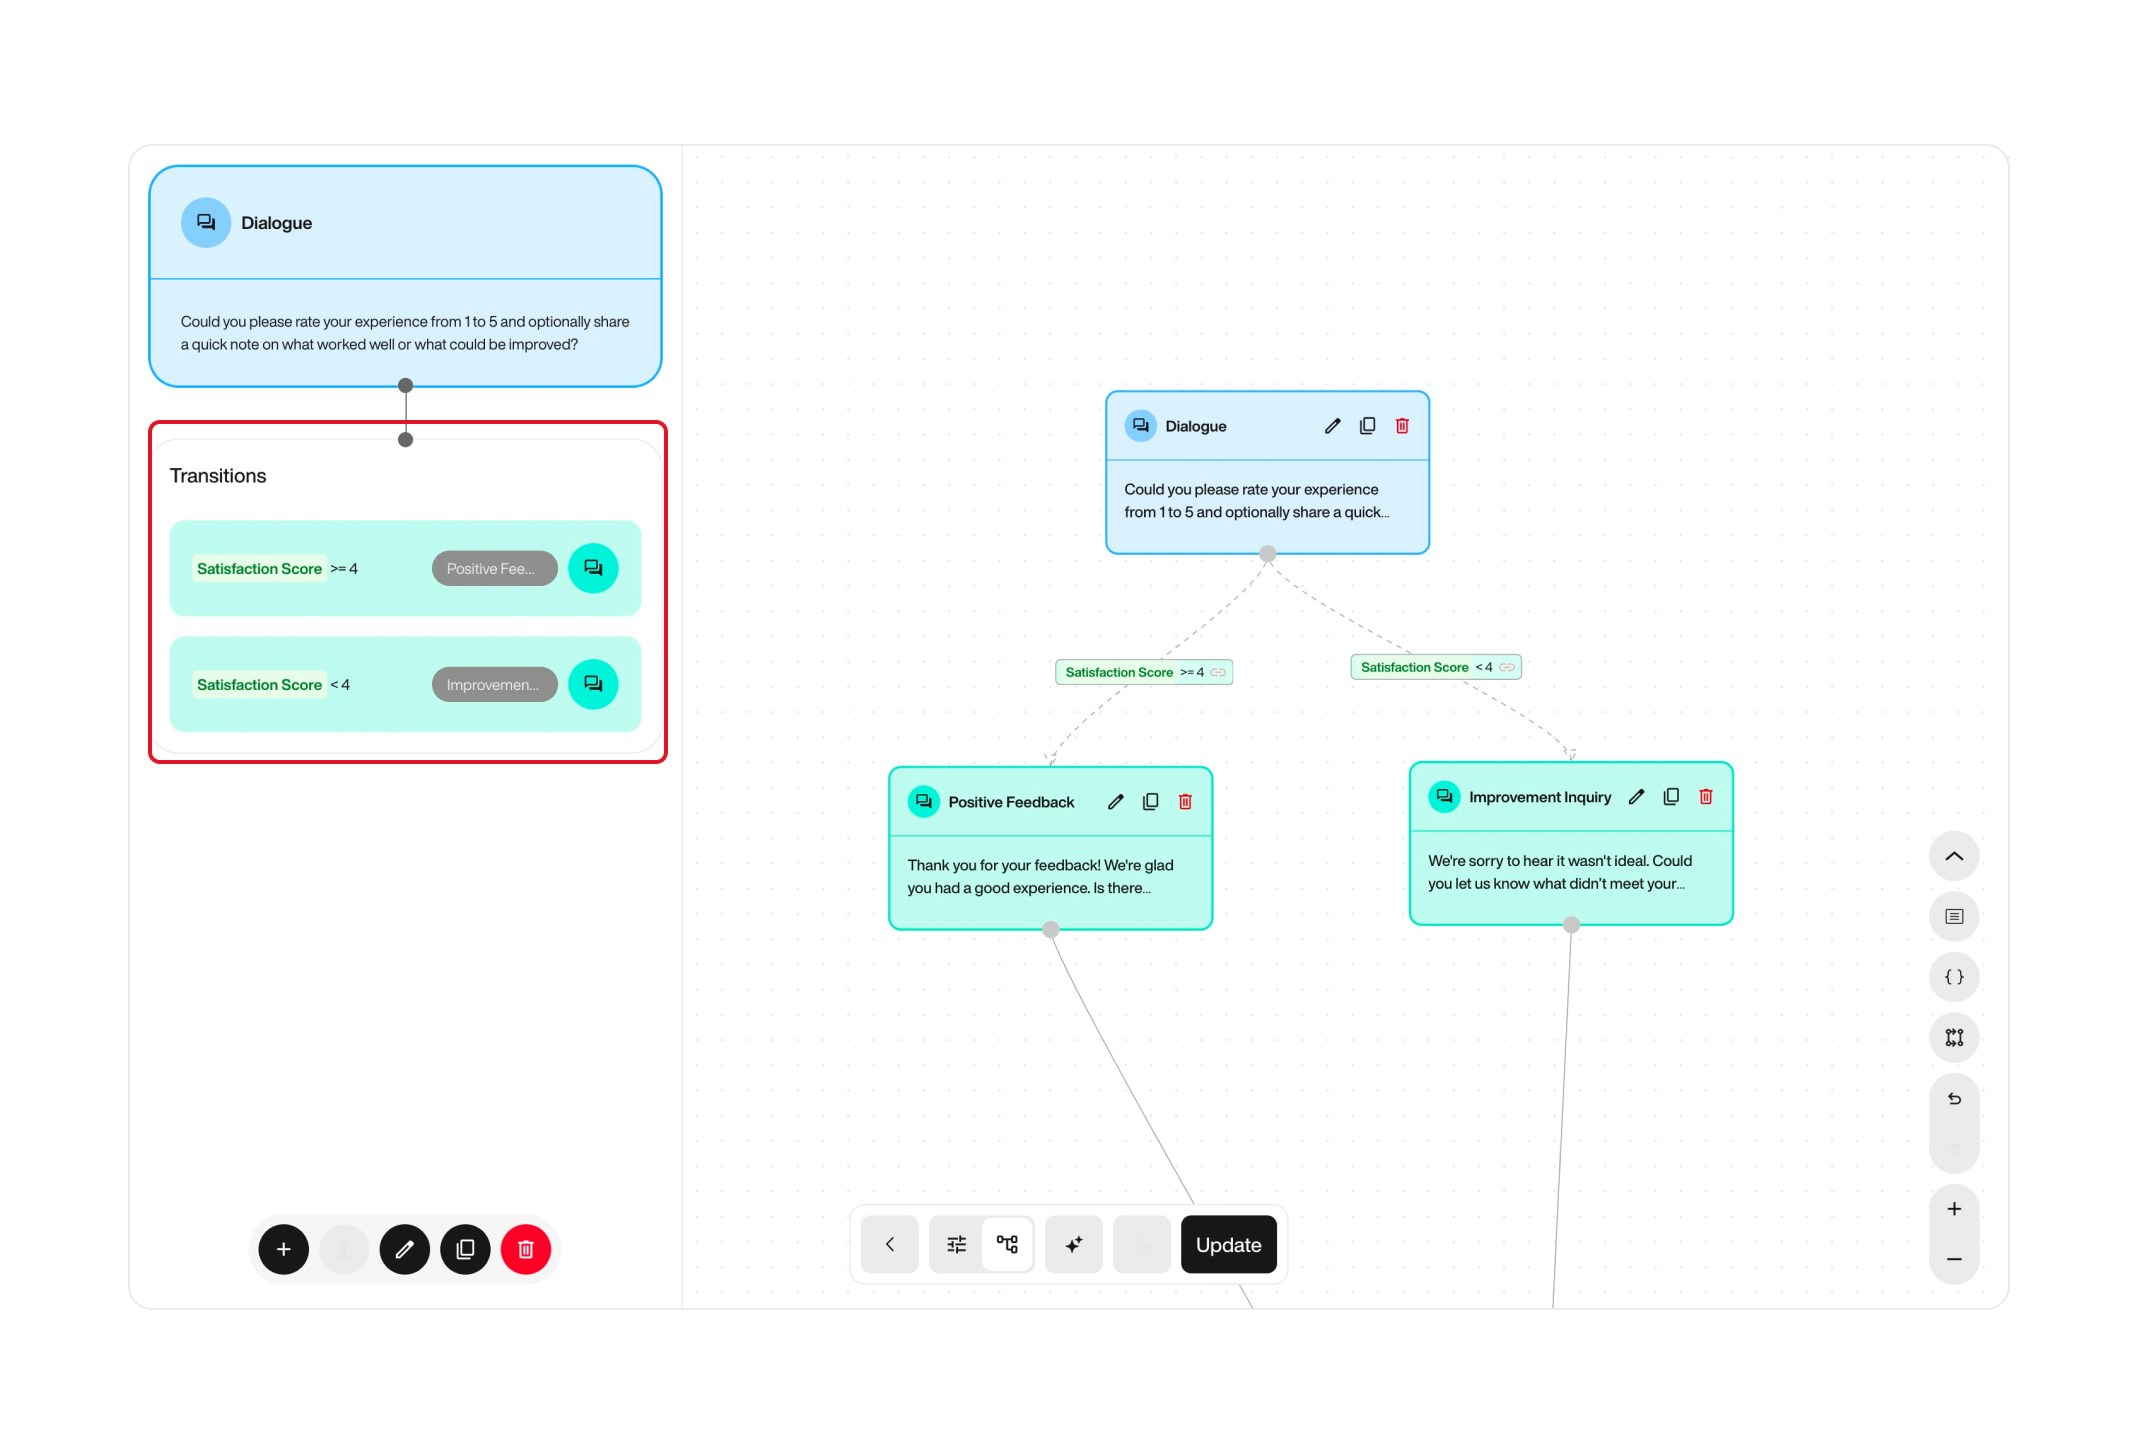
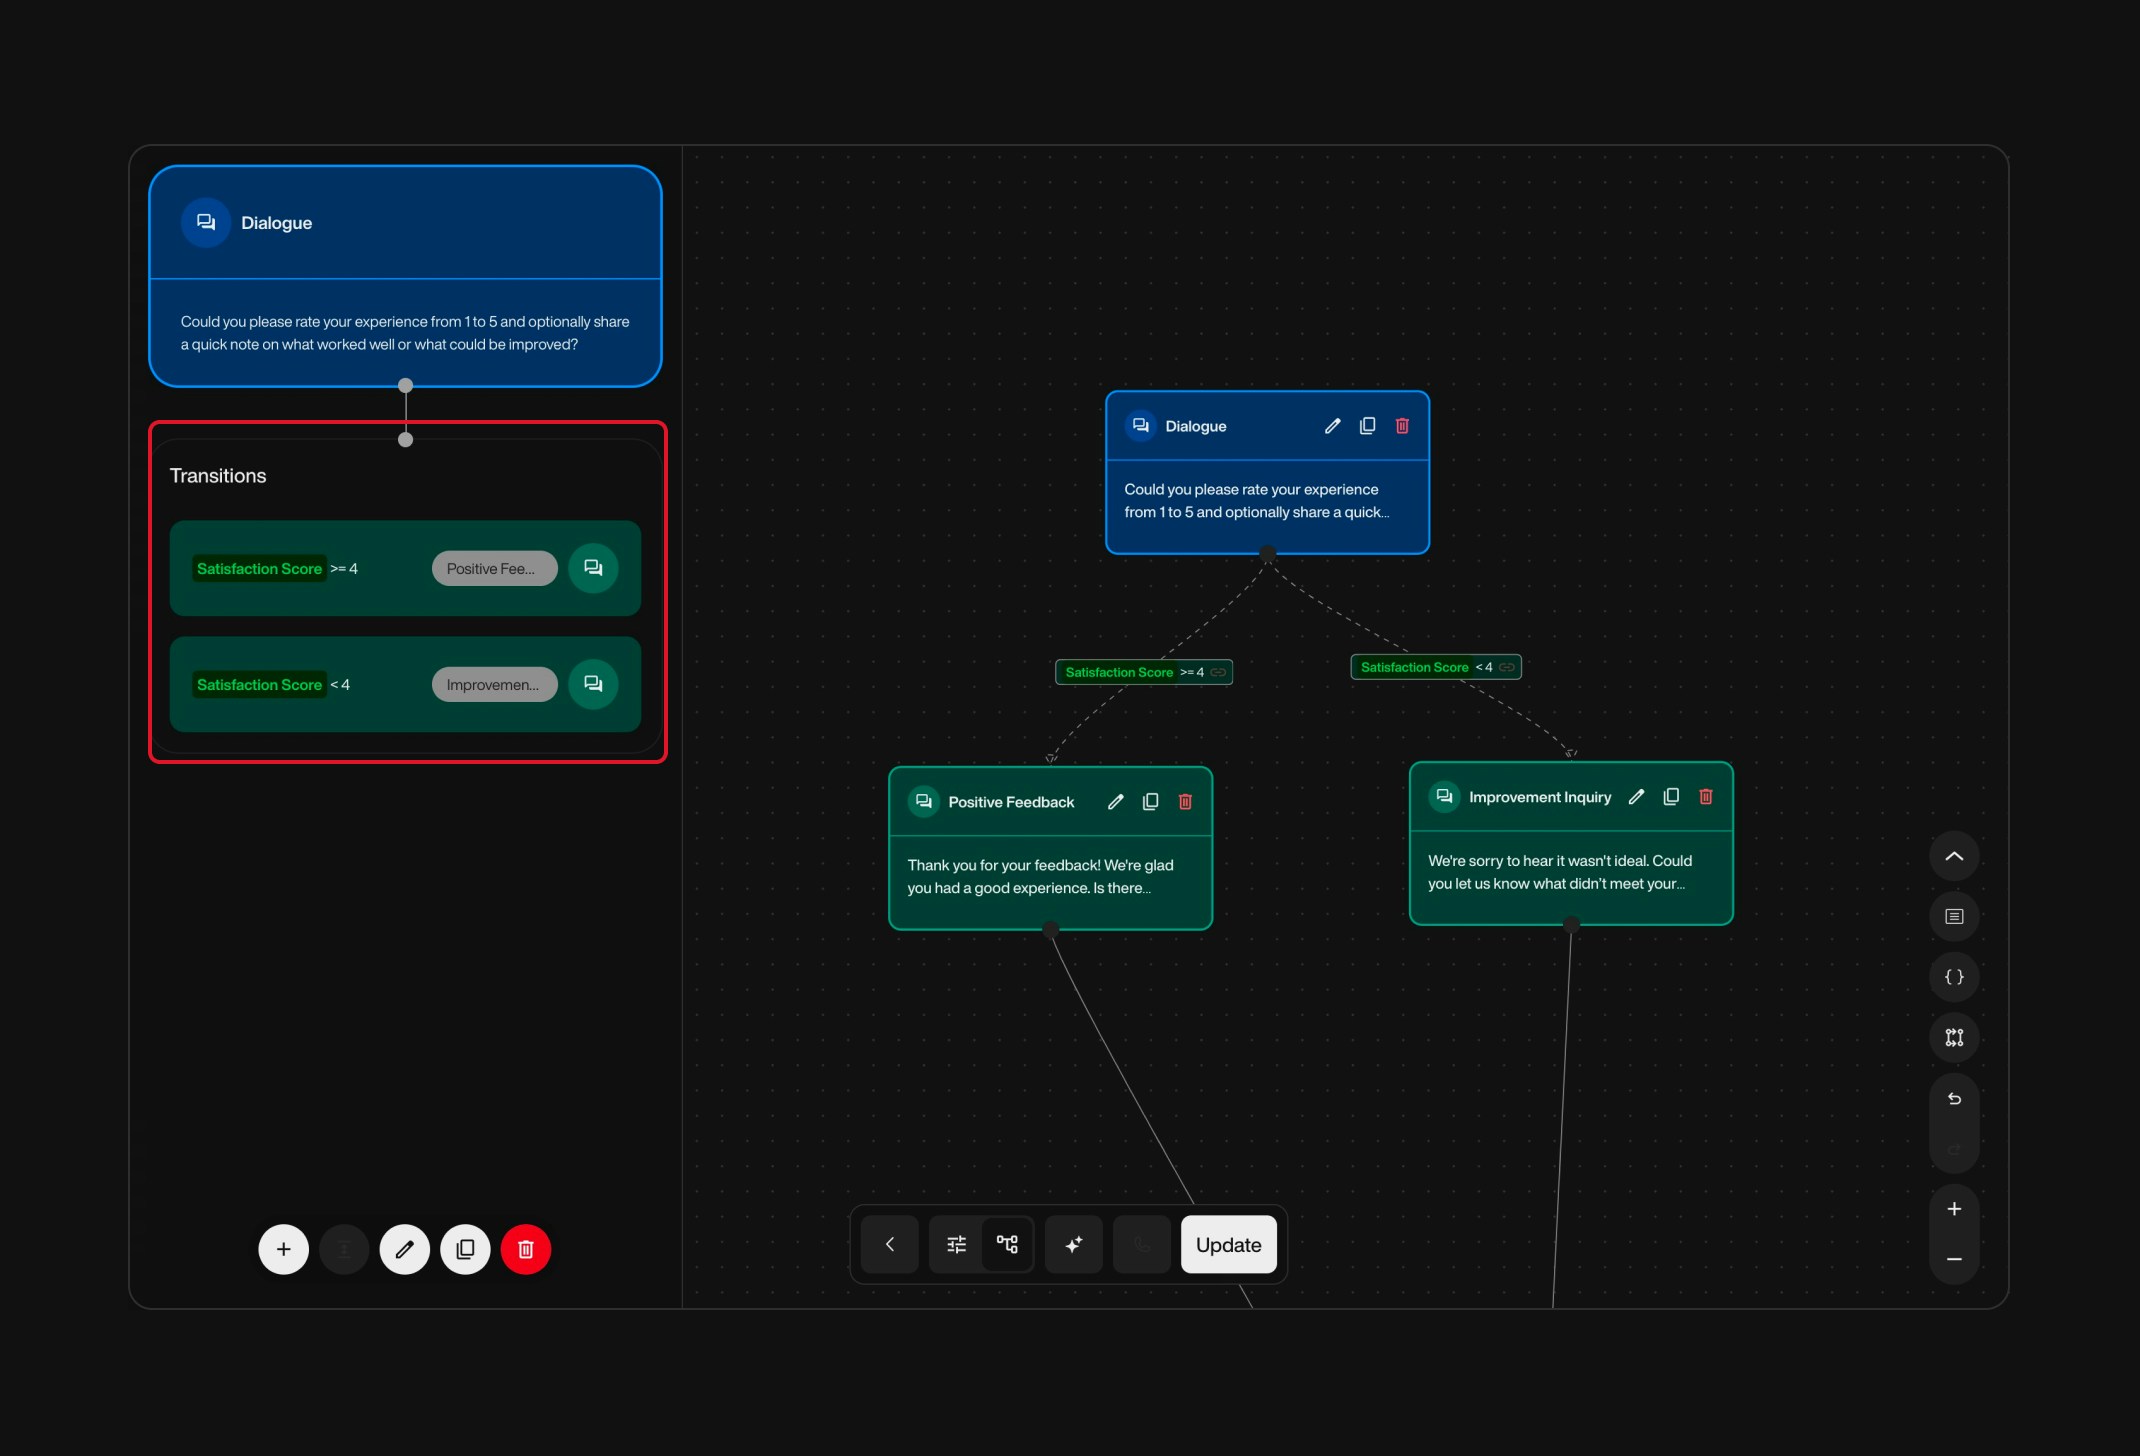
## Implementing Conditional Logic with Variables

<span style={{ fontSize: '18px', fontWeight: 600, color: 'white' }}>
  Conditional Branching
</span>

1. **Enable Conditional Transitions** in a node's configuration by toggling the **"Conditional Branching"** option.

2. **Add Conditions** using variables and operators (e.g., **`satisfactionScore >= 4`**).

3. **Label Each Condition** for clarity.

4. **Connect to Subsequent Nodes** based on each condition.

<Card title="Example">
  * **Variable**: `satisfactionScore`
  * **Conditions**:
    * If **`satisfactionScore >= 4`**, proceed to positive feedback node.
    * If **`satisfactionScore < 4`**, proceed to improvement inquiry node.
</Card>

<br />

<div className="flex gap-6">
  <div className="w-1/2">
    <div className="block dark:hidden">
      <Frame>
        <div className="p-0 pb-0">
          <img src="https://mintcdn.com/nlpearl/yjNN1PpSs3yxoZOQ/images/light_mode/variables_tree-1.jpg?fit=max&auto=format&n=yjNN1PpSs3yxoZOQ&q=85&s=e07d1222f6be54a2b5b61598d97cbd69" alt="Frame 1 – Light Mode" className="rounded-[14px] w-full block" width="2140" height="1456" data-path="images/light_mode/variables_tree-1.jpg" />
        </div>
      </Frame>
    </div>

    <div className="hidden dark:block">
      <Frame>
        <div className="p-0 pb-0">
          <img src="https://mintcdn.com/nlpearl/LRcBocnC9aRvHcb-/images/dark_mode/variables_tree-1.jpg?fit=max&auto=format&n=LRcBocnC9aRvHcb-&q=85&s=54bbed4b61a5764f688004c84f821157" alt="Frame 1 – Dark Mode" className="rounded-[14px] w-full block" width="2140" height="1456" data-path="images/dark_mode/variables_tree-1.jpg" />
        </div>
      </Frame>
    </div>
  </div>

  <div className="w-1/2">
    <div className="block dark:hidden">
      <Frame>
        <div className="p-0 pb-0">
          <img src="https://mintcdn.com/nlpearl/yjNN1PpSs3yxoZOQ/images/light_mode/variables_tree-2.jpg?fit=max&auto=format&n=yjNN1PpSs3yxoZOQ&q=85&s=64316f625f5e318407687a93fcaab647" alt="Frame 2 – Light Mode" className="rounded-[14px] w-full block" width="2140" height="1456" data-path="images/light_mode/variables_tree-2.jpg" />
        </div>
      </Frame>
    </div>

    <div className="hidden dark:block">
      <Frame>
        <div className="p-0 pb-0">
          <img src="https://mintcdn.com/nlpearl/LRcBocnC9aRvHcb-/images/dark_mode/variables_tree-2.jpg?fit=max&auto=format&n=LRcBocnC9aRvHcb-&q=85&s=da42e6e1e66b9f82a7025f4df5bc15f3" alt="Frame 2 – Dark Mode" className="rounded-[14px] w-full block" width="2140" height="1456" data-path="images/dark_mode/variables_tree-2.jpg" />
        </div>
      </Frame>
    </div>
  </div>
</div>

***

## Populating Variables from External Data

Call variables can be filled dynamically from CSV files or APIs to personalize outbound calls.

<span style={{ fontSize: '18px', fontWeight: 600, color: 'white' }}>
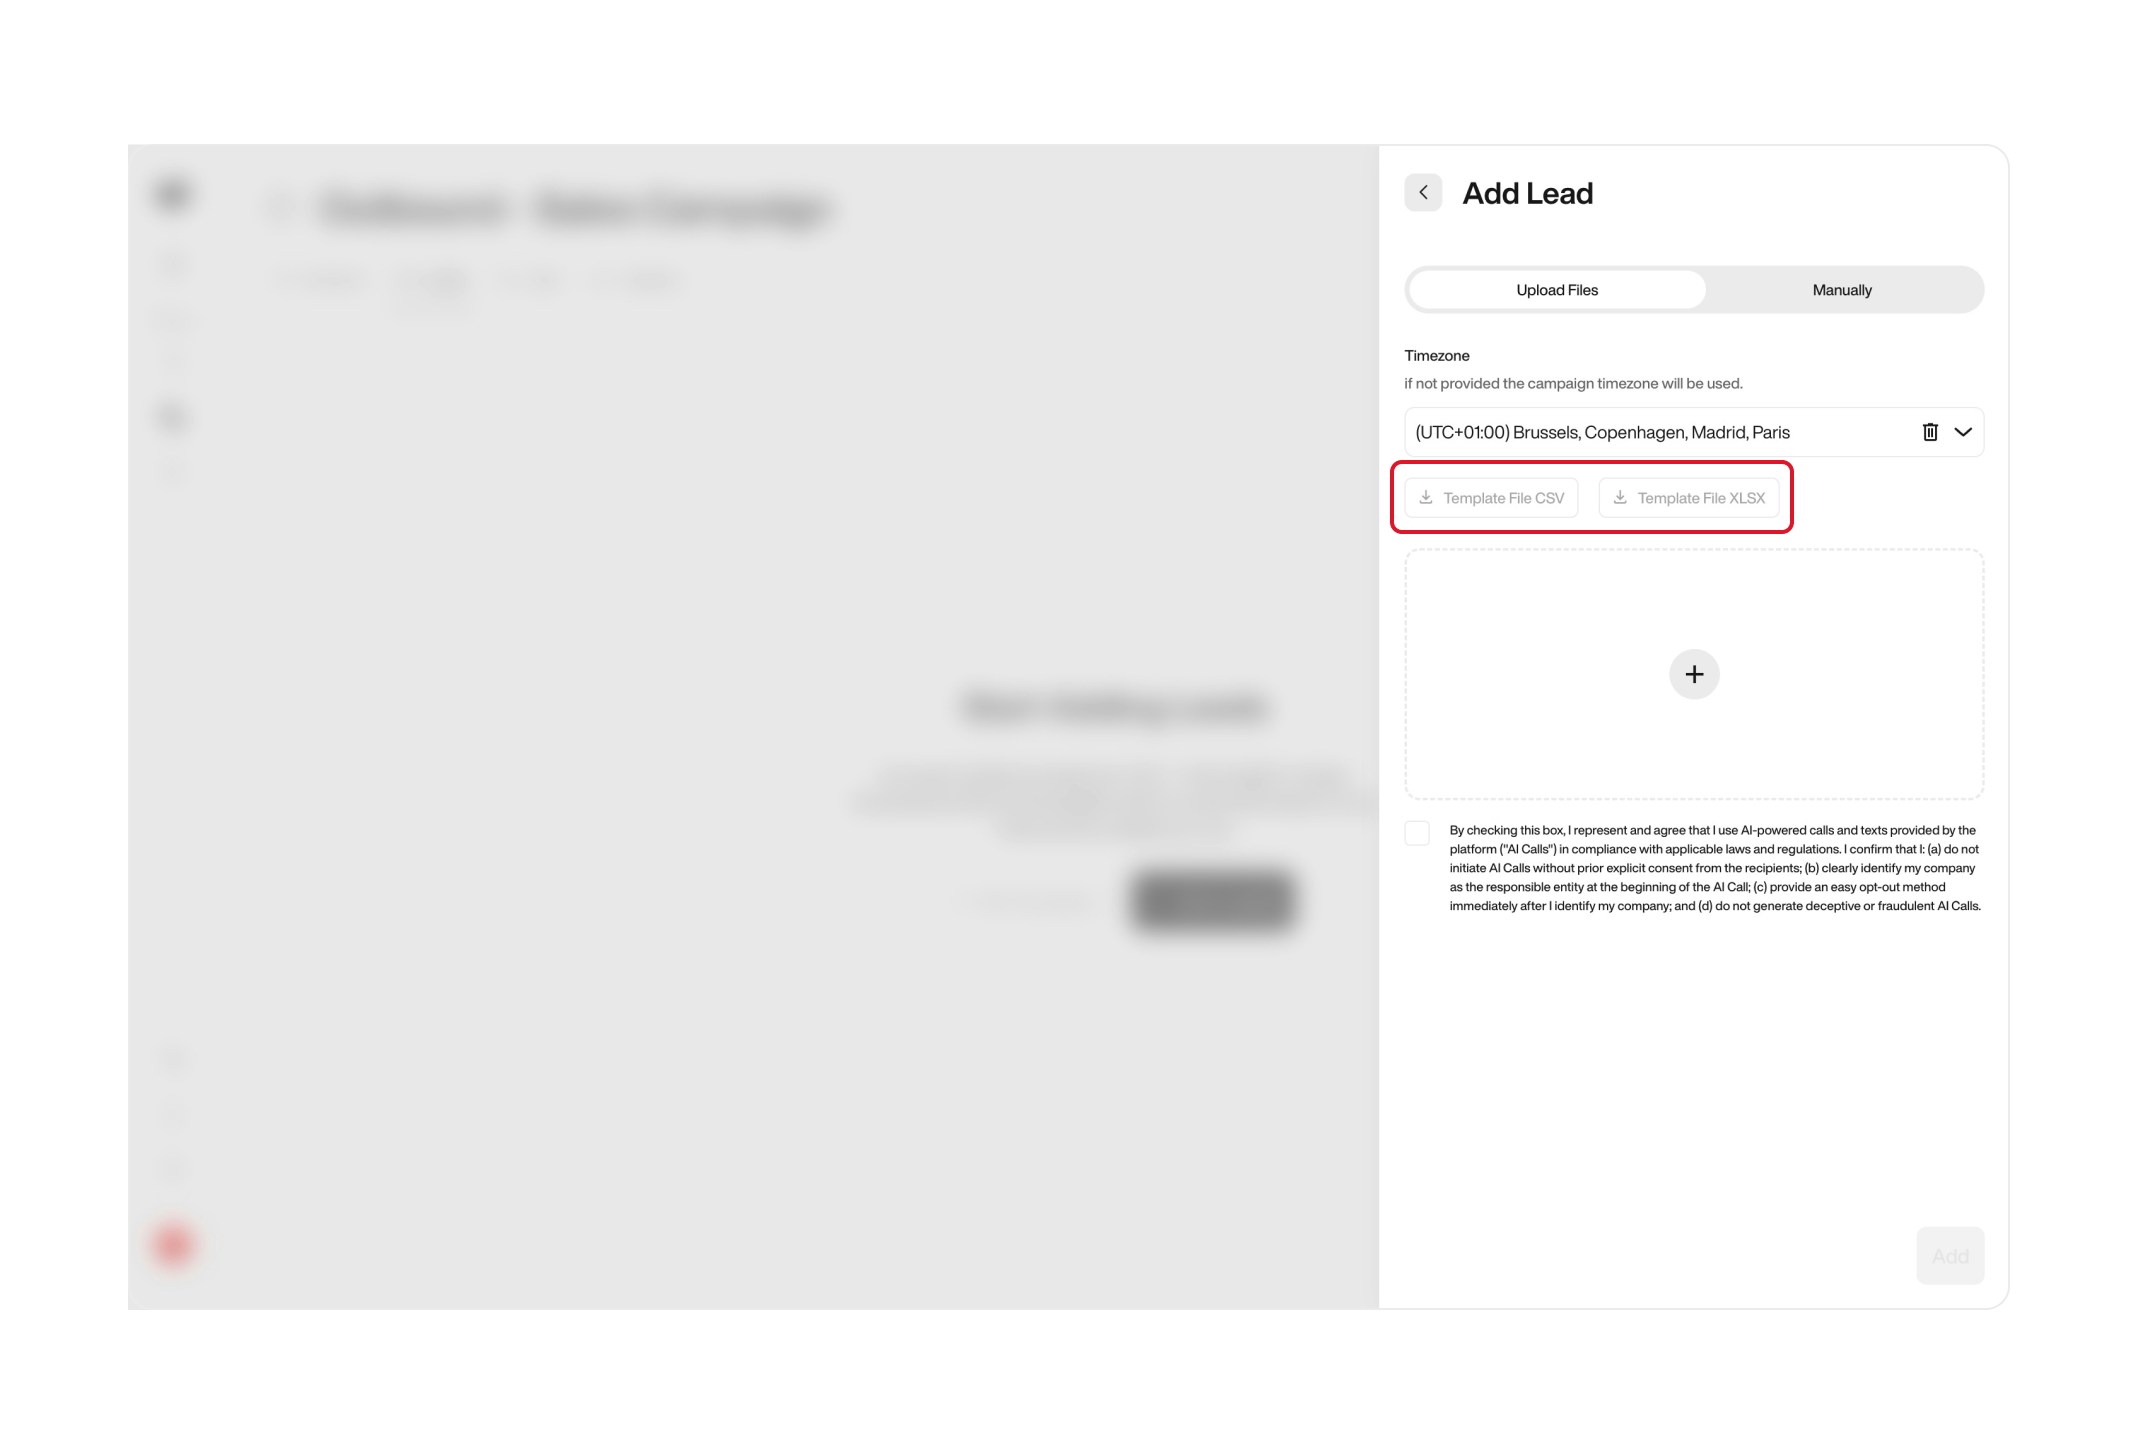
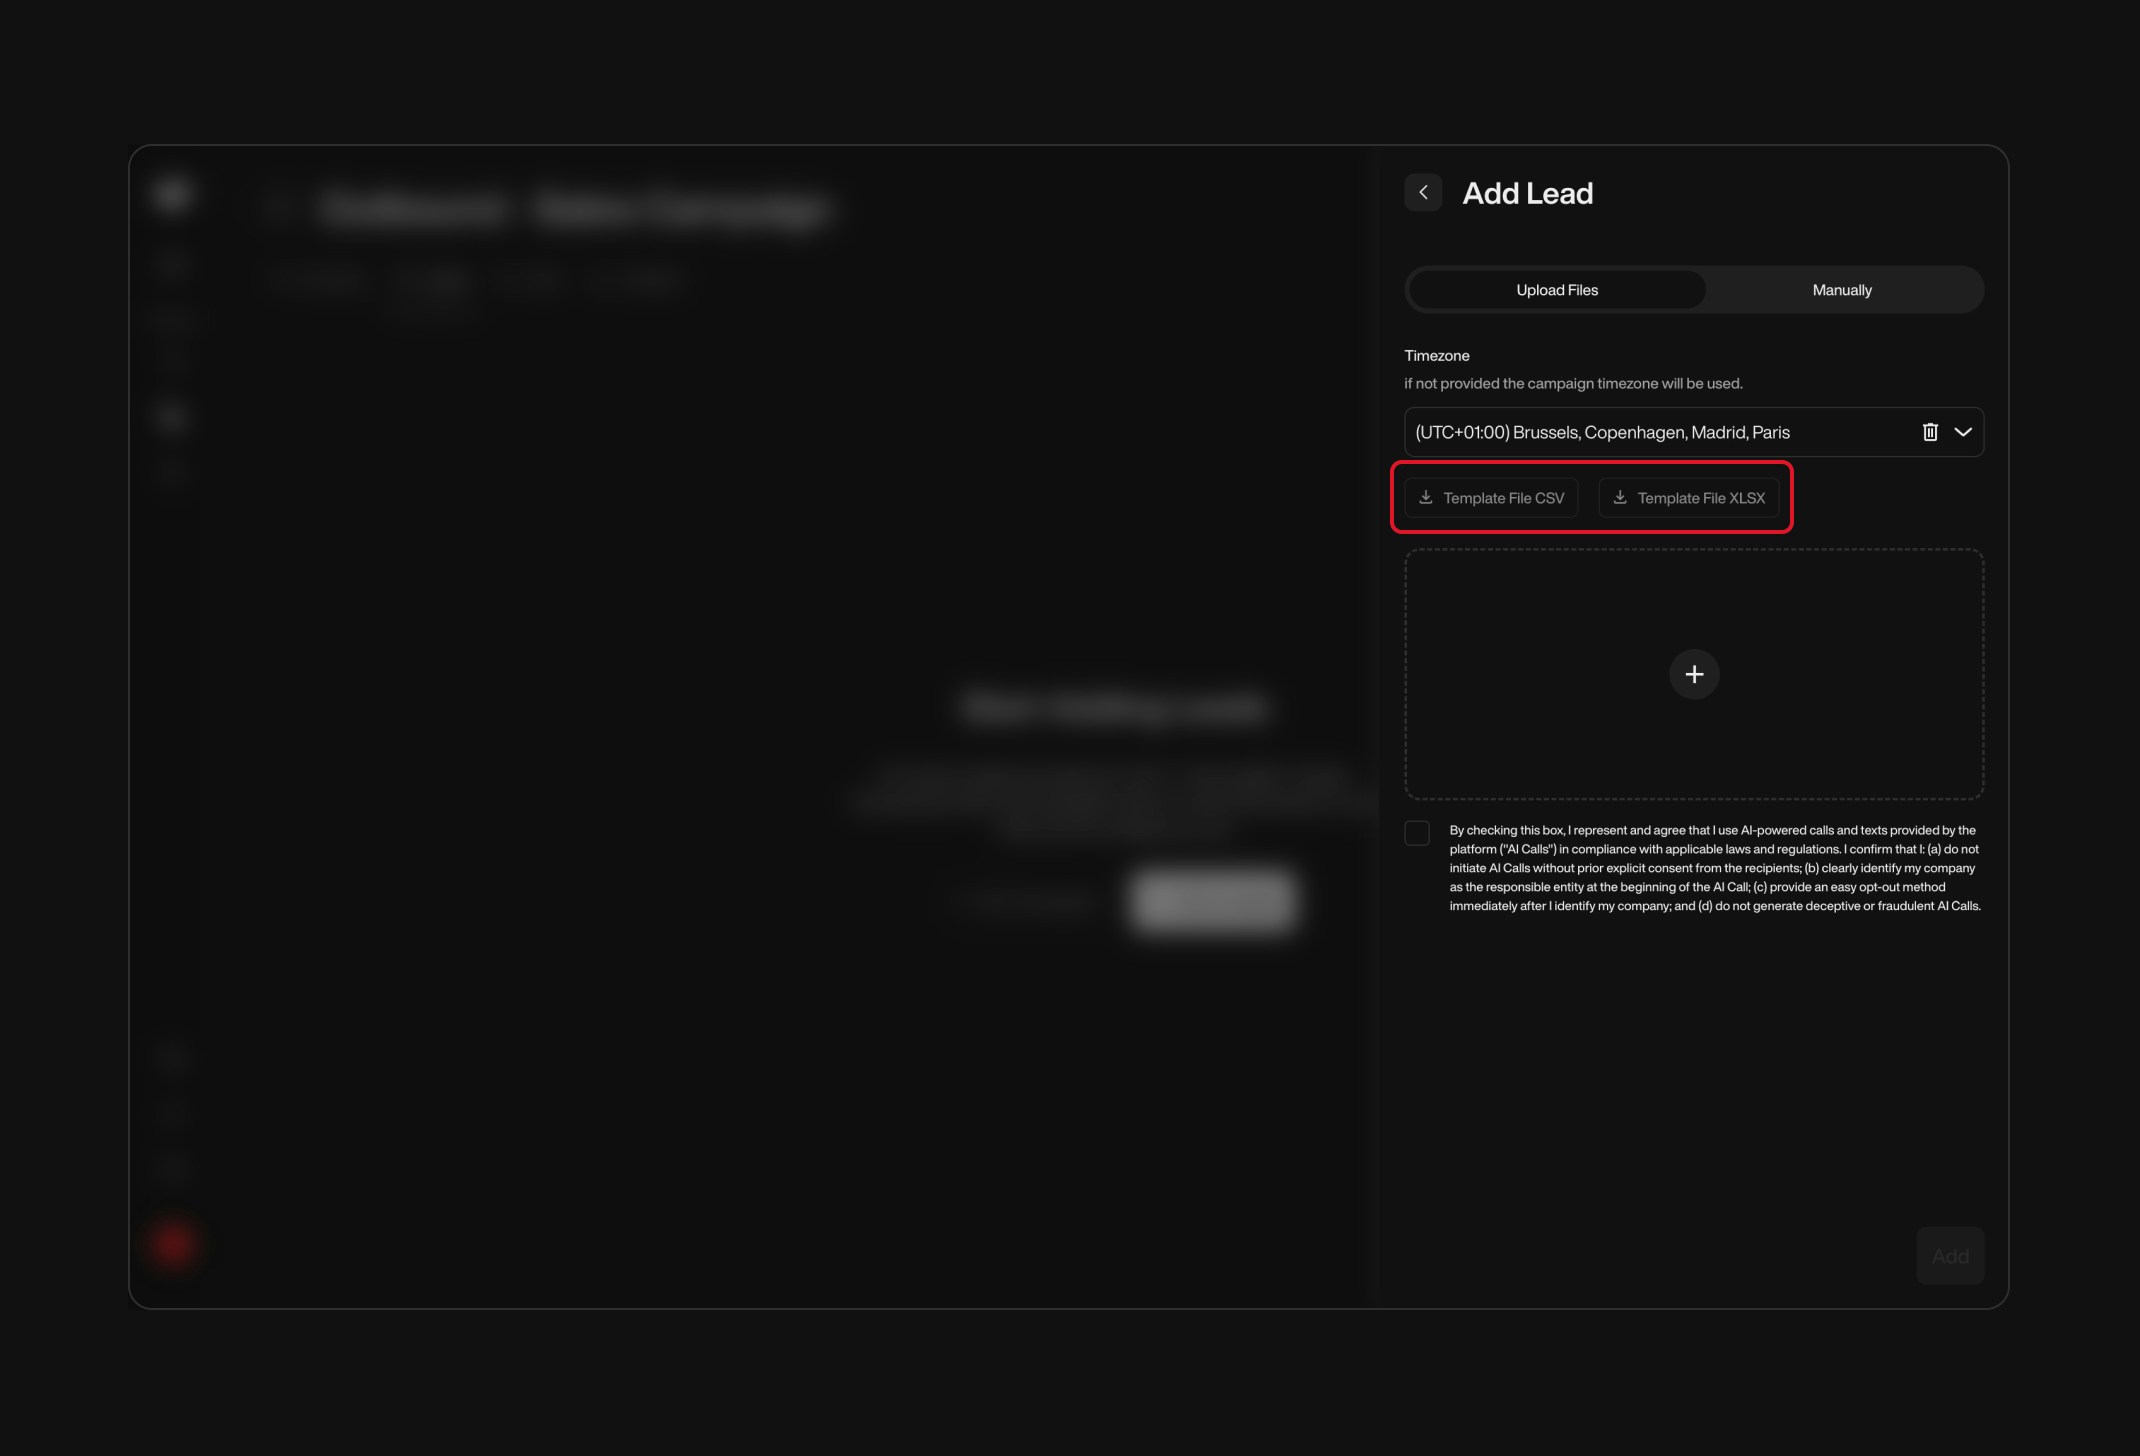
  Adding Variables via the Platform (Outbound Campaigns)
</span>

<Steps>
  <Step title="Download the Lead Template CSV">
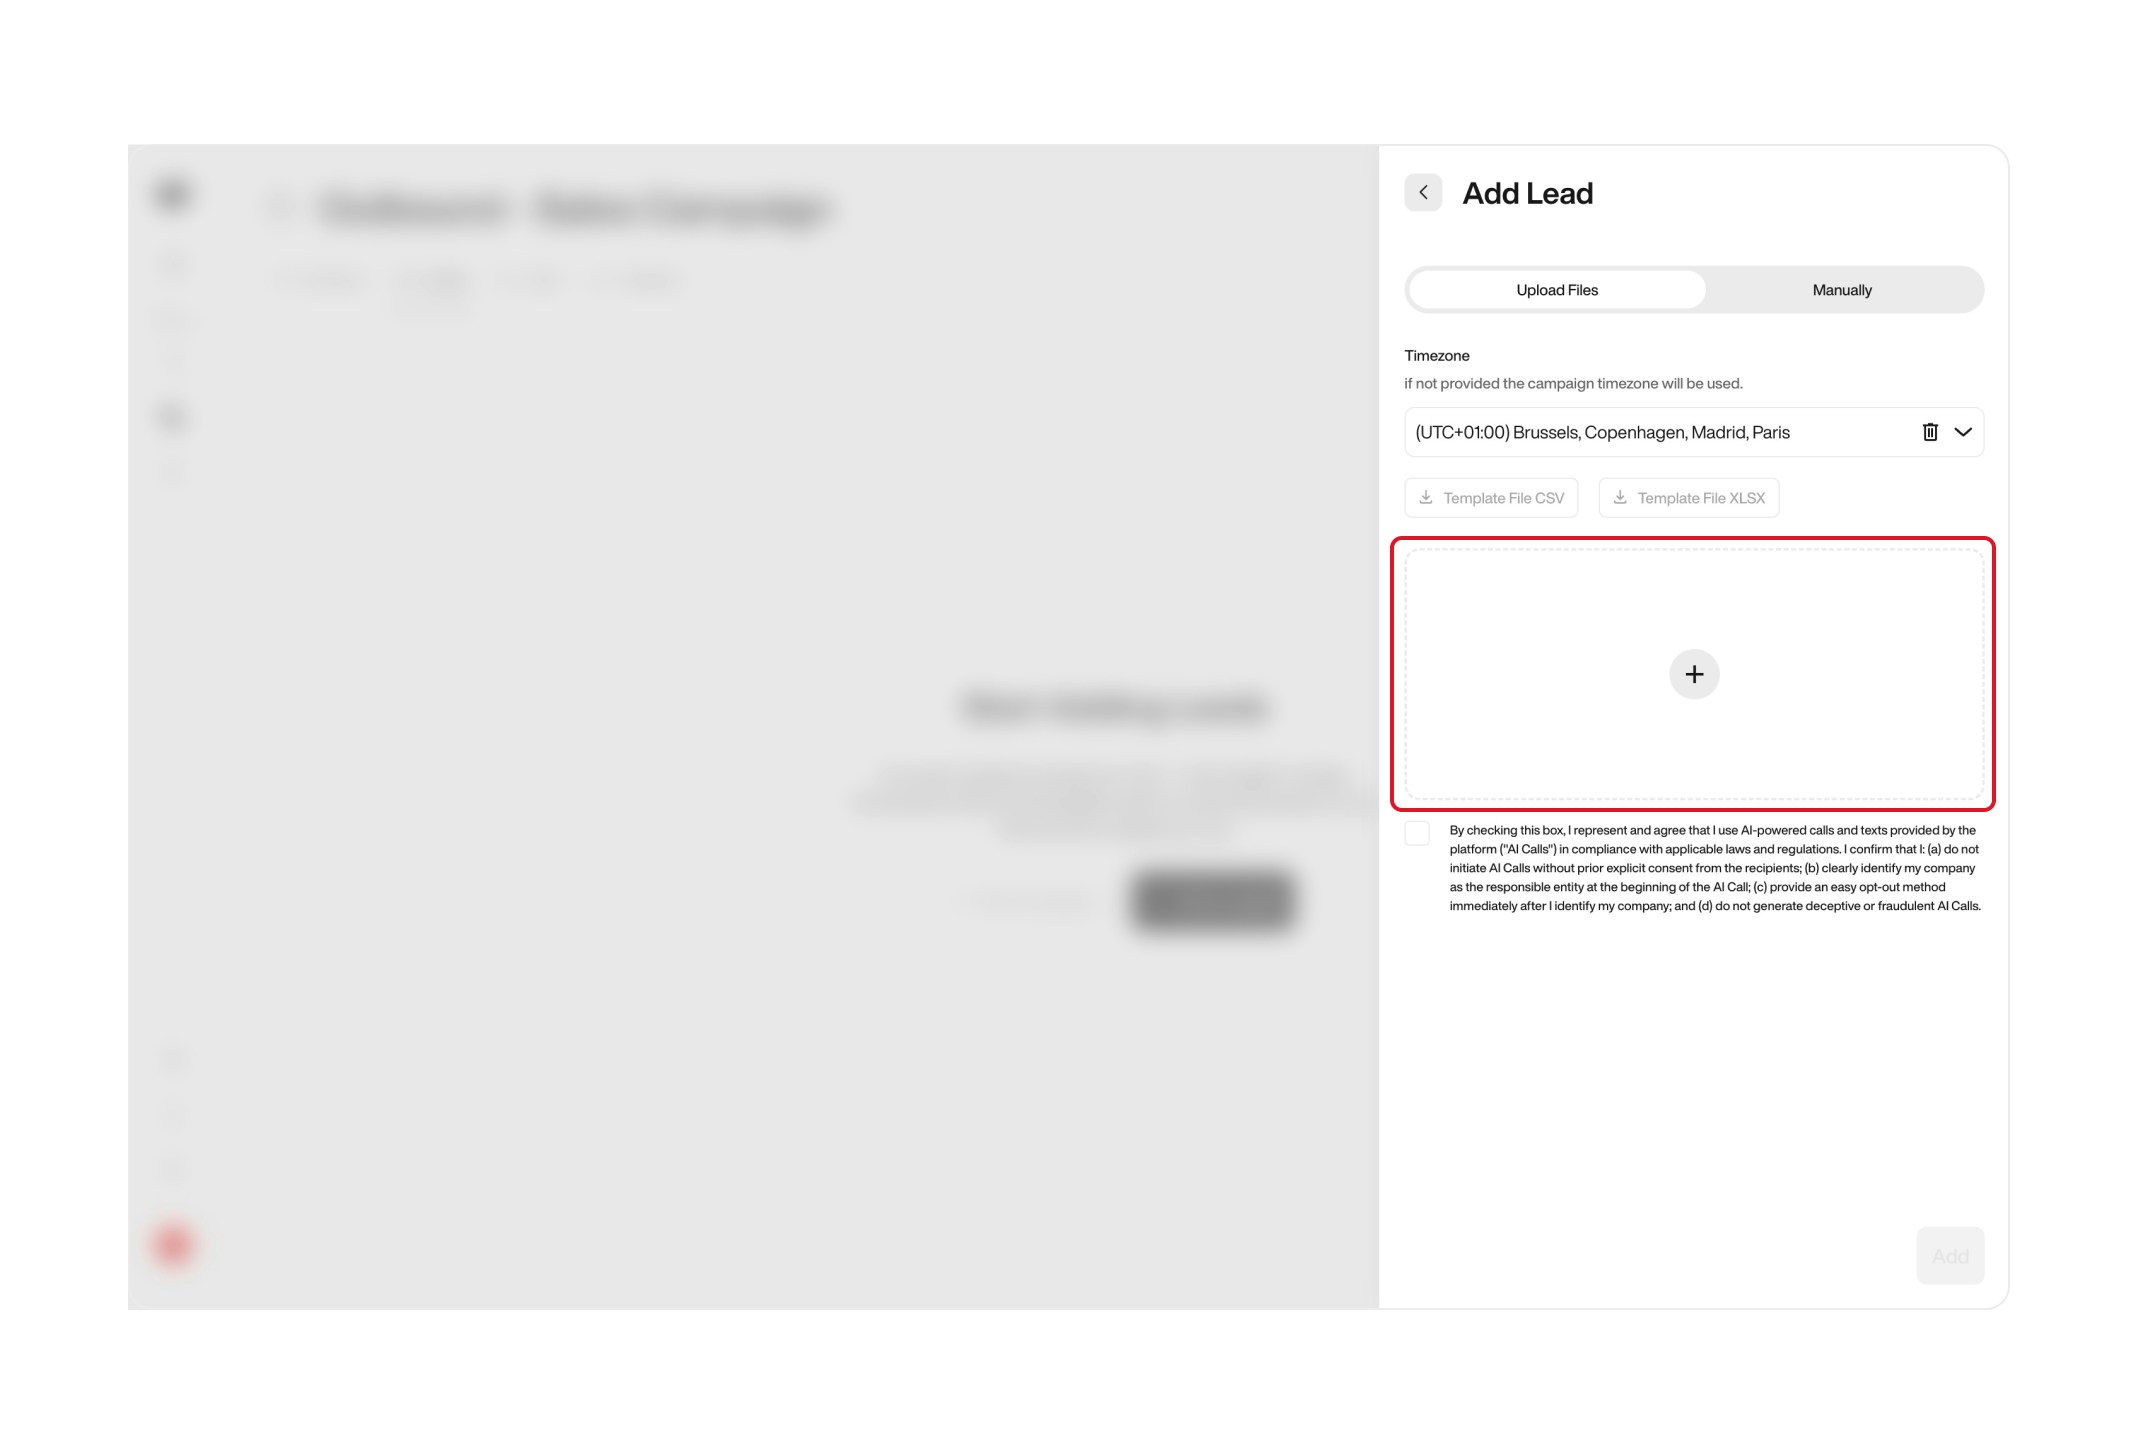
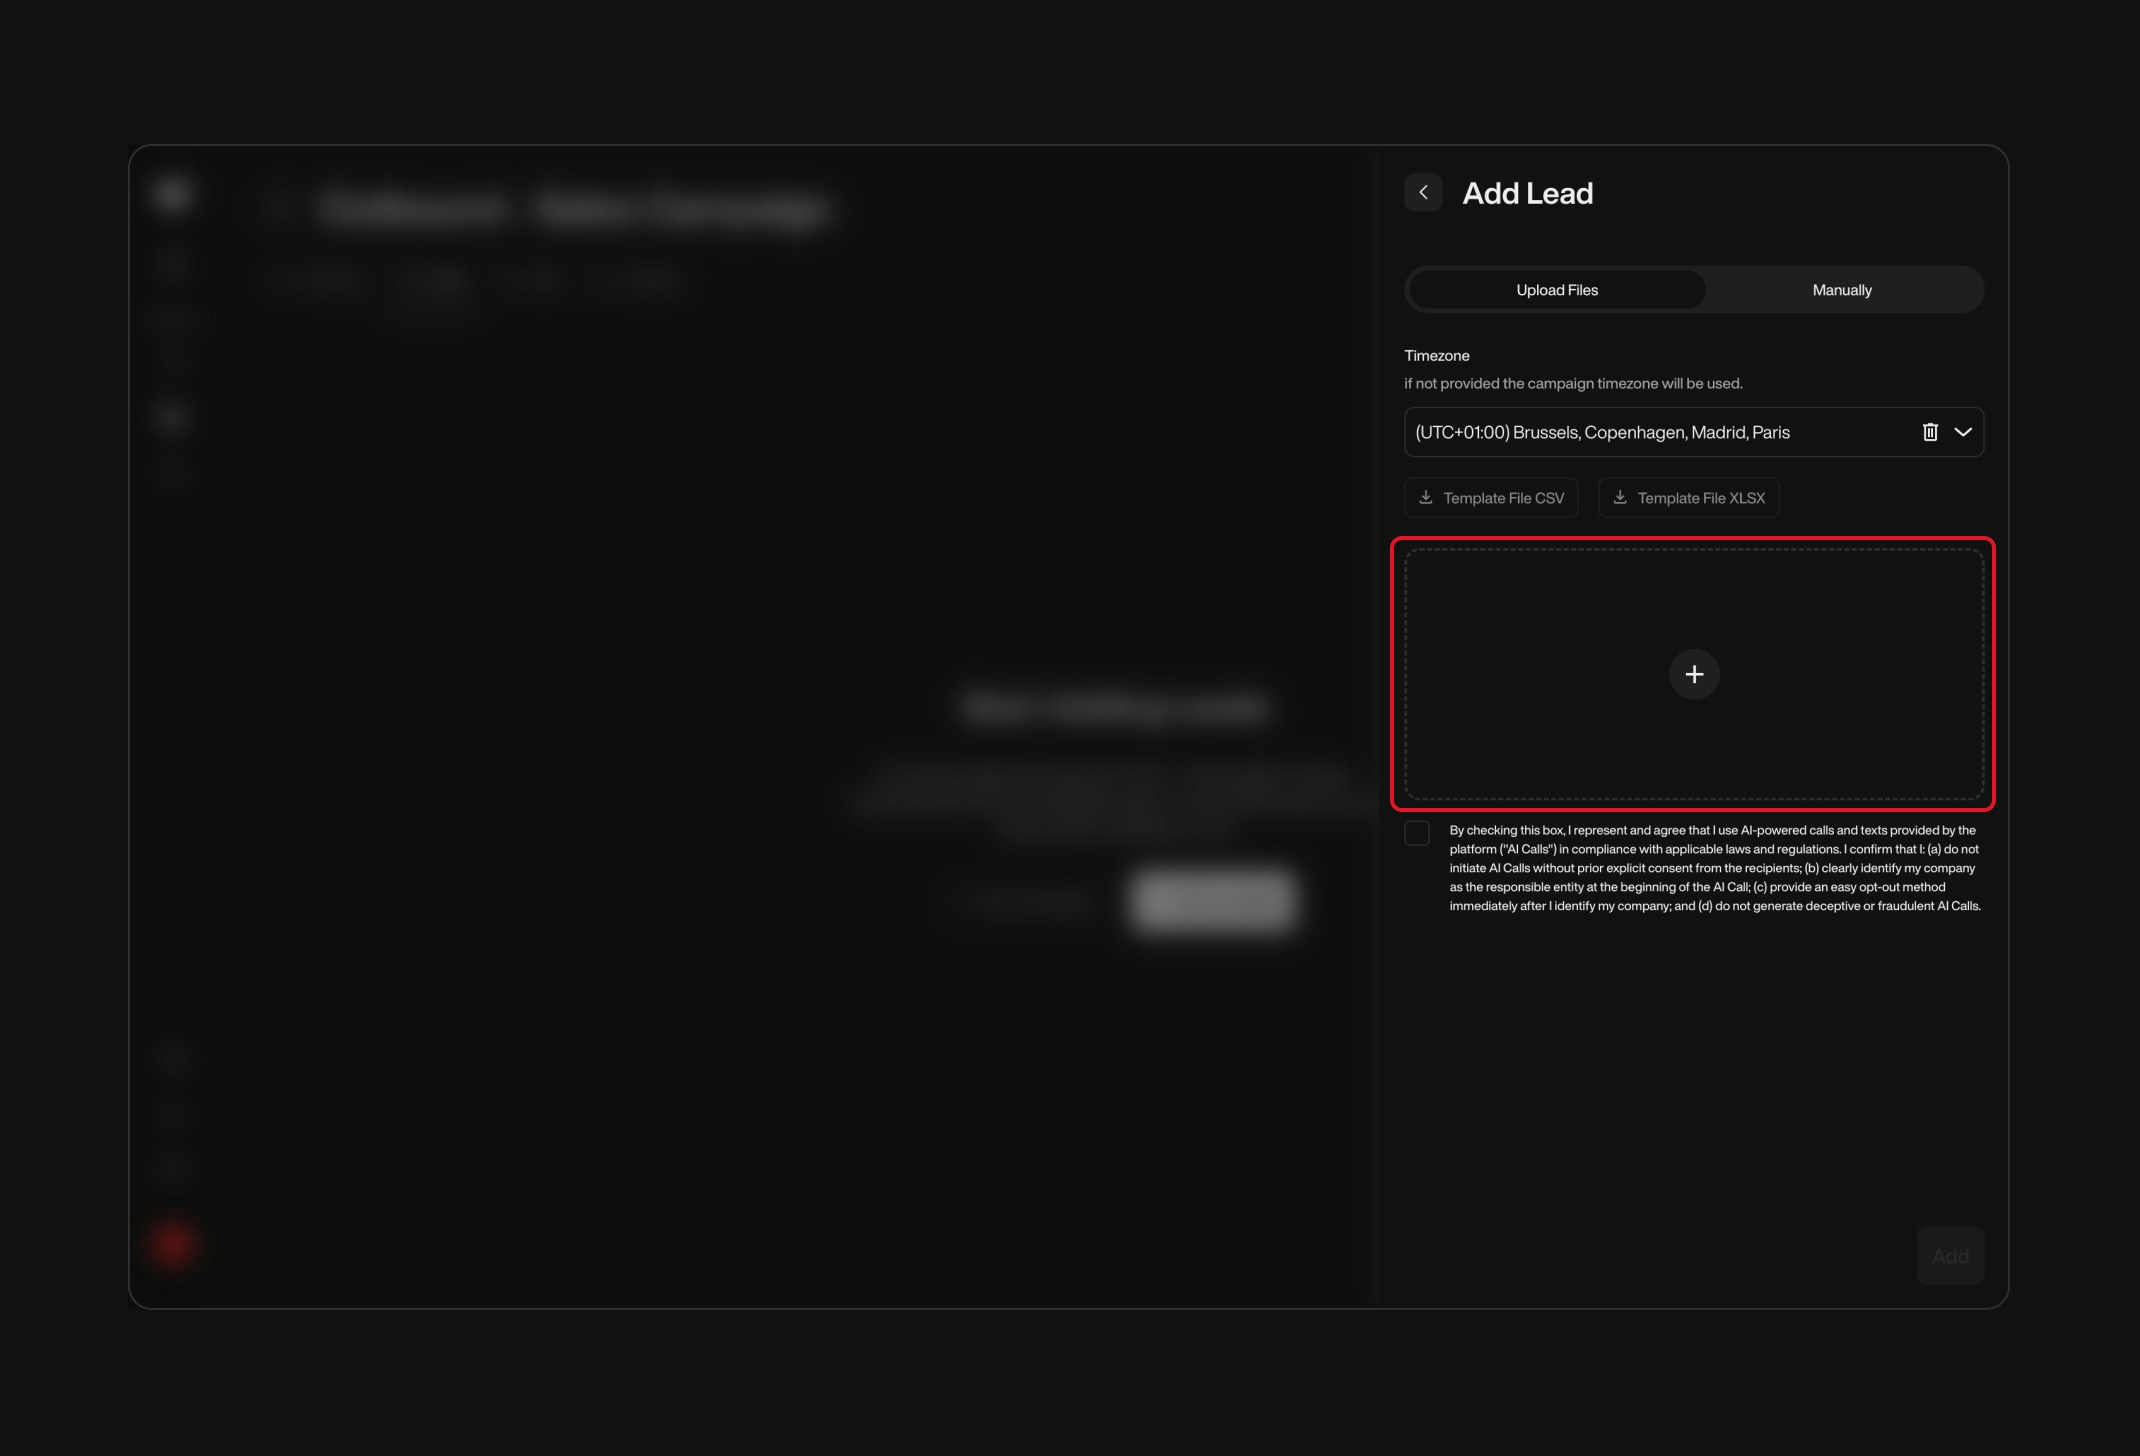
    Go to the **Outbound Campaigns** section of the platform, then click **Download Lead Template**.

    This CSV contains predefined columns where you can add your custom variables.

    <div className="block dark:hidden">
      <Frame>
        <div className="p-1">
          <img src="https://mintcdn.com/nlpearl/yjNN1PpSs3yxoZOQ/images/light_mode/variables_manager-download.jpg?fit=max&auto=format&n=yjNN1PpSs3yxoZOQ&q=85&s=d65ffa16c91f22fbc1bee6d8649159fa" alt="Send Email action interface on light mode" className="rounded-[14px]" width="2140" height="1456" data-path="images/light_mode/variables_manager-download.jpg" />
        </div>
      </Frame>
    </div>

    <div className="hidden dark:block">
      <Frame>
        <div className="p-1">
          <img src="https://mintcdn.com/nlpearl/LRcBocnC9aRvHcb-/images/dark_mode/variables_manager-download.jpg?fit=max&auto=format&n=LRcBocnC9aRvHcb-&q=85&s=a0e9a7800916e6e5a71d6be05b00ae10" alt="Send Email action interface on dark mode" className="rounded-[14px]" width="2140" height="1456" data-path="images/dark_mode/variables_manager-download.jpg" />
        </div>
      </Frame>
    </div>

    <br />
  </Step>

  <Step title="Fill in the CSV with your Lead Data">
    Open the downloaded CSV and complete it by filling in the lead information, including any custom variables in the appropriate columns.

    Make sure each variable matches the column header to avoid upload issues.

    Once completed, **upload the CSV back into the platform**.

    <div className="block dark:hidden">
      <Frame>
        <div className="p-1">
          <img src="https://mintcdn.com/nlpearl/yjNN1PpSs3yxoZOQ/images/light_mode/variables_manager-addlead.jpg?fit=max&auto=format&n=yjNN1PpSs3yxoZOQ&q=85&s=153722c87d940b91c71a5086cc6a5667" alt="Send Email action interface on light mode" className="rounded-[14px]" width="2140" height="1456" data-path="images/light_mode/variables_manager-addlead.jpg" />
        </div>
      </Frame>
    </div>

    <div className="hidden dark:block">
      <Frame>
        <div className="p-1">
          <img src="https://mintcdn.com/nlpearl/LRcBocnC9aRvHcb-/images/dark_mode/variables_manager-addlead.jpg?fit=max&auto=format&n=LRcBocnC9aRvHcb-&q=85&s=f866f5bbac7d85a07d09ad3acdf3c862" alt="Send Email action interface on dark mode" className="rounded-[14px]" width="2140" height="1456" data-path="images/dark_mode/variables_manager-addlead.jpg" />
        </div>
      </Frame>
    </div>
  </Step>
</Steps>

<br />

<Card title="Example CSV Entry">
  | phoneNumber | customerName | membershipStatus |
  | ----------- | ------------ | ---------------- |
  | +1234567890 | Jane Smith   | Gold             |
</Card>

***

<span style={{ fontSize: '18px', fontWeight: 600, color: 'white' }}>
  Adding Variables via API
</span>

1. **Use the Add Lead API Endpoint**: `PUT /v1/Outbound/{outboundId}/Lead`.
2. **Include Variables** in the `callData` field of your JSON payload.

<Card title="Example Request">
  ```http theme={null}
  PUT /v1/Outbound/{outboundId}/Lead
  Content-Type: application/json
  Authorization: Bearer <token>

  {
    "phoneNumber": "+1234567890",
    "externalId": "lead123",
    "callData": {
      "customerName": "Jane Smith",
      "membershipStatus": "Gold"
    }
  }
  ```
</Card>

***

<span style={{ fontSize: '18px', fontWeight: 600, color: 'white' }}>
  Sending Variables in Single On-Demand Calls
</span>

1. **Use the Make Call API Endpoint**: `POST /v1/Outbound/{outboundId}/Call`.
2. **Include Variables** in the `callData` field of your JSON payload.

<Card title="Example Request">
  ```http theme={null}
  POST /v1/Outbound/{outboundId}/Call
  Content-Type: application/json
  Authorization: Bearer <token>

  {
    "to": "+1234567890",
    "callData": {
      "firstName": "John",
      "accountBalance": "$100"
    }
  }
  ```
</Card>

***

<Note>
  Best Practices for Using Variables

  * **Use Descriptive Names**: Clearly name variables for easy identification (e.g., `customerEmail`).
  * **Define Variables Early**: Plan your variables before building the conversation flow.
  * **Categorize Variables**: Use **Pre-call** and **Collected In-call** categories to organize your variables.
  * **Avoid Unnecessary Variables**: Only create variables that are essential to your conversation.
  * **Test Thoroughly**: Simulate conversations to ensure variables function as intended.
  * **Handle Data Securely**: Be cautious with personal and sensitive information.
  * **Document Variables**: Use the description field to note the purpose of each variable.
  * **Use Allowed Values and Codes**: When appropriate, define allowed values and use codes for better data management.
</Note>

***

## Examples

<Card title="Example 1: Personalizing an Outbound Call">
  <Info>
    **Scenario**: Notifying customers about a service upgrade.
  </Info>

  1. **Variables**:
     * **Pre-call Variables**:
       * `customerName` (Text)
       * `currentPlan` (Text)
     * **Collected In-call Variables**:
       * `interested` (Boolean)
  2. **Script**: "Hello **{customerName}**, we're excited to inform you about an upgrade to your **{currentPlan}** plan."
  3. **Collect Interest**:
     * Question: "Would you like to hear more about this upgrade?"
     * Store response in `interested` (Boolean).
  4. **Implement Conditional Logic**:
     * If **`interested`** is **true**, proceed with details.
     * If **false**, thank the customer and end the call.

  <Note>
    **Lead Import Tip**\
    Use the platform to import leads with the `customerName` and `currentPlan` variables populated.
  </Note>
</Card>

<br />

<Card title="Example 2: Scheduling Multiple Dates">
  <Info>
    **Scenario**: Collecting multiple available dates from a customer.
  </Info>

  1. **Variable**:
     * `availableDates` (Date & Time)
     * **Allow Multiple Entries**: Enabled.
  2. **Script**: "Please provide the dates you are available for the meeting."
  3. **Collect Dates**:
     * The system allows the customer to provide multiple dates, which are stored in the `availableDates` variable.
  4. **Usage**:
     * The collected dates can be used to schedule meetings or appointments.
</Card>

<br />

<Card title="Example 3: Dynamic Survey with Conditional Logic">
  <Info>
    **Scenario**: Gathering customer feedback.
  </Info>

  1. **Ask Satisfaction Score**:
     * Question: "On a scale of 1 to 5, how satisfied are you with our service?"
     * Store in `satisfactionScore` (Whole Number).
  2. **Conditional Paths**:
     * If **`satisfactionScore >= 4`**, proceed to a node thanking the customer.
     * If **`satisfactionScore < 4`**, proceed to a node asking for improvement suggestions.
  3. **Follow-Up Actions**: Send a personalized email using collected data, thanking them or addressing concerns.
</Card>

***

## Frequently Asked Questions (FAQ)

<AccordionGroup>
  <Accordion title="Can I use variables in both Simple and Advanced modes?">
    Yes, variables function similarly in both modes and can be managed accordingly.
  </Accordion>

  <Accordion title="How do I handle empty variables?">
    Implement checks using conditional logic or assign default values to handle empty variables gracefully.
  </Accordion>

  <Accordion title="Are variable names case-sensitive?">
    Yes, variable names are case-sensitive. Ensure consistency when referencing them.
  </Accordion>

  <Accordion title="Can I change a variable's value during the conversation?">
    Yes, variables can be updated multiple times as the conversation progresses.
  </Accordion>

  <Accordion title="How do I include variables when adding leads via the platform or API?">
    Include variables in the CSV file for platform uploads or in the `callData` field when using the API.
  </Accordion>

  <Accordion title="What is the difference between Pre-call and Collected In-call variables?">
    **Pre-call Variables** are configured before the conversation starts and typically include data imported from external sources or predefined settings. **Collected In-call Variables** are captured or updated during the conversation based on user interactions.
  </Accordion>

  <Accordion title="What happens if I delete a variable that’s in use?">
    Deleting a variable that’s in use can cause errors in your conversation flow. Remove all references before deleting.
  </Accordion>
</AccordionGroup>

***

## Conclusion

Variables are powerful tools that enhance your conversations by making them dynamic and personalized. By effectively using variables, you can:

* **Collect and Store User Inputs**: Gather essential information from users.
* **Personalize Interactions**: Create tailored experiences for each user.
* **Control Conversation Flow**: Direct the conversation based on user responses and data.
* **Integrate External Data**: Incorporate information from other systems for enriched interactions.

<Note>
  Remember to:

  * **Plan Carefully**: Define your variables before building your conversation.
  * **Organize Variables**: Use categories like Pre-call and Collected In-call for better management.
  * **Enhance User Experience**: Use variables to make interactions meaningful.
  * **Test Thoroughly**: Regularly test your conversation to ensure variables work correctly.
  * **Follow Best Practices**: Keep your variables organized and your data secure.
</Note>

***

For additional support, contact our support team at [support@nlpearl.ai](support@nlpearl.ai).

***
