> ## Documentation Index
> Fetch the complete documentation index at: https://developers.nlpearl.ai/llms.txt
> Use this file to discover all available pages before exploring further.
# Users & Workspaces
> Invite users, assign roles, manage permissions, and switch between workspaces.
***
Use **Users & Workspaces** settings to control who can access your workspace, what each person is allowed to manage, and which workspace you are currently working in.
Invite team members and assign them the right access level.
Create reusable permission sets for different responsibilities.
Switch between workspaces or create a new one.
Limit access to Pearls, billing, phone numbers, API keys, users, and audit logs.
***
# Users & Roles
Control who can access the current workspace and what each person is allowed to do.
## Managing Users
The **Users** page lets workspace owners and admins invite new members, review existing users, and update their access level.
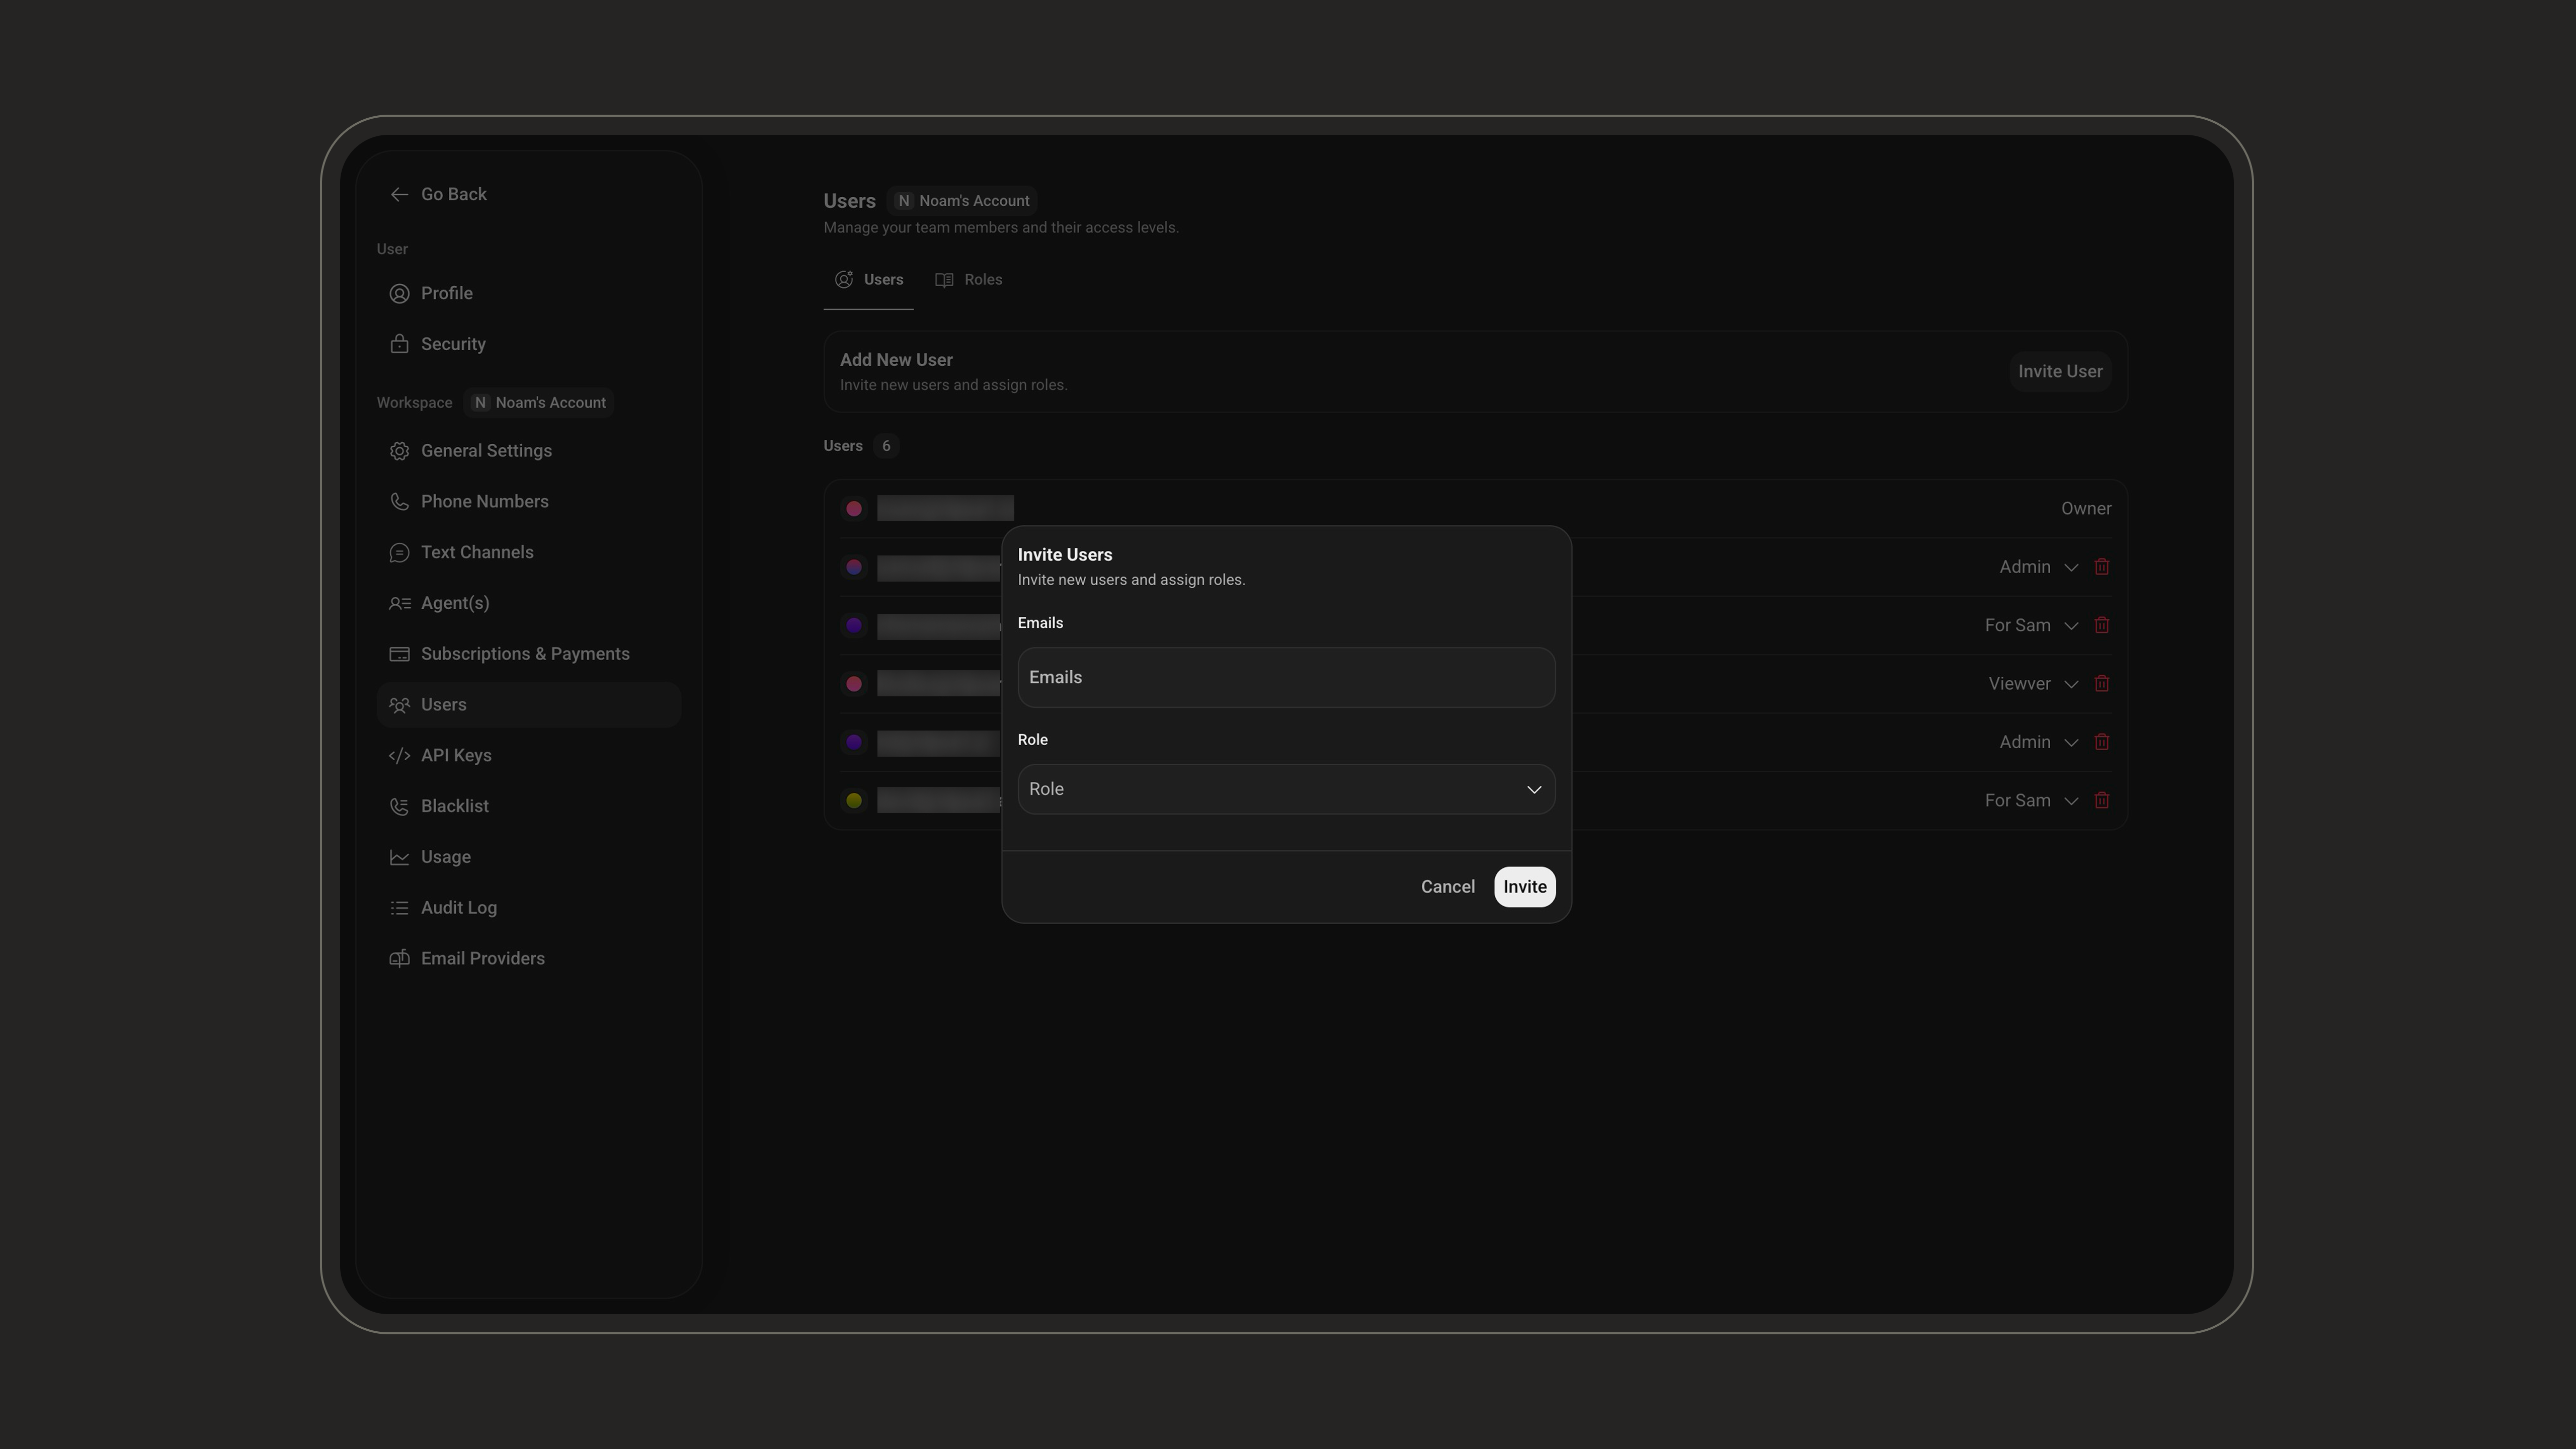
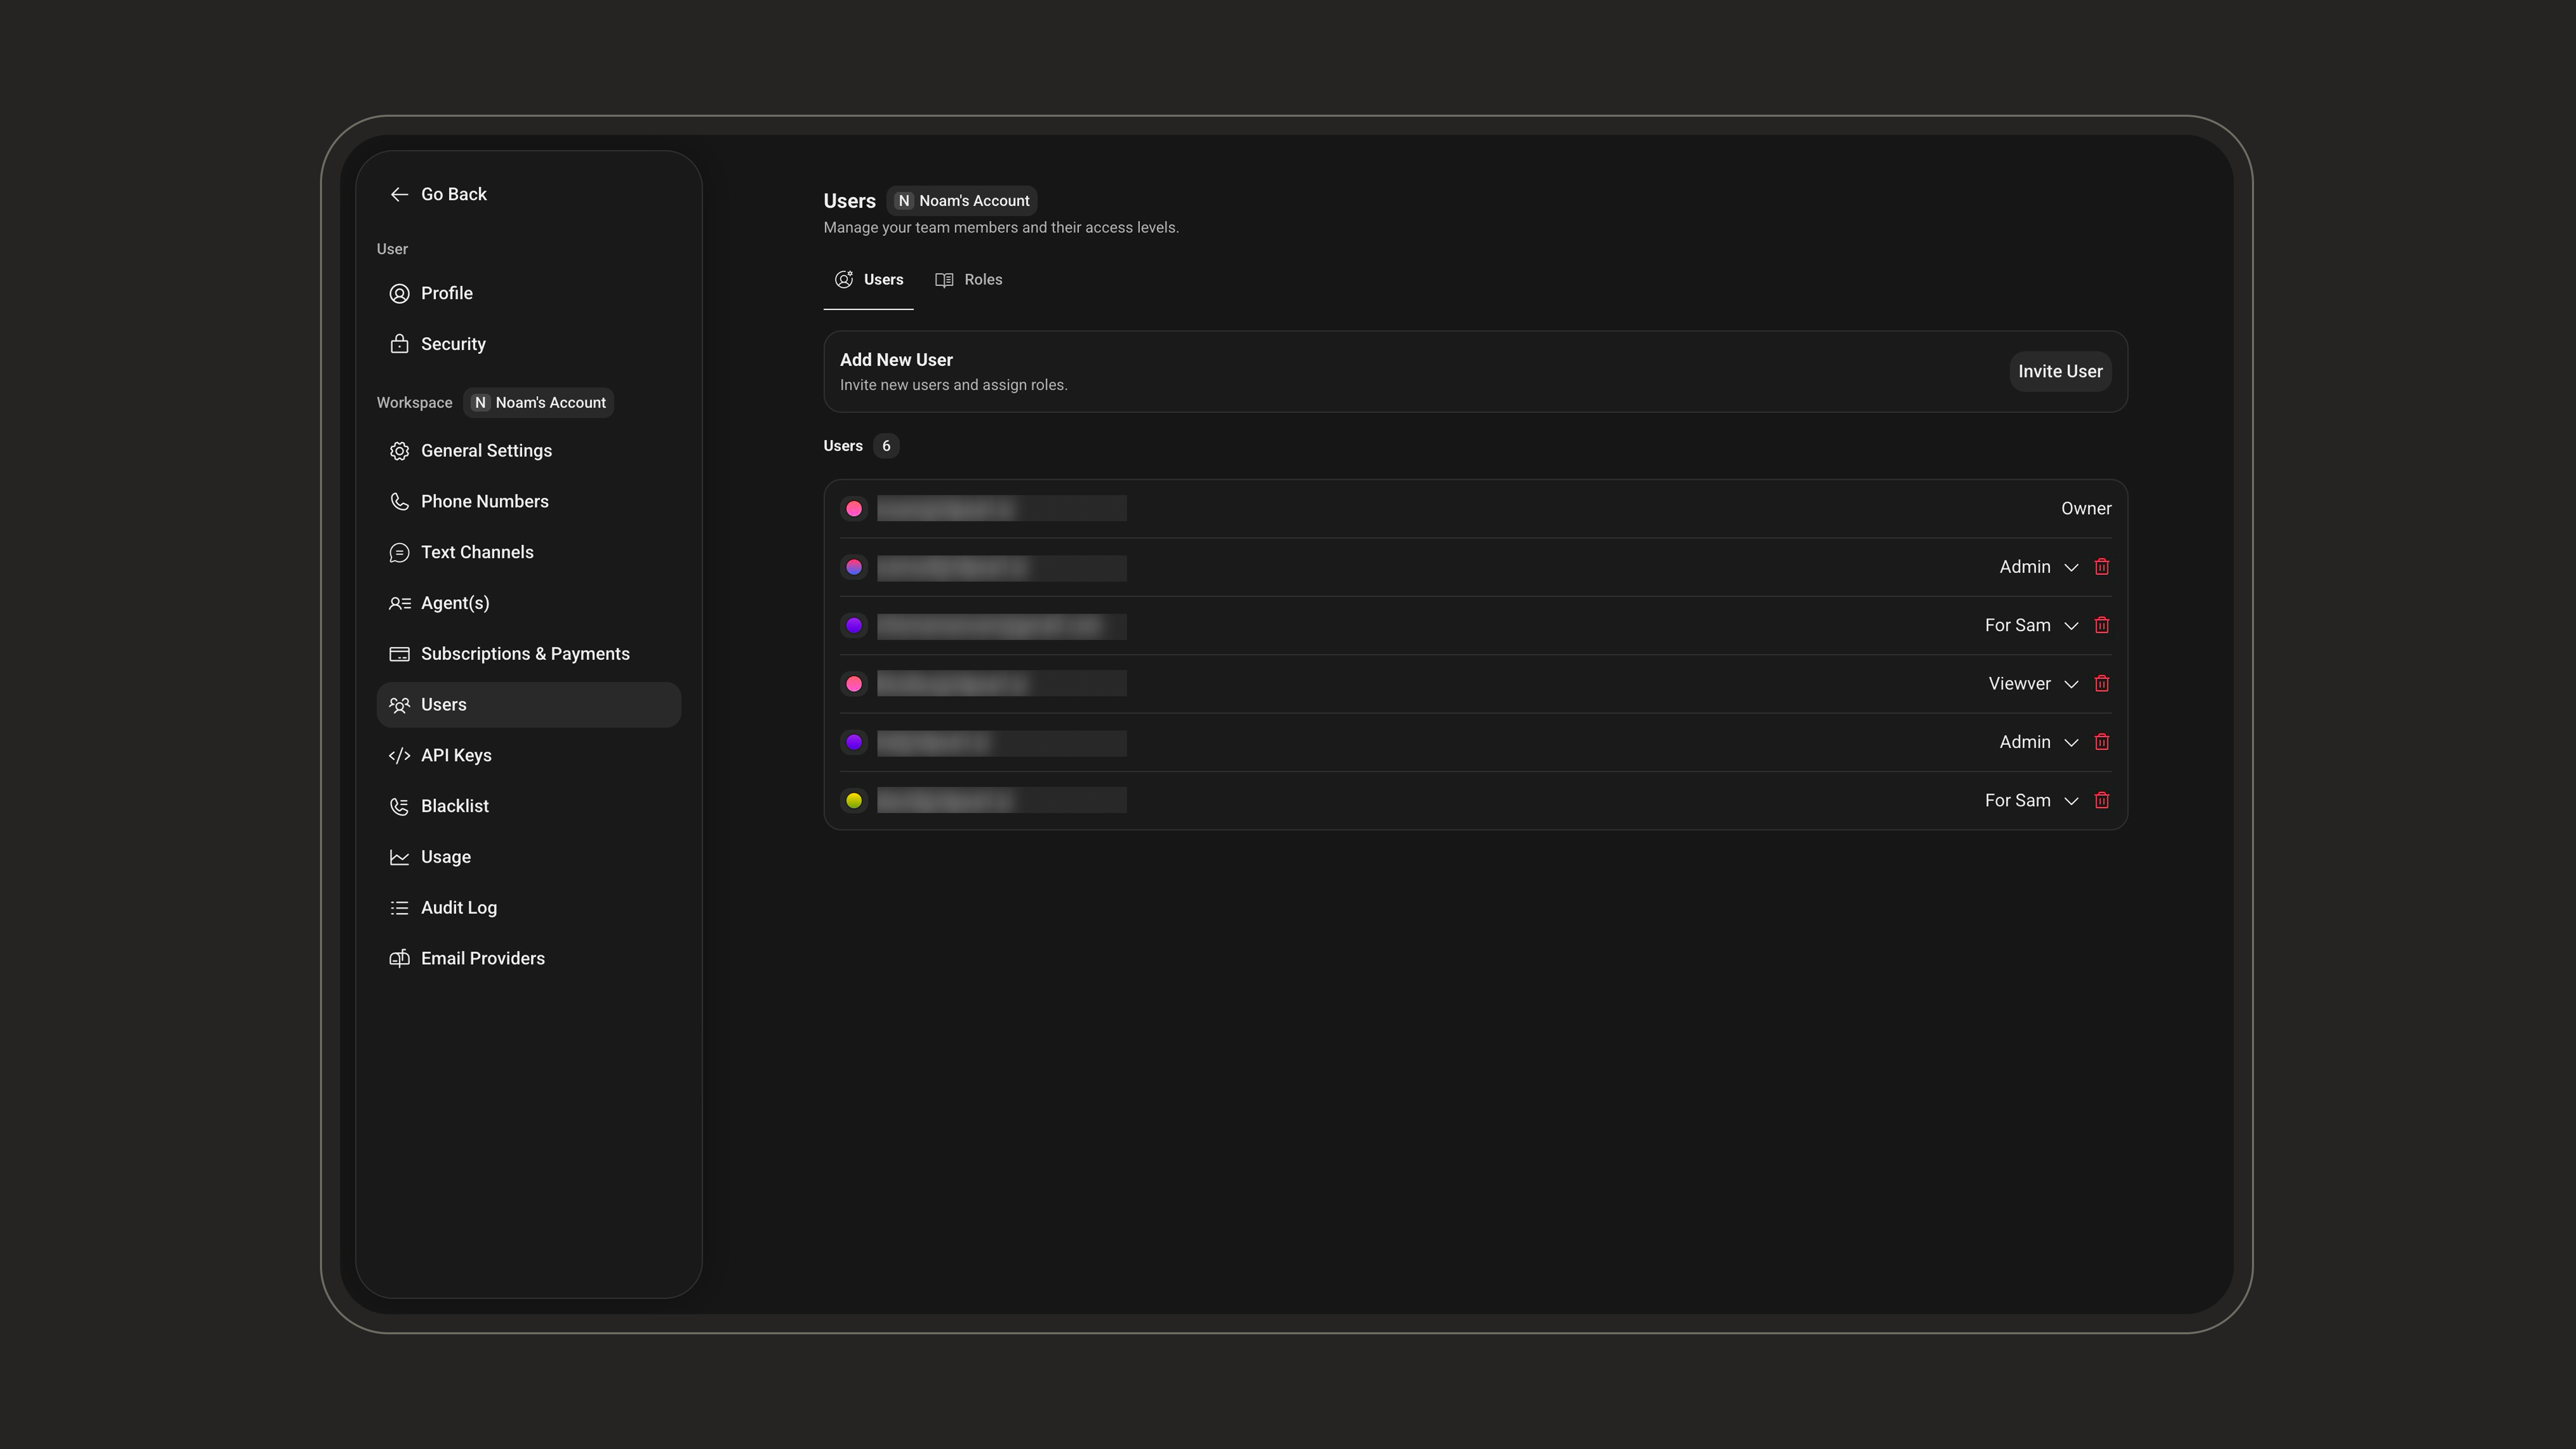 Go to **Workspace > Users**.
Click **Invite User**, enter one or more email addresses, then choose the role to assign.
Go to **Workspace > Users**.
Click **Invite User**, enter one or more email addresses, then choose the role to assign.
 Confirm that each user has the correct role, such as **Owner**, **Admin**, or a custom role created for your team.
Give users the minimum access they need for their work. You can always update their role later as responsibilities change.
***
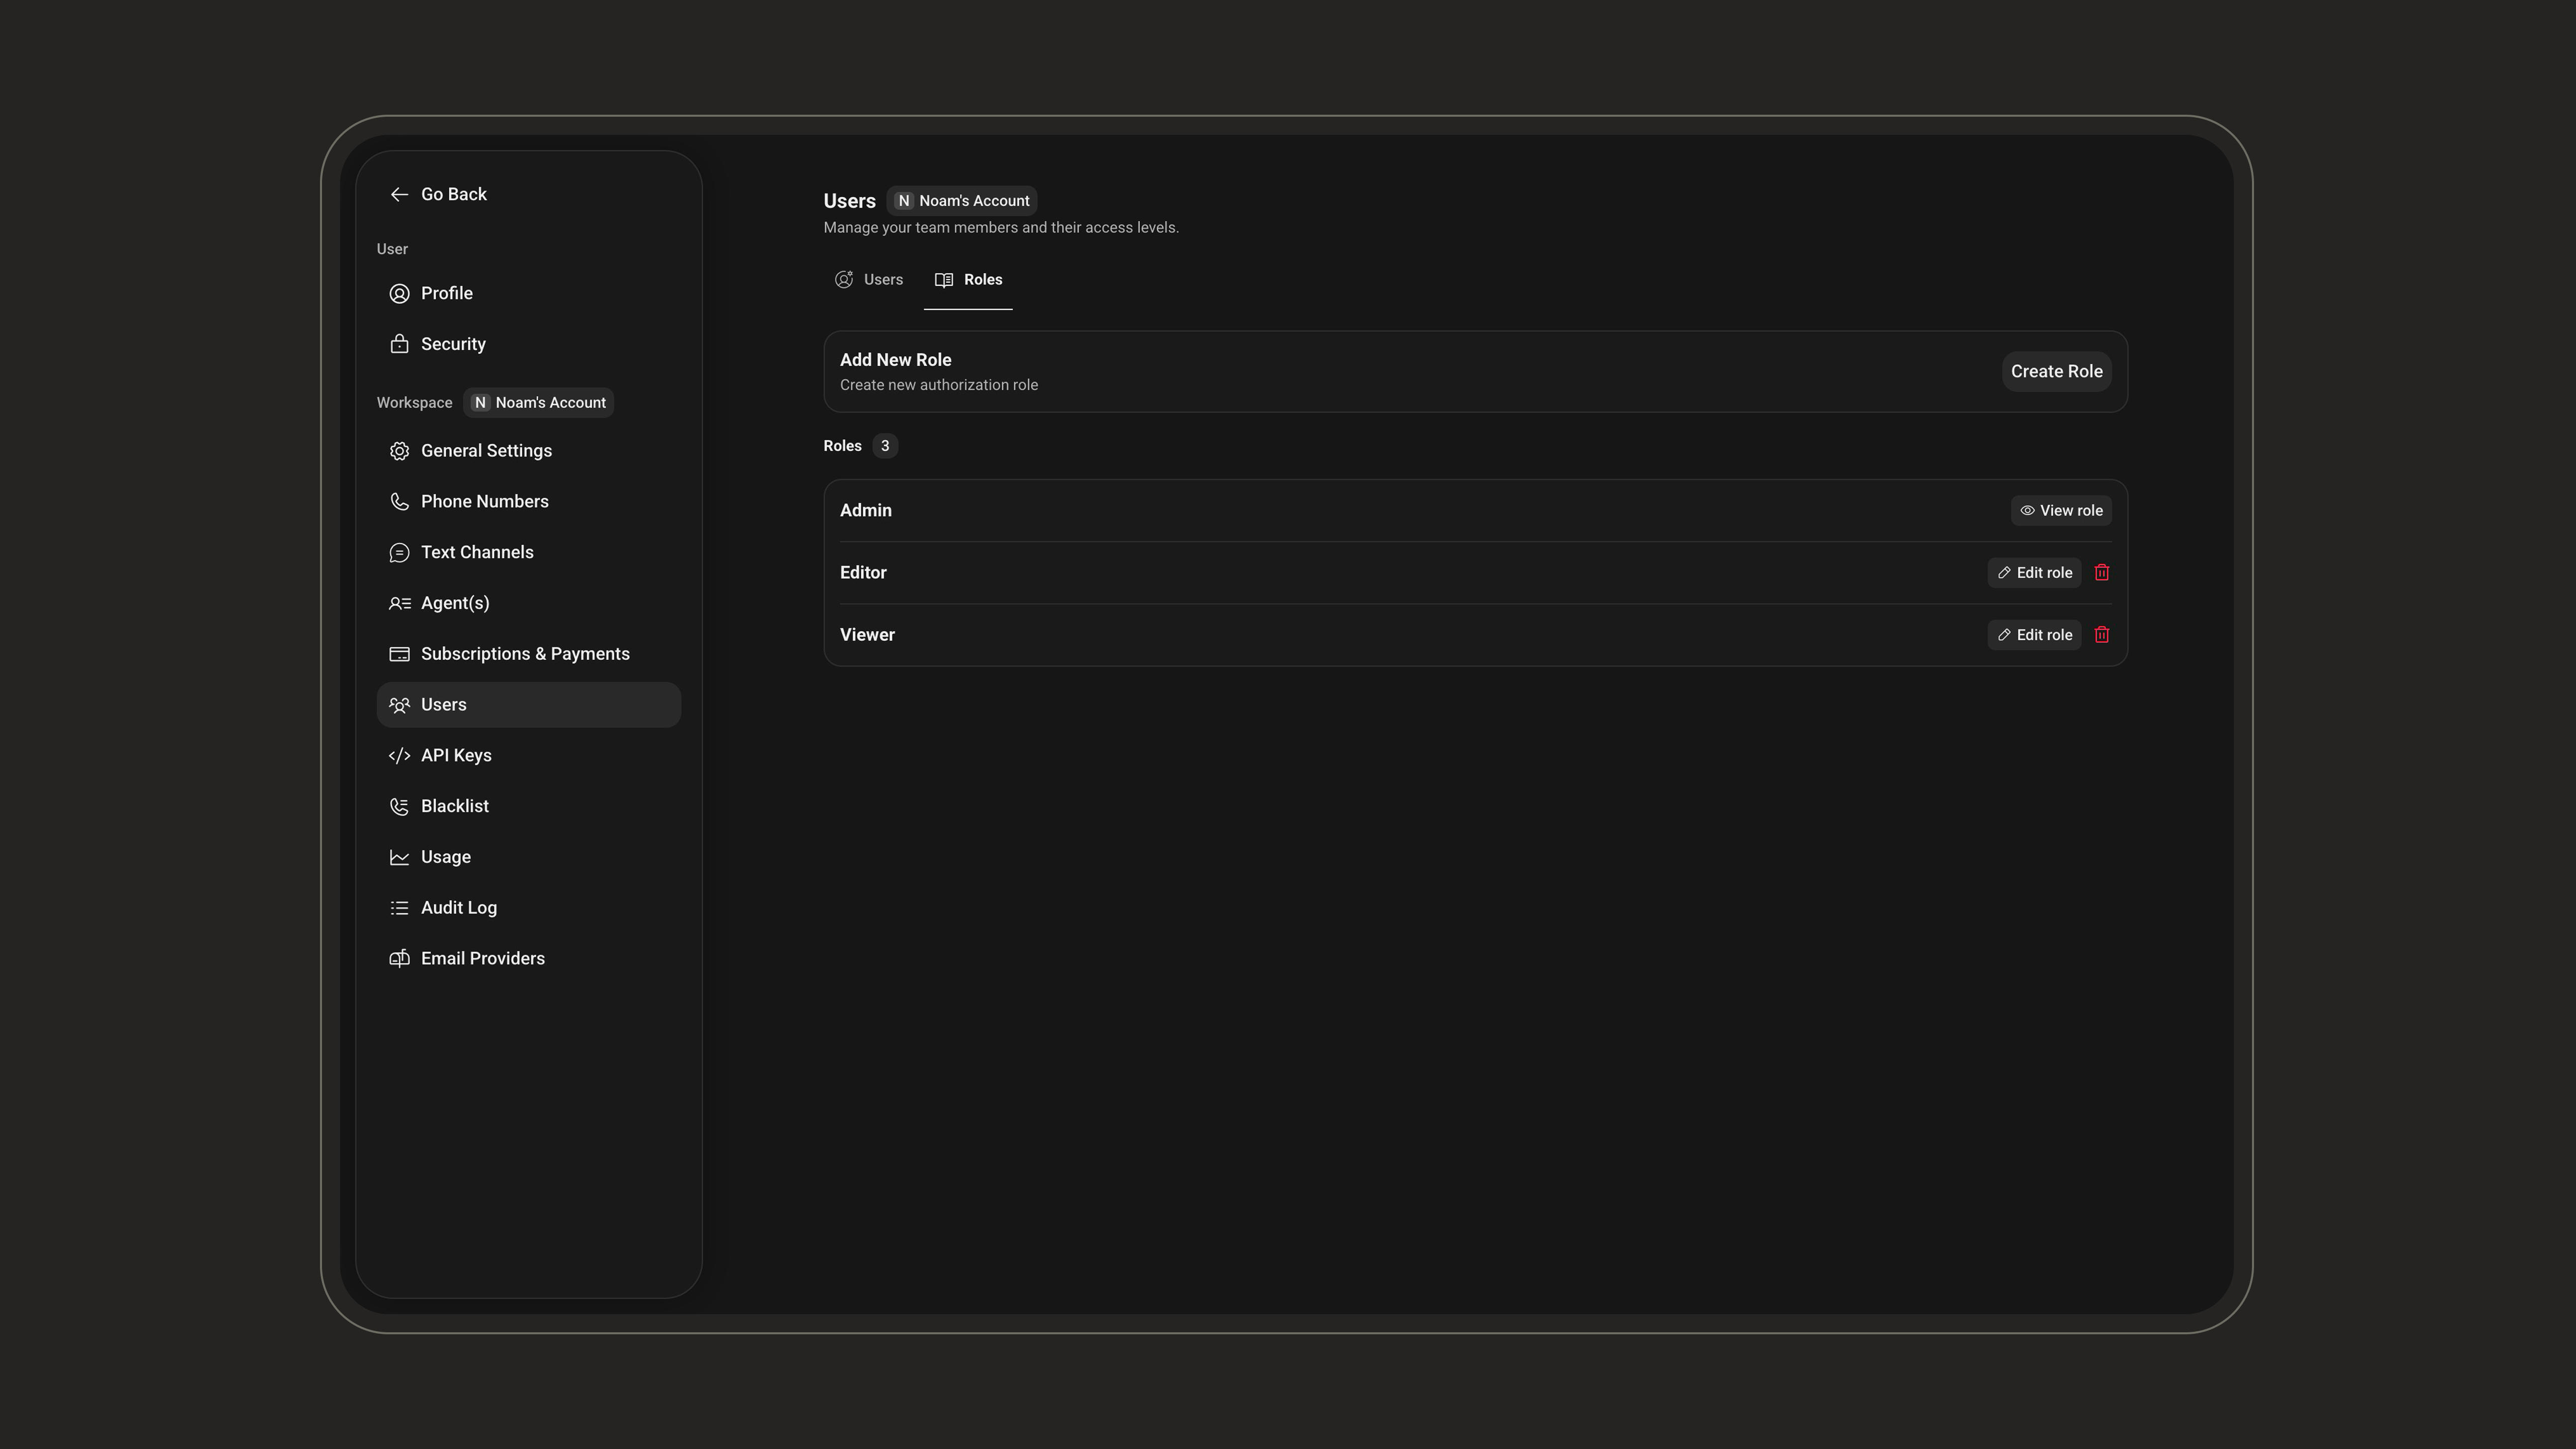
## Managing Roles
Roles define what users are allowed to do in a workspace. You can use roles to separate responsibilities between admins, operators, support teams, billing teams, and other internal workflows.
To manage roles, go to **Workspace > Users**, then open the **Roles** tab.
Confirm that each user has the correct role, such as **Owner**, **Admin**, or a custom role created for your team.
Give users the minimum access they need for their work. You can always update their role later as responsibilities change.
***
## Managing Roles
Roles define what users are allowed to do in a workspace. You can use roles to separate responsibilities between admins, operators, support teams, billing teams, and other internal workflows.
To manage roles, go to **Workspace > Users**, then open the **Roles** tab.
 Click **Create Role** and enter a clear role name.
Choose which actions the role should allow.
Click **Create Role** and enter a clear role name.
Choose which actions the role should allow.
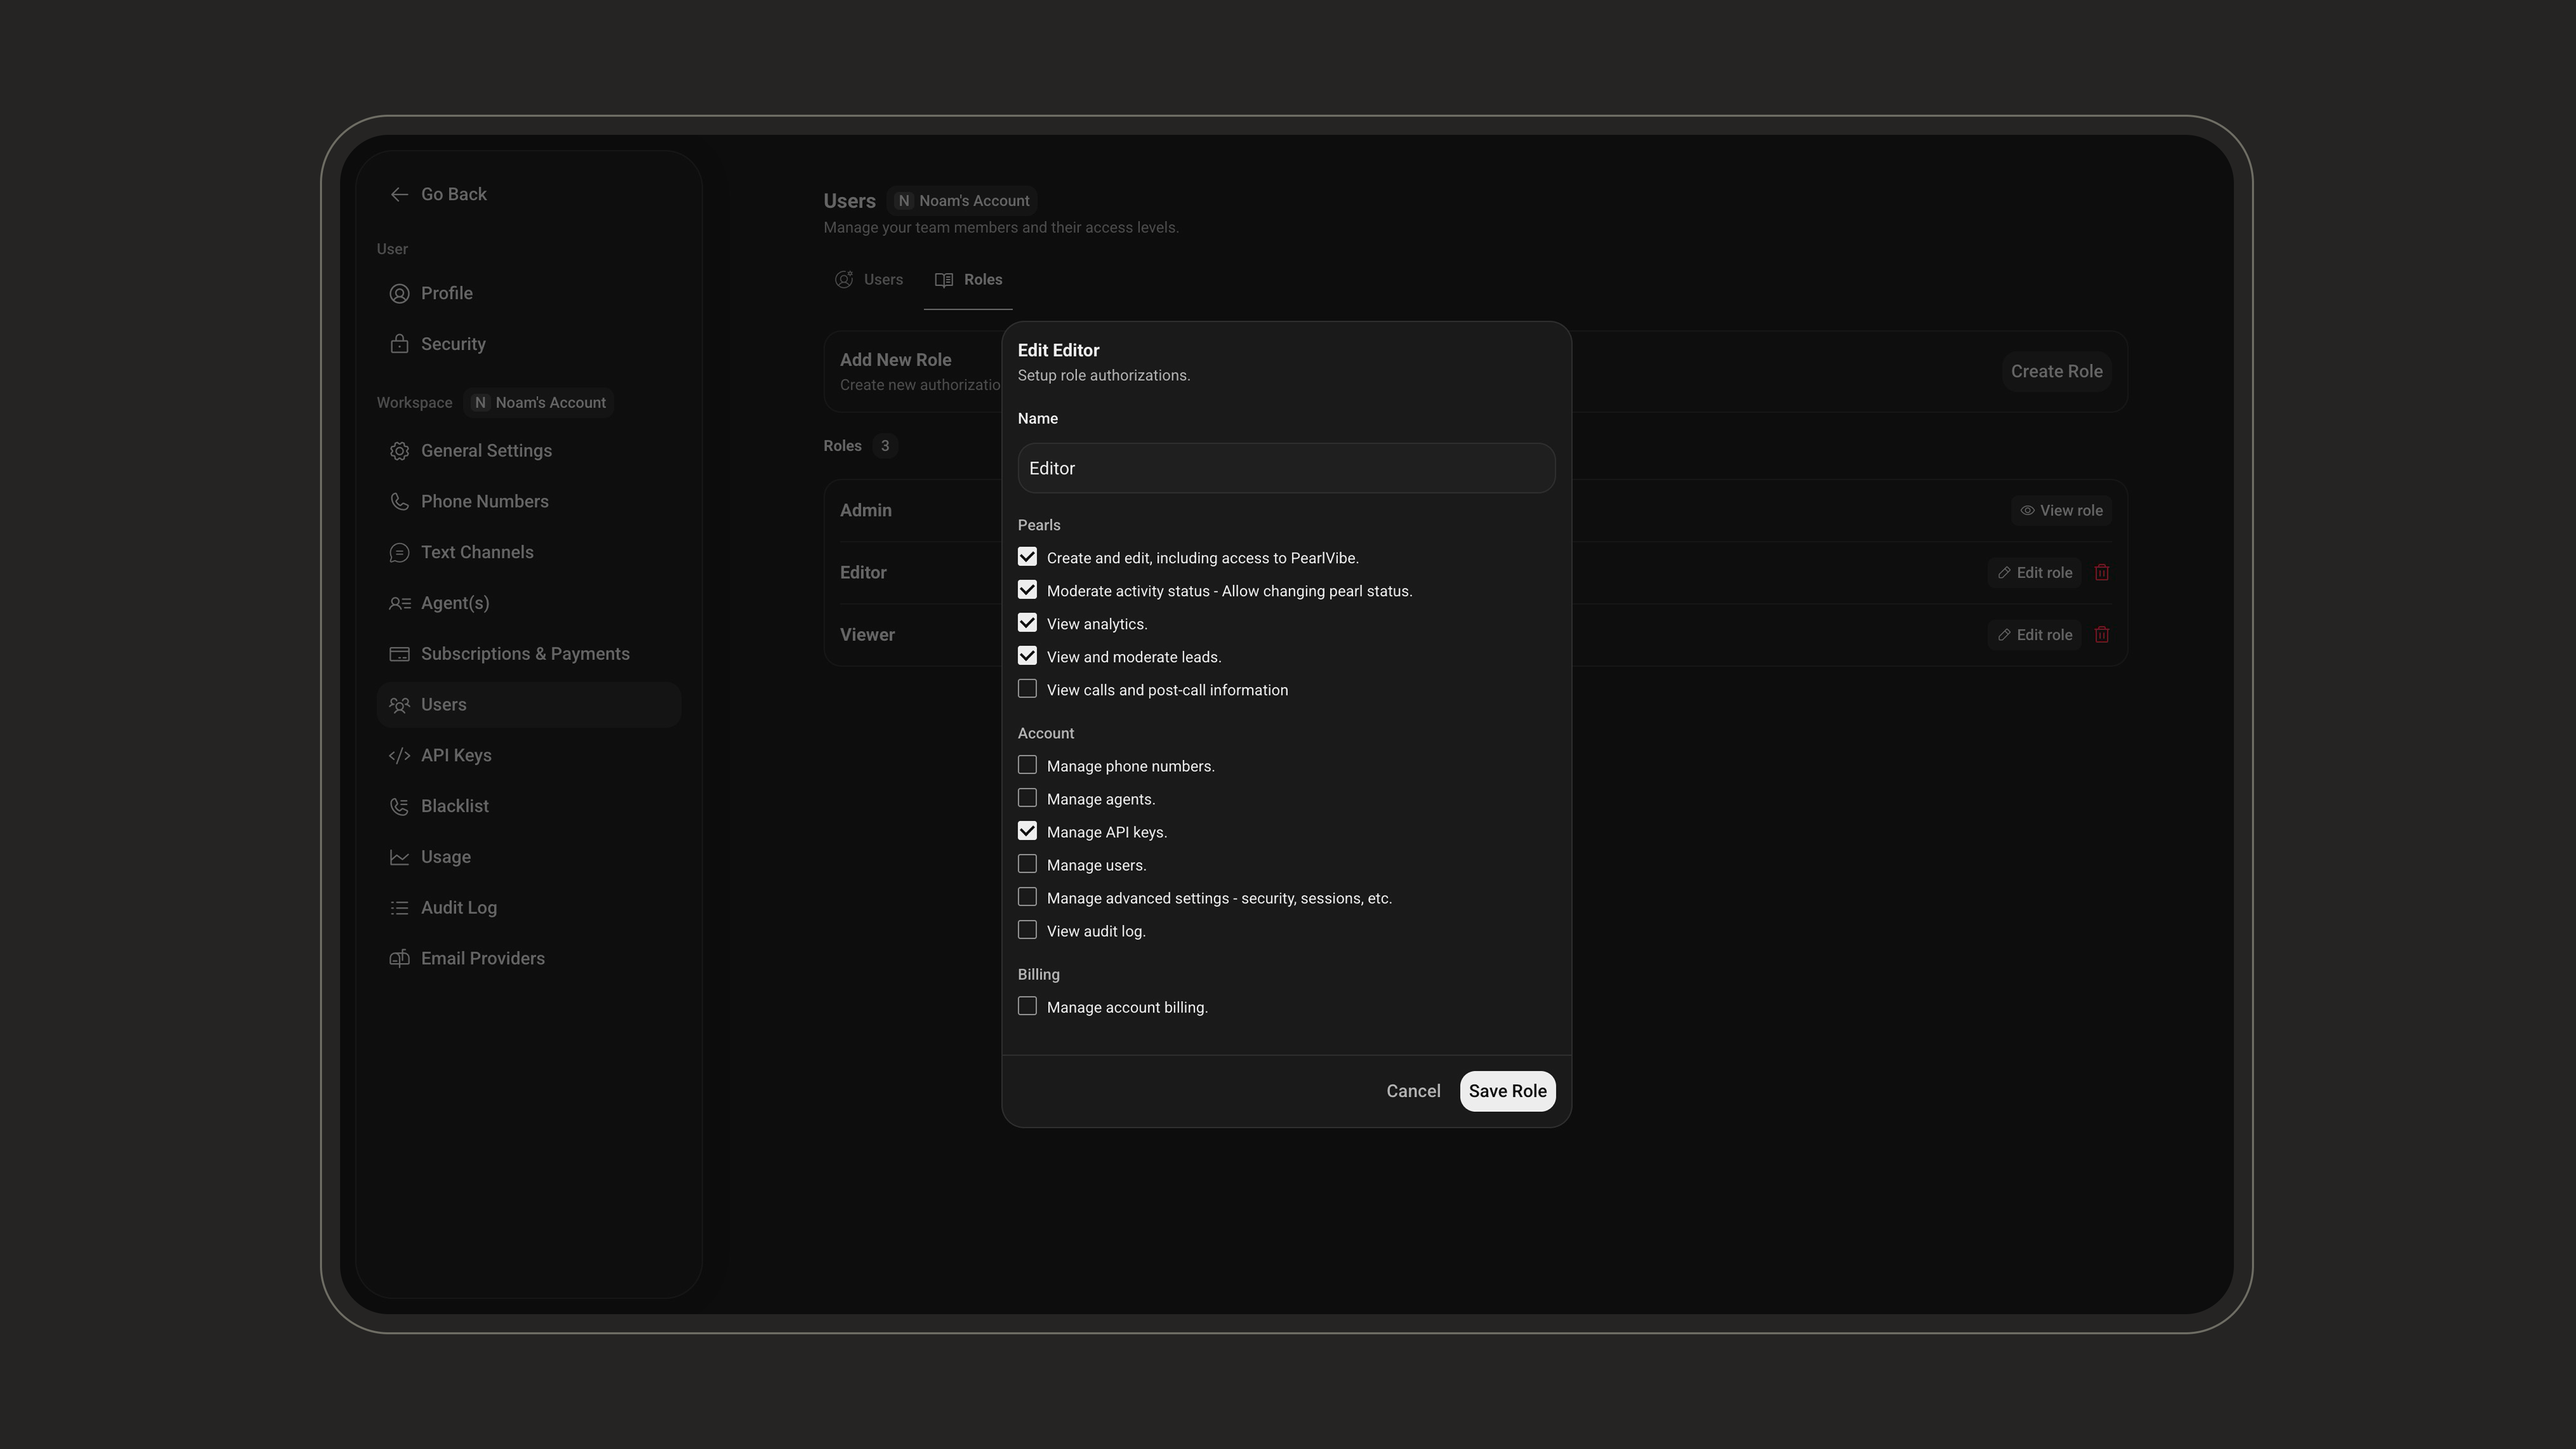 Click **Save Role** to make the role available when inviting or updating users.
Common permissions include:
| Area | What it allows |
| --------------------- | ------------------------------------------------------ |
| **Pearls** | Create and edit Pearls, including access to PearlVibe. |
| **Activities** | Moderate activity status. |
| **Analytics** | View analytics. |
| **Leads** | View and moderate leads. |
| **Calls** | View calls and post-call information. |
| **Resources** | Manage phone numbers, agents, API keys, and users. |
| **Advanced settings** | Manage security and sessions. |
| **Audit log** | View the audit log. |
| **Billing** | Manage account billing. |
Create role names that match real responsibilities, such as `Support`, `Operations`, `Billing`, or `Admin`.
***
# Workspaces
A **workspace** is an isolated environment with its own Pearls, activities, settings, billing, users, and logs. Use workspaces to separate teams, customers, or projects. Everything above (users and roles) is scoped to the workspace you are currently in.
In the settings menu, the options are split into two groups:
* **User** settings (such as **Profile** and **Security**) are personal to your account and follow you across every workspace.
* **Workspace** settings (everything listed under the **Workspace** section, like General Settings, Phone Numbers, Text Channels, Agents, Subscriptions & Payments, Users, API Keys, and more) apply **only to the workspace you are currently in**.
When you switch workspaces, all the **Workspace** settings change to reflect the selected workspace. Your **User** settings stay the same.
***
## General Settings
The **General Settings** page manages your workspace identity, notifications, and security preferences.
Click **Save Role** to make the role available when inviting or updating users.
Common permissions include:
| Area | What it allows |
| --------------------- | ------------------------------------------------------ |
| **Pearls** | Create and edit Pearls, including access to PearlVibe. |
| **Activities** | Moderate activity status. |
| **Analytics** | View analytics. |
| **Leads** | View and moderate leads. |
| **Calls** | View calls and post-call information. |
| **Resources** | Manage phone numbers, agents, API keys, and users. |
| **Advanced settings** | Manage security and sessions. |
| **Audit log** | View the audit log. |
| **Billing** | Manage account billing. |
Create role names that match real responsibilities, such as `Support`, `Operations`, `Billing`, or `Admin`.
***
# Workspaces
A **workspace** is an isolated environment with its own Pearls, activities, settings, billing, users, and logs. Use workspaces to separate teams, customers, or projects. Everything above (users and roles) is scoped to the workspace you are currently in.
In the settings menu, the options are split into two groups:
* **User** settings (such as **Profile** and **Security**) are personal to your account and follow you across every workspace.
* **Workspace** settings (everything listed under the **Workspace** section, like General Settings, Phone Numbers, Text Channels, Agents, Subscriptions & Payments, Users, API Keys, and more) apply **only to the workspace you are currently in**.
When you switch workspaces, all the **Workspace** settings change to reflect the selected workspace. Your **User** settings stay the same.
***
## General Settings
The **General Settings** page manages your workspace identity, notifications, and security preferences.
 | Setting | Description |
| ----------------------- | ----------------------------------------------------------------------------------------------- |
| **Workspace Name** | The name visible to all members of the workspace. |
| **Billing Email** | Email used for invoices, receipts, and payment-related notifications. |
| **Notifications Email** | Email where important alerts and workspace notifications are sent. |
| **Newsletter** | Opt in to receive product news, feature updates, and occasional announcements. |
| **Session Timeout** | How long a session on the platform stays active before expiring due to inactivity (in minutes). |
| **Public Recordings** | When enabled, call recordings are accessible publicly via a shared link. |
| **Delete Workspace** | Permanently delete the workspace and all associated data. |
Deleting a workspace is permanent and cannot be undone. All associated data is removed.
***
## Creating a New Workspace
You can create a separate workspace when you need to isolate teams, customers, projects, or billing.
| Setting | Description |
| ----------------------- | ----------------------------------------------------------------------------------------------- |
| **Workspace Name** | The name visible to all members of the workspace. |
| **Billing Email** | Email used for invoices, receipts, and payment-related notifications. |
| **Notifications Email** | Email where important alerts and workspace notifications are sent. |
| **Newsletter** | Opt in to receive product news, feature updates, and occasional announcements. |
| **Session Timeout** | How long a session on the platform stays active before expiring due to inactivity (in minutes). |
| **Public Recordings** | When enabled, call recordings are accessible publicly via a shared link. |
| **Delete Workspace** | Permanently delete the workspace and all associated data. |
Deleting a workspace is permanent and cannot be undone. All associated data is removed.
***
## Creating a New Workspace
You can create a separate workspace when you need to isolate teams, customers, projects, or billing.
 Click the current workspace name in the sidebar.
Click **Create New Workspace**, enter a workspace name, then click **Create**.
A new workspace has its own subscription and is billed separately.
***
## Switching Workspaces
If your account belongs to multiple workspaces, use the workspace switcher to move between them. The selected workspace controls which Pearls, activities, settings, billing, users, and logs you are viewing.
Click the current workspace name in the sidebar.
Click **Create New Workspace**, enter a workspace name, then click **Create**.
A new workspace has its own subscription and is billed separately.
***
## Switching Workspaces
If your account belongs to multiple workspaces, use the workspace switcher to move between them. The selected workspace controls which Pearls, activities, settings, billing, users, and logs you are viewing.
 Click the workspace name in the platform sidebar.
Select the workspace you want to manage from the list.
***
## Related Settings
Configure session timeout, audit logs, 2FA, and enterprise SSO.
Manage subscriptions, payment methods, invoices, and auto-recharge.
Click the workspace name in the platform sidebar.
Select the workspace you want to manage from the list.
***
## Related Settings
Configure session timeout, audit logs, 2FA, and enterprise SSO.
Manage subscriptions, payment methods, invoices, and auto-recharge.
